In this article, i am not going to explain the basics of Spring Cloud Stream OR the process of creating publishers and subscribers. Those have been clearly described in the Part 1 and Part 2of this article series.
It is possible to send messages with headers. In the receiving end (consumer application), there can be multiple message handlers (@StreamListener annotated methods) those accepts messages based on the headers of the message.
A copy of the message will be sent to every handler method and they will accept the message if it matches the given condition . The condition is a SpEL expression (Spring Expression Language) that performs checks on header values. The sample condition is given as follows.
In that way, you can use the headers to route messages (message routing) among multiple message handlers. Here we will look at, how to deliver the messages to the correct recipient based on the header.
In the previous part, we have tried Spring Cloud Stream pre-built component such as Sink, Source and Processor for building message driven microservices.
In this part, we will look at how to create custom binding classes with custom channels for publishing and retrieving messages with RabbitMQ.
Setting up the publisher application
The publisher application is almost similar as the previous article except the bindings and related configurations.
The previous article uses Source class (Spring Cloud Stream built-in component) for configuring the outputmessage channel (@Output) for publishing messages. Here we are not going to use the built-in component and we will be developing a custom output binding class to build and configure the output message channel.
This file contains bidirectional Unicode text that may be interpreted or compiled differently than what appears below. To review, open the file in an editor that reveals hidden Unicode characters. Learn more about bidirectional Unicode characters
we have declared a custom Source class with “orderPublishChannel” as the output message channel.
Now we need to bind this OrderSource class in the OrderController.
This file contains bidirectional Unicode text that may be interpreted or compiled differently than what appears below. To review, open the file in an editor that reveals hidden Unicode characters. Learn more about bidirectional Unicode characters
source.create() will configure the output message channel whose name is “orderPublishChannel“. The published messages will be delegated to the RabbitMQ exchange through the “orderPublishChannel“.
We need to change the application.properties based on the channel name as follows.
Now we have completed the development of the publisher application with custom source bindings for publishing messages. Lets move forward with developing the consumer application.
Setting up the consumer application.
The consumer application is almost similar as the previous article except the bindings and related configurations.
The previous article uses Sink class (Spring Cloud Stream built-in component) for configuring the inputmessage channel (@Input) for retrieving messages. Here we are not going to use the built-in component and we will be developing a custom input binding class to build and configure the input message channel.
Spring Cloud Stream is a framework that helps in developing message driven or event driven microservices. Spring Cloud Stream uses an underlying message broker (such as RabbitMQ or Kafka) that is used to send and receive messages between services.
When i am writing this article, there are two implementations of the Spring Cloud Stream.
Spring Cloud Stream implementation that uses RabbitMQ as the underlying message broker.
Spring Cloud Stream implementation that uses Apache Kafka as the underlying message broker.
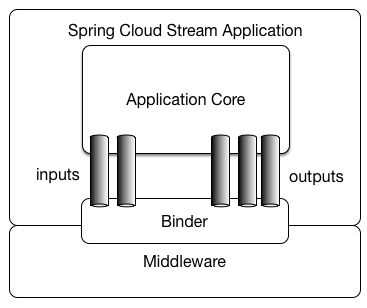
An application defines Input and Output channels which are injected by Spring Cloud Stream at runtime. Through the use of so-called Binder implementations, the system connects these channels to external brokers.
The difficult parts are abstracted away by Spring, leaving it up to the developer to simply define the inputs and outputs of the application. How messages are being transformed, directed, transported, received and ingested are all up to the binder implementations. (e.g:- RabbitMQ or Kafka)
In the previous article (Part 2 of this series), we have discussed how to use Spring Cloud Bus to broadcast the refresh event ( /actuator/bus-refresh) across all the connected services. In here the refresh event should be manually triggered on any service that is connected to the Spring Cloud Bus. (You can select any service as you wish. The only requirement is that it should connect to the Spring Cloud Bus).
The main problem here is that whenever the properties are changed, the refresh event should be manually triggered. Even if it is for just one service, it is still a manual process. What will happen if the developer forgets to manually trigger the refresh event after updating the properties in the remote repository?
Wouldn’t be nicer if there is any way to automate this refresh event triggering whenever the remote repository is changed. In order to achieve this, the config server may need to listen for the events of the remote repository. This can be done with webhook event feature provided by the remote repository providers.
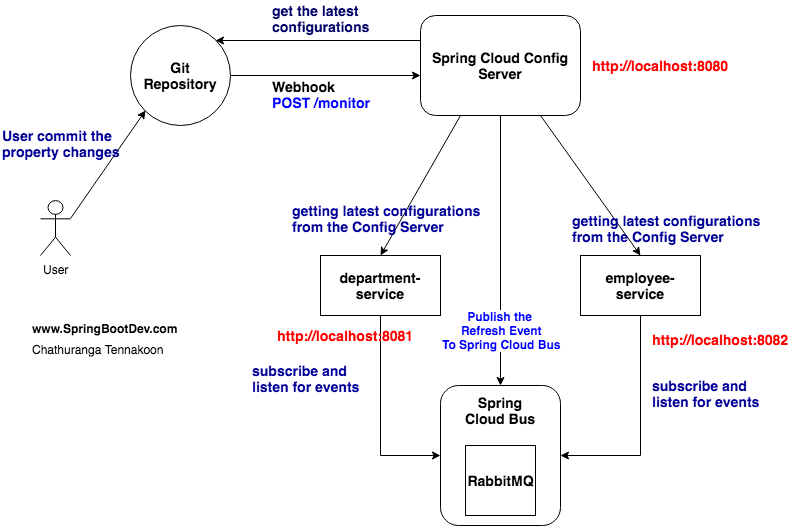
The Solution
Here is the architecture of the proposed solution.
The previous article (click here to visit it) has described how to use Spring Cloud Config Server as a centralized location for keeping the configuration properties related to the application services (microservices). The application services will act as Config Clients who will communicate with Config Server to retrieve the properties related to them.
If any property is changed, the related service need to be notified by triggering a refresh event with Spring Boot Actuator (/actuator/refresh). The user will have to manually trigger this refresh event. Once the event is triggered, all the beans annotated with @RefreshScope will be reloaded (the configurations will be re-fetched) from the Config Server.
In a real microservice environment, there will be a large number of independent application services. Therefore is it not practical for the user to manually trigger the refresh event for all the related services whenever a property is changed.
In previous article, we have discussed how to use Spring Cloud Bus to broadcast the configuration property changes (occurred in the Spring Cloud Config Server) across distributed services.
Spring Cloud Bus links or connects the distributed services through a lightweight message broker such as Kafka or RabbitMQ. whenever the refresh event is triggered in one service, Spring Cloud Bus will broadcast the refresh event across multiple services (known as Config Clients).
Therefore every Config Client should connect to the underlying message broker (that can be either RabbitMQ or Kafka) of the Spring Cloud Bus to listen for the refresh events published/broadcasted. This will lead every Config Client to keep a connection with message broker implemented in the Spring Cloud Bus.
I am a big fan of Spring family. In this article, i am going to explain how to use Spring Cloud Config Server for externalizing and versioning the configuration properties of your microservice.
The Problem!
The one of the most challenge in the distributed application environment (or rather microservices environment) is to maintain and manage the configuration related properties in the microservices.
In microservice environment, there may be hundred of isolated services and each service may have different configuration properties depending on the environment (eg:- qa, dev, prod, uat etc…).
Some of the properties are shared among services and some of the properties are specific/private to that service. Those properties may be changed or updated in later and the update need to be reflected. If the configuration maintaining and management is not properly planned, you have to face for a difficult time when those update happens.
In a previous article, we have declared/defined the Zuul routes by providing the service details (URL) manually (Click here to visit that article). That means we have provided the domain name or ip address and port number of each service. Just think of a situation where the application contains a large number of microservices. Do you think that it is practical to find (manually) the server details (ip address/domain) and port details of every service? If that is difficult, then how do we declare the zuul route mapping to expose each service through the Zuul Proxy?
“The solution is to perform the Zuul routes mapping with serviceId registered in the Eureka Server“.
Here i am not going to discuss about the importance of Netflix Zuul Proxy or Netflix Eureka server. I have already written two separate articles on both of those areas. If you need to refresh your knowledge on those areas, please refer the relevant articles.
In order to demonstrate the serviceId based Zuul route mapping, we will be creating following set of applications.
Eureka Server :- Spring Boot Applciation to act as Eureka Server. All the microservices will be registered here.
Zuul Proxy: – Spring Boot Application to act as Zuul Reverse Proxy. This is the centralized gateway for directing all the requests for the misroservices. Zuul proxy will communicate with Eureka server to get the details (ip address and port) of the relevant microservice for delegating the client request.
student-service :- just dummy microservice for representing the backend business service.
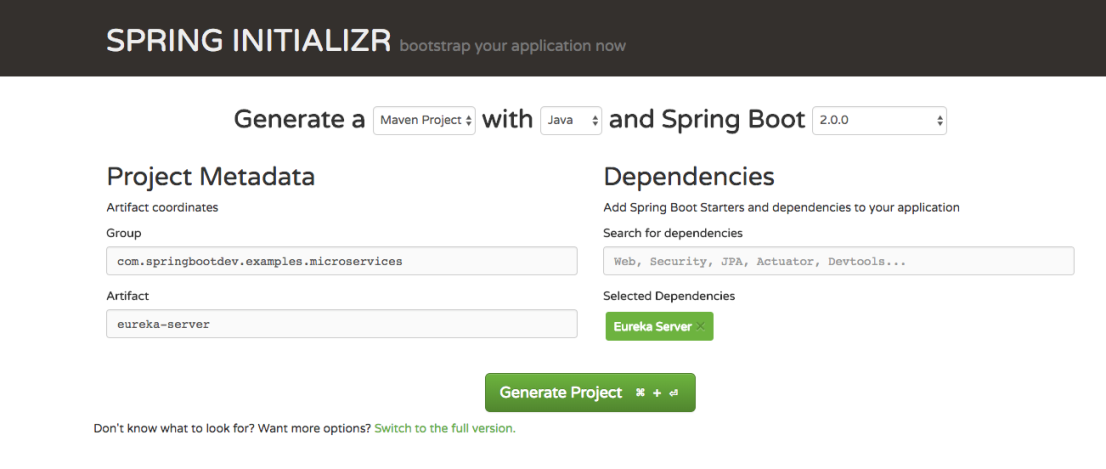
Eureka Server is just another spring boot application with Spring Cloud Netflix Eureka dependency. Then annotate the main spring boot configuration class with @EnableEurekaServer annotation.
Therefore create a spring boot application with Eureka dependency.
Then add the @EnableEurekaServer annotation to the main Spring Boot Application configuration class (That is the class annotated with @SpringBootApplication annotation)
This file contains bidirectional Unicode text that may be interpreted or compiled differently than what appears below. To review, open the file in an editor that reveals hidden Unicode characters. Learn more about bidirectional Unicode characters
This file contains bidirectional Unicode text that may be interpreted or compiled differently than what appears below. To review, open the file in an editor that reveals hidden Unicode characters. Learn more about bidirectional Unicode characters
In this article, i am going to how to create two microservices and expose them through Netflix Zuul Proxy. Here i will show you step by step guide on setting up the Zuul proxy and routing the client requests to the related microservices.
What is Zuul and importance of reverse proxy?
Zuul is an api gateway (or rather Reverse Proxy) comes under the Netflix OSS stack. If you want to know the importance of reverse proxy in microservices architecture or know about Zuul, Please click here to refer my article on that. It is recommended to go through that article, before moving forward with this article.
In order to demonstrate the capabilities of Zuul proxy, i will set up two spring boot applications as microservices.
student-service
course-service
For the simplicity of this article, i will just post only the important code segments of above micorservices here. If you want to go thorough full application code, please get the source from the GitHub.
Important: First of all, i need to emphasize that all the REST endpoints are not properly implemented and they just contain few hardcoded values. The purpose of this article is to demonstrate the capabilities of the Zuul proxy in the context of Routing. If your real project implementation, you can follow the best practices and standards to implement the controller logic as your wish. Here i have just set up few controllers and RESTFul endpoints for the demonstration purpose.
student-service
Lets look at the StudentControlller.
This file contains bidirectional Unicode text that may be interpreted or compiled differently than what appears below. To review, open the file in an editor that reveals hidden Unicode characters. Learn more about bidirectional Unicode characters
The REST endpoints exposed in the StudentController can be listed as below.
#getting the name of the controller
GET http://localhost:8081/name
#getting the student by student Id
GET http://localhost:8081/students/{student_id}#getting a list of students by course id
GET http://localhost:8081/courses/{course_id}/students
#getting a list of students who are registered for a particular course in the particular department.
GET http://localhost:8081/departments/{department_id}/courses/{course_id}/students
You can see that the REST endpoints contains simple URI Path (Resource Path) to some complex URI path with set of path variables. I have added those endpoints intentionally to show you how to map the routes for the those endpoints in Zuul Proxy.
The student-service can be up and run with following command. It will run on port 8081.
mvn spring-boot:run
course-service
Lets look at the CourseController
This file contains bidirectional Unicode text that may be interpreted or compiled differently than what appears below. To review, open the file in an editor that reveals hidden Unicode characters. Learn more about bidirectional Unicode characters
The REST endpoints exposed in the CourseController can be listed as below.
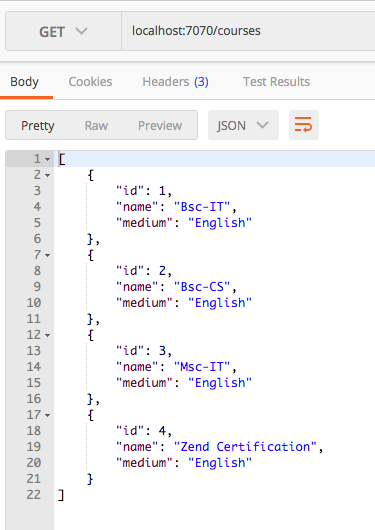
#getting the all courses
GET http://localhost:8082/courses
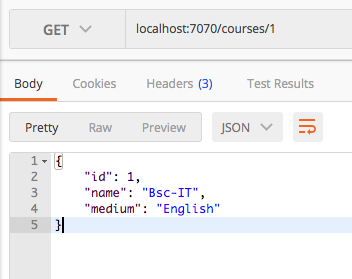
#getting the course by course_id
GET http://localhost:8081/courses/{course_id}
The course-service can be up and run with following command. It will run on port 8082.
mvn spring-boot:run
Setting up the Zuul Proxy
I know that most people are curiously waited until i start this section of the article. and lets start it now.
How to create the Zuul Proxy?
Just believe me that Zuul proxy is just another spring boot application. It has the Spring Cloud Netflix Zuul on its classpath dependencies and annotated the main SpringBootApplication configuration class with @EnableZuulProxy annotation.
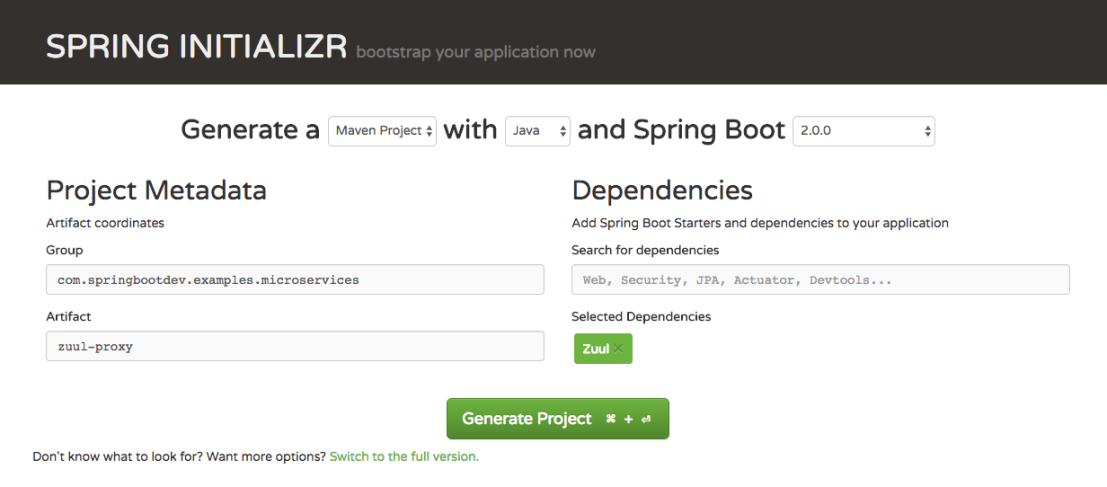
Lets create our Zuul Proxy application.
Go to https://start.spring.io/ and generate a Spring Boot Application with dependency Zuul. Please refer the below screen shot.
Then open the generated project and annotate the main spring boot application configuration with @EnableZuulProxy annotation.
This file contains bidirectional Unicode text that may be interpreted or compiled differently than what appears below. To review, open the file in an editor that reveals hidden Unicode characters. Learn more about bidirectional Unicode characters
Lets change the port of the Zuul Proxy application into any port that is not in use. Here i will change it to 7070.
The Zuul Proxy can be up and run with following command.
mvn spring-boot:run
Route mapping with Zuul.
We have set up two microservices in our local server. one is running on port 8081 and other one is running on port 8082. We need to expose those two microservices through the Zuul proxy running on port 7070. These route mapping can be done in the application.properties file in the Zuul Proxy Application.
This file contains bidirectional Unicode text that may be interpreted or compiled differently than what appears below. To review, open the file in an editor that reveals hidden Unicode characters. Learn more about bidirectional Unicode characters
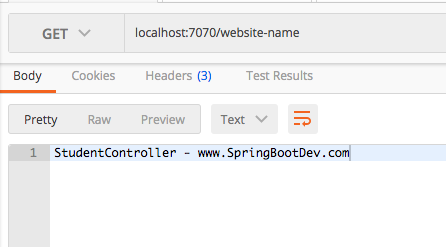
Here you can see that it is a simple URI mapping. There is no path variable associated with it. According to the above route mapping, it will consider the website-name as the default route mapping. Therefore any request for the /website-name will be redirected to the http://localhost:8081/name.
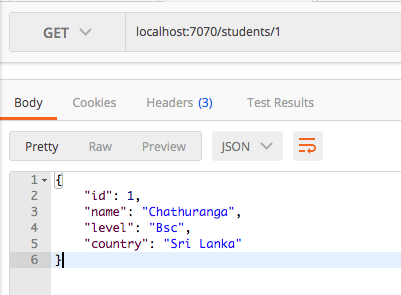
According to the above route mapping, any request for the /students/* will be directed to http://localhost:8081/students. (This is applicable for any request that matches the above pattern)
Therefore http://localhost:7070/students/1 will be directed to http://localhost:8081/students/1
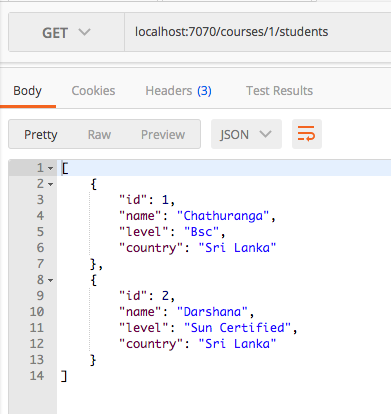
3. URI resource mapping for http://localhost:8081/courses/{course_id}/students
According to the above mapping any request that matches the /courses/*/students pattern will be directed to the url declared along with path variables.
The request for http://localhost:7070/courses/1/students will be directed to the http://localhost:8081/courses/1/students.
I know that now you are confused and thinking of why the URL path doest not start with /students-courses? It is the name that we have used to declare the URL (zuul.routes.students-courses.url).
Keep it in your mind that if there is a path declared in the application.properties file, that path will be considered. If there is no path declared, then it will consider the name defined in the url mapping as the path. (This is the default behavior)
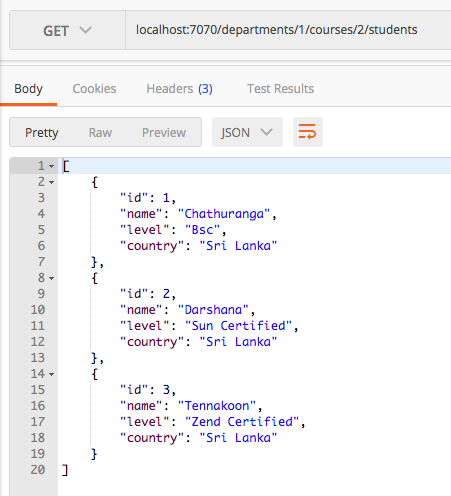
Any request that matches the /departments//courses//students pattern, will be redirected to the endpoint http://localhost:8081/departments//courses//students URL along with path variables.
e.g:- http://localhost:7070/departments/1/courses/2/students WILL BE DIRECTED TO http://localhost:8081/departments/1/courses/2/students
Now we have completed the route mapping for all the REST services published in the student-service. Now lets look at how the REST endpoints in the course-service will be exposed through the Zuul proxy.
In the course-service, there are only two REST endpoints. we can do just one simple mapping for both of those endpoints.
# zuul route mapping for the course-service
zuul.routes.courses.url = http://localhost:8082/courses
According to the above route mapping, any request for the /courses will be directed to the http://localhost:8082/courses url
http://localhost:7070/courses will forward to http://localhost:8082/courses
http://localhost:7070/courses/1 will forward to http://localhost:8082/courses/1
In this article, i have guided you on exposing the micro services with through Zuul Proxy with Simple URI resource mapping (no path variables) to some complex URI resource mapping (with multiple path variables)
If you want to learn more about Spring Cloud Zuul Proxy, please click following link to visit the official documentation.
Zuul is a Proxy server (proxy service) provided by Netflix OSS. It provides wide range of features such as dynamic routing, filtering requests and server side load balancing etc…
In microservices architecture, Zuul acts as the api gateway for all the deployed microservices and it sits as the middle man in between client applications and backend services. This means that all the microservices will be exposed to the external parties (services or applications) through the Zuul proxy. If any service/application need to access the any of the microservices deployed in behind the reverse proxy, it has to come through the Zuul proxy. Zuul will hide the identities of the server applications behind the proxy and serve the client applications exposing its identity (identity of the reverse proxy) on behalf of backend servers and sever applications. Therefore Zuul is identified as a Reverse Proxy.
Forward Proxy and Reverse Proxy
Here we should know what is the difference between Proxy (forward Proxy) and Reverse Proxy. One is for protecting/hiding clients and other one is for protecting/hiding servers.
Forward Proxy is the proxy for the client and it hides the identities of the clients. It receives the request from the client and sends the requests to the server on behalf of the clients. The main purpose of forward proxy is to act on behalf of clients by hiding their identities. The forward proxies are mainly used to access the contents or websites, that is blocked by your ISP or blocked for your country/area.
Reverse Proxy does the opposite of what the Forward Proxy does. It hides the identities of the servers and receive the requests from clients on behalf of servers. Behind the reverse proxy there might be different web services and servers may exist. It is the responsibility of the reverse proxy to delegate the client request to the relevant service/server application and responds back to the client. Therefore the main purpose of reverse proxy is to server client applications on behalf of set of backend applications deployed in behind the reverse proxy.
Sometimes there might be several instances of the same service or server may running in behind the reverse proxy and that is known as clustering. In this situation,the reverse proxy may determine the most appropriate server instance(or cluster node) for serving the client request and will delegate the request for that cluster node. This is done/achieved with the load balancing application available in the reverse proxy. Clustering will ensure the high availability of service (even if one node is down, the request will be served by next available node) and proper load balancing among multiple requests. Lets look at those later with some other article.
Proxy (both proxies) will provide the centralized point(or rather single point) of access for the communication between client and servers. Therefore it is easy to implement the enforcing of security policies, content filtering and other constraints with proxies. Both Forward and Reverse proxies exists (should place) in between client and server.
Please refer the following diagram to see the role of the Reverse Proxy.
A reverse proxy allows you to route requests to a single domain to multiple backing services behind that proxy. This can be useful in situations where you want to break up your application into several loosely-coupled components (like microservices) and distribute them even in different servers but, you need to expose them to the public under a single domain. Then the users will get the same experience as they are communicating with a single application. This can be achieved with dynamic routing feature available in the reverse proxy.
The importance of Reverse Proxy in Microservices architecture can be summarized as below.
High Availability: provides the supports for the high availability of the microservice in the clustered environment. Even if one service (node) fails down, the client request will be served by next available node.
Load Balancing: supports for the load balancing among multiple nodes in the cluster. Therefore it make sure that no server or service is overloaded with multiple requests. It will properly distribute the requests among multiple nodes to maximize the utilization of resources.
Single Point of Access with Request and Response Filtering: This is the single point of access or the gateway for the microservices. If the microservices are exposed through the reverse proxy, the the external clients can access/consume those services through the reverse proxy. Therefore it is possible to filter the requests that are coming to the microservices. In addition, it can filter the responses that are going from the misroservices too. Therefore this will provide an extra level of request and response filtering support for the microservices. Authentication and Authorization security policies can be enforced with making use of this single point of access.
Dynamic Routing: There may be multiple microservices which are deployed in behind the reverse proxy. Those services may deployed in different servers with different domain names. Sometimes in the same server (where the reverse proxy is deployed) but with different ports. All the services will be exposed to public (client applications) through the reverse proxy and the proxy will assign their own route (url path) to each service. each route will be mapped to original route in the related service. Therefore client will get the same experience as it communicates with a single application and SSO (Single Sign On) and CORS (Cross Origin Resource Sharing) related issue will be sorted.
The Netflix Zuul as a Reverse Proxy
We have already discussed the importance of the reverse proxy in the Microservices architecture and now it is the time to select the appropriate Reverse Proxy to use. The Netflix has introduced Zuul as the reverse proxy under their OSS (Open Source Software) stack.
Zuul proxy will provide following main functionalities as a reverse proxy. They can be listed as follows. Lets look at each of them in detailed in separate articles.


