What is Spring Cloud Stream?
Spring Cloud Stream is a framework that helps in developing message driven or event driven microservices. Spring Cloud Stream uses an underlying message broker (such as RabbitMQ or Kafka) that is used to send and receive messages between services.
When i am writing this article, there are two implementations of the Spring Cloud Stream.
- Spring Cloud Stream implementation that uses RabbitMQ as the underlying message broker.
- Spring Cloud Stream implementation that uses Apache Kafka as the underlying message broker.
High Level Overview of Spring Cloud Stream
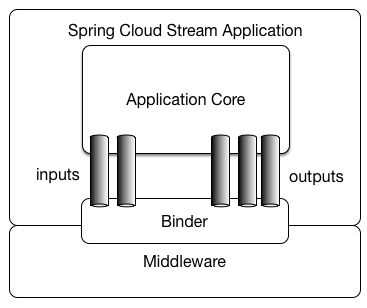
source:- https://ordina-jworks.github.io/img/spring-cloud-stream/application-core.png
An application defines Input and Output channels which are injected by Spring Cloud Stream at runtime. Through the use of so-called Binder implementations, the system connects these channels to external brokers.
The difficult parts are abstracted away by Spring, leaving it up to the developer to simply define the inputs and outputs of the application. How messages are being transformed, directed, transported, received and ingested are all up to the binder implementations. (e.g:- RabbitMQ or Kafka)
Message Driven Communication with RabbitMQ
In message driven architecture, the distributed application services are communicated each other through messages. One service can Publish (Produce) messages and some other services may subscribe to Consume those messages.
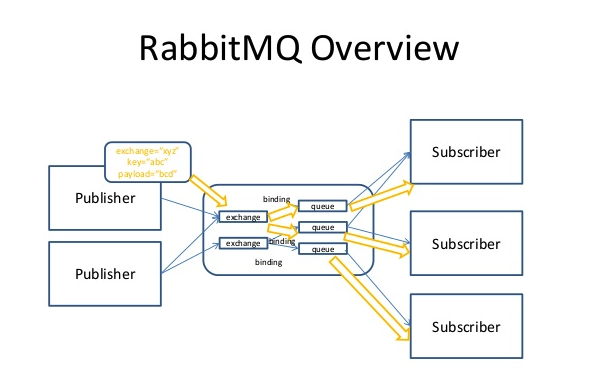
RabbitMQ act as the intermediate message broker which helps the message driven communication between those services. the communication happens as follows.
The producer application publishes messages to the RabbitMQ exchange. The exchange will divert and store the message in the relevant queue based on the routing key.
The consumer applications are subscribed to the queues and listen for the incoming messages. whenever the message is delivered to the queue, the subscribed consumer application will be notified.
This is the abstract functionality of the RabbitMQ message broker. If you want to learn more about RabbitMQ, please click here to visit the official documentation.
What we are going to build!
- Publisher Application :- publish messages and sends them to the RabbitMQ message broker. RabbitMQ will receive those messages through the related exchange.
- RabbitMQ message broker:- receiving the messages from publishers, redirects and stores them in the related queues until it is delivered to the correct recipient (consumer application).
- Consumer Application:- will listen for the RabbitMQ queue and stream the stored messages.
Lets build them…….
Installing RabbitMQ with Docker
Let’s start with RabbitMQ, which we recommend running as RabbitMQ as a docker image. First we need to install Docker and run following commands once Docker is installed successfully:
docker pull rabbitmq:3-management
This command pulls RabbitMQ docker image together with management plugininstalled and enabled by default.
Next, we can run RabbitMQ:
docker run -d --hostname my-rabbit --name some-rabbit -p 15672:15672 -p 5672:5672 rabbitmq:3-management
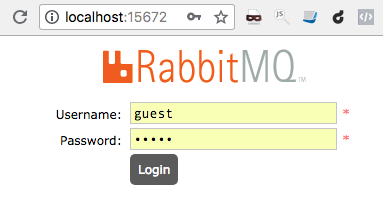
Once we executed the above command, we can go to the web browser and open http://localhost:15672, which will show the management console login form.
The default username is: ‘guest’ and password: ‘guest’
RabbitMQ will also listen on port 5672. (but the web port is 15672)
Congratulations! Now you have set up the RabbitMQ message broker.
Important Concepts!
before moving forward, we will look at some important concepts here. Those concepts will help you in understanding the contents clearly.
Binder :- This represents the underlying message broker middleware such as RabbitMQ or Kafka.
Channel :- represents a logical connection between the external application and the message broker middleware. it can be either input channel or output channel based on the participating application. e.g:-
- Publisher application publishes message to the message broker through Output channel
- Consumer application receives messages from message broker through Input channel.
Setting up the Consumer Application
The development of the Consumer application is very simple. You need to add the following dependency in to the pom.xml.
 <dependency>
    <groupId>org.springframework.cloud</groupId>
    <artifactId>spring-cloud-starter-stream-rabbit</artifactId>
</dependency>
Now the Consumer application needs to make a connect with RabbitMQ message broker and for subscribing for the queue and listening for the incoming messages. In order to achieve this, add the following connection details and RabbitMQ configurations for the application.properties.
#RabbitMQ connection details
spring.rabbitmq.host=localhost
spring.rabbitmq.port=5672
spring.rabbitmq.username=guest
spring.rabbitmq.password=guest

#this is the name of the exchange
spring.cloud.stream.bindings.input.destination=orders-exchange

#this is the name of the queue
spring.cloud.stream.bindings.input.group=orders-queue
spring.cloud.stream.bindings.<channel-name>.destination:-
This will represent the exchange in which to the created queue is bound and subscribed. The exchange will direct the received messages relevant bound(subscribed) queue based on the matched criteria (e.g:- routing key)
spring.cloud.stream.bindings.<channel-name>.group :-
This will represent the queue that is responsible for storing the messages. The queue will be created when the consumer application is up and it will be subscribed to the exchange for getting messages. The consumer application will listen to the queue for receiving incoming messages.
As you can see in the configurations, it creates the orders-queue and subscribe the queue to the orders-exchange to listen for the incoming messages (to the queue).
Since we are using the Sink class, the <channel-name> should be input. It is the default channel name of the Sink class.
How the messages are received by the consumer application?
Please refer the following class.
This file contains bidirectional Unicode text that may be interpreted or compiled differently than what appears below. To review, open the file in an editor that reveals hidden Unicode characters.
Learn more about bidirectional Unicode characters
| import org.slf4j.Logger; | |
| import org.slf4j.LoggerFactory; | |
| import org.springframework.cloud.stream.annotation.EnableBinding; | |
| import org.springframework.cloud.stream.annotation.StreamListener; | |
| import org.springframework.cloud.stream.messaging.Sink; | |
| @EnableBinding(Sink.class) | |
| public class OrderListener | |
| { | |
| private static final Logger logger = LoggerFactory.getLogger(OrderListener.class); | |
| @StreamListener(target = Sink.INPUT) | |
| public void listenForOrder(Order order) | |
| { | |
| logger.info(" received new order ["+order.toString()+"] "); | |
| } | |
| } |
OrderListener class is bound to the Sink class. Sink class will make a logical input channel (known as input channel) between consumer application and the subscribed queue of the RabbitMQ message broker.
Spring Cloud Stream supports dispatching messages to handler method(s) annotated with @StreamListener. @StreamListener will use the created input channel (as specified in the target) to connect with queue for listening new messages.
Here are some important points !
@EnableBinding annotation can be added to any class (as OrderListener) which is responsible for publishing or reading messages (or both) with RabbitMQ message broker.
This annotation will help to bind the class to the related message channel (Input or Output) and the class can send or receive messages through the bound channel.
Sink is a Spring Cloud Stream component that is used to retrieve/read messages from the message queue. Therefore the OrderListener is capable of receiving messages from the message queue.
@StreamListener will use the given input channel (Sink.INPUT) to listen to the subscribed queue for retrieving the newly received messages (that are already stored in the queue).
Please refer the source code section of the article for finding out the fully completed source code of the Subscriber application.
The blueprint of the Order (message)
Here is the blueprint of the message being published and received.
@Data
public class Order implements Serializable
{
    @JsonProperty("order_name")
    private String orderName;
    private Float amount;
    private String status;
}
@Data – is an annotation comes under Lombok project and there is no relationship with Spring Cloud Stream.
What is Sink, Source and Processor ?
All these are Spring Cloud Stream components designated for specific operations.
- Sink :- enables to retrieve the messages (from the queue) through default channel named as “input“. If you looked at the source code of the Sink class, you can see that input channel name is “input“
public interface Sink {

   String INPUT = "input";

   @Input(Sink.INPUT)
   SubscribableChannel input();
}
The @Input annotation identifies an input channel, through which the received messages (that are stored in the queue) are transmitted to the consumer/subscriber application.
- Source:- enables to send/publish the messages (to the exchange) through a default channel named as “output“. Please check the source code and note the channel name.
public interface Source {

   String OUTPUT = "output";

   @Output(Source.OUTPUT)
   MessageChannel output();
}
The @Output annotation identifies an output channel, through which the publisher application publishes the messages to the exchange of the message broker middleware.
- Processor:- A single component which encapsulates both Sink and Source operations. Therefore this is capable of publishing as well as receiving messages.
Setting up the Producer/Publisher Application
The complete source code of the Publisher application is available in GitHub. In order to keep the article simple and well focused, i will go through only the important classes and components of the Publisher application.
The following controller method is responsible for publishing messages to the RabbitMQ message broker. (please refer the source code for complete class)
@Slf4j
@EnableBinding(Source.class)
@RestController
public class OrderController
{
    @Autowired
    private Source source;

    @PostMapping("/orders/publish")
    public String publishOrder(@RequestBody Order order)
    {
        source.output().send(MessageBuilder.withPayload(order).build());
        log.info(order.toString());
        return "order_published";
    }
}
As i have described earlier, the Source class will have the output() method which will configure the output message channel for sending or publishing messages from publisher application to RabbitMQ exchange.
Here are the list of RabbitMQ connection details and other related properties declared in the application.properties
#RabbitMQ connection details
spring.rabbitmq.host=localhost
spring.rabbitmq.port=5672
spring.rabbitmq.username=guest
spring.rabbitmq.password=guest

#this is the name of the exchange
spring.cloud.stream.bindings.output.destination=orders-exchange
spring.cloud.stream.bindings.<channel-name>.destination :-
Here you can see that the channel-name is “output” (It is the default message channel of the Source class). The destination of “output” channel is “orders-exchange” (As name implies, it is an exchange)
Testing and Running the application.
Now we have different components known as publisher application, subscriber application and RabbitMQ message broker.
Building and running publisher application
First we need to build and run the publisher application. Once it is up, log into the RabbitMQ web admin panel and check wether the declared exchange has been created. According to the above configuration, the exchange name should be “orders-exchange“. (Please refer the below screenshot).
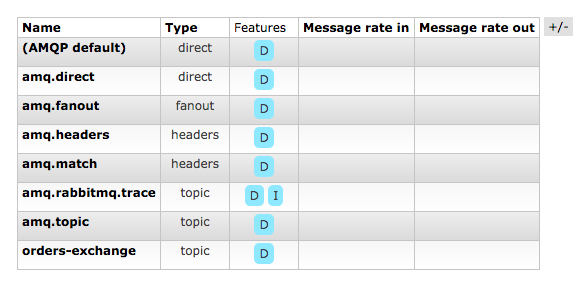
As you can see above, the declared exchange will be automatically created when the publisher application is up (for the first time).
Building and running consumer application
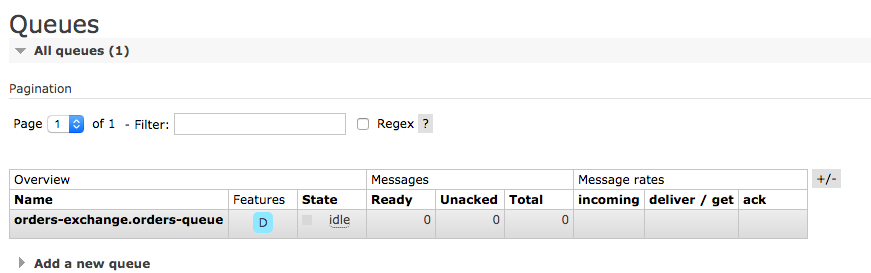
Now we should build and run the consumer application for consuming the messages published by the publisher application. Once the consumer application is up (for the first time), you can see that the declared queue will automatically get created. According to the above configurations, the queue name should be “orders-queue“.
The created queue will be subscribed to the given exchange (e.g:- orders-exchange) as declared. (please refer the below screenshot)
Publishing the message(s)
Lets publish the message.
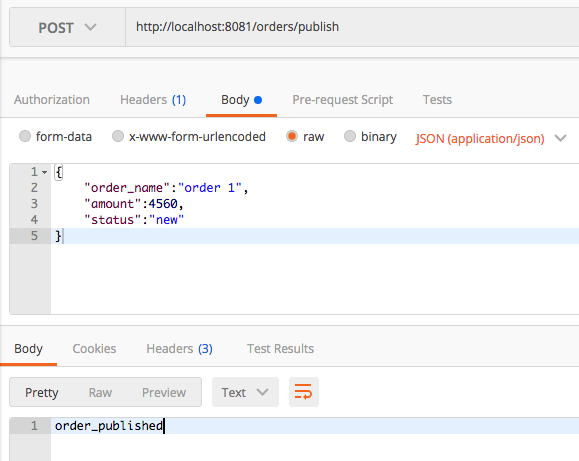
If you check the log of the publisher application, you can see that the message has been successfully published.

Receiving the message(s)
Now check the log of the Consumer application. You can see that the message is correctly delivered to the consumer application as follows.

Now you can understand that how it is easy to develop message driven microservices with Spring Cloud Stream.
The Source Code
The complete source code of this article is published at GitHub. Click here to download.
If you have any query, please feel free to drop a message.

if i have multiple subscribers in the same queue, here the message gets passed only to one subscriber.
How to pass the message to all subscribers
LikeLike
That is not true. the copy of the message will be passed to all subscribers those who listen for the queue. So every subscriber will get a copy of the message.
LikeLike