@PathVariable and @RequestParam are Spring MVC based annotations used for two different purposes. One is for accessing the path variable in the request URI and other one is for accessing the query param in query string.
@PathVariable
As name implies, @PathVariable annotation is used to access the variable value in the URI path.
POST http://www.springbootdev.com/api/users/1/profile
@PostMapping("/api/users/{user_id}/profile")
public String getPathVariable(@PathVariable("user_id") Integer userId)
{
      //TODO implementation should goes here
}
Here you can see that user_id path variable is represented by userId variable. According to the sample URI request, the value of userId variable will be 1.
@RequestParam
@RequestParam annotation is used to access the query param in the query string. Then you might be wondering about “what is query string“.
What is query string?
Wikipedia says “On the World Wide Web, a query string is the part of a uniform resource locator (URL) containing data that does not fit conveniently into a hierarchical path structure. The query string commonly includes fields added to a base URL”
@PostMapping("/departments/{department_id}/students")
public List<Student> getStudents(
  @PathVariable("department_id") Integer departmentId,
  @RequestParam("subject") String subject,
  @RequestParam("country") String country) {

      //TODO implementation should goes here
}
Here you can see that path variable is represented by the departmentId and query params are represented by subject and country variables.
JAX-RS : @QueryParam and @PathParam
@PathVariable and @RequestParam are Spring framework owned annotations. Therefore those annotations can be used only within the spring based web applications.
What will happen if you are building a RESTful web service without using Spring? Lets assume that we build JAX-RS web service. how do you access path variable and query parameters? JAX-RS has the equivalent annotations for above spring based annotations and they do the same job.
@RequestBody and @ResponseBody annotations are used to convert the body of the HTTP request and response with java class objects. Both these annotations will use registered HTTP message converters in the process of converting/mapping HTTP request/response body with java objects.
The source code for this article can be found in the GitHub.
What is the HTTP Message Converter and Why it is used?
The client (web browser or REST client) cannot send the java objects (as it is) in the body of the HTTP request. On the other hand, the server application cannot compose the body of the HTTP response with java objects (as it is). Simply the HTTP Request and Response body cannot contains the in the form of java objects.
HTTP request and response body should contain either JSON , XML or some other type of formatteddata (RSS etc). Therefore the HTTP message converters are used to convert the HTTP request body (either in JSON or XML) to the Java objects and Java objects back to XML or JSON for embedding into the HTTP response body.
How the Message Converter Works?
you might be having a little confusion of how message converters are exactly worked. How the spring frameworks picks the right message converter that can transform the HTTP request body into the targeted java class object. On the other hand, how the server application responds back with exactly the similar type (either XML or JSON) that is expected by the client. This is achieved by checking the headers of the HTTP request. Lets look at what are those headers in detailed.
Content-Type
This header informs the server application about the content type of the body of the HTTP Request. Based on the content type, the server application picks the correct message converter out of the available message converters for converting the HTTP Request body into the java class object.
e.g:-
If the Content-Type is application/json , then it will select a JSON to Java Object converter.
If the Content-Type is application/xml , then it will select a XML to Java Object converter.
Accept
This header informs the server application about the Acceptablemedia type of the body of the HTTP Response (Simply what the client will accept from the server). Based on the value of the Accept header, the server application picks the correct message converter out of the available message converters for converting returned java class object(s) to the requested media type.
e.g:-
If the Accept is application/json , then it will select a Java Object to JSON converter.
If the Accept is application/xml , then it will select a Java Object to XML converter.
@RequestBody
This is used to convert the body of the HTTP request to the java class object with the aid of selected HTTP message converter. This annotation will be used in the method parameter and the body of the http request will be mapped to that method parameter. As described above, the message converter is selected based on the value of Content-Type Header of the HTTP request.
@ResponseBody
This annotation is used to add the return value to the body of the HTTP response with the aid of selected HTTP message converter. As described above, the message converter is selected based on the value of Accept Header of the HTTP request. @RestController is the preferred way to achieve the same functionality earlier provided by @ResponseBody. Under the hood, @RestController is @Controller + @ResponseBody, and it avoids the need of prefixing every method with @ResponseBody.
Ok. enough theories. Lets do some cool stuffs with coding. You can download the following samples from GitHub.
The following dependency has been added to configure/register the HTTP message converter for XML type.
The source code of UserController has posted below and you can see that the single method available there. It can accept request body with both JSON and XML content types. In addition, it can produces both JSON and XML content types in response body.
This file contains bidirectional Unicode text that may be interpreted or compiled differently than what appears below. To review, open the file in an editor that reveals hidden Unicode characters. Learn more about bidirectional Unicode characters
@RequestBody will help to convert the body of the HTTP Request to the User object. The method can handle a request body that is in the form of either XML or JSON. The transformed user object will be saved to database using the userRepository. The persisted user object will be retuned by the method.
Since the class is annotated with @RestController, every method in the class is implicitly annotated with @ResponseBody. Therefore the returned value/object will substitute the body of the HTTPResponse. The body of the HTTP Response can be either XML or JSON.
Before building and running the application, make sure that you have changed the datasource configurations of the application.properties to your development environment.
This file contains bidirectional Unicode text that may be interpreted or compiled differently than what appears below. To review, open the file in an editor that reveals hidden Unicode characters. Learn more about bidirectional Unicode characters
Ok lets run the application and make few api calls with Postman.
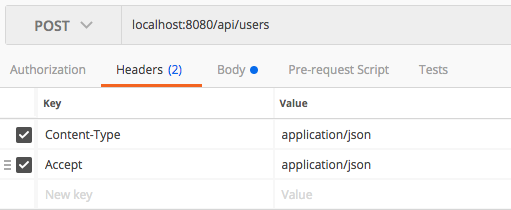
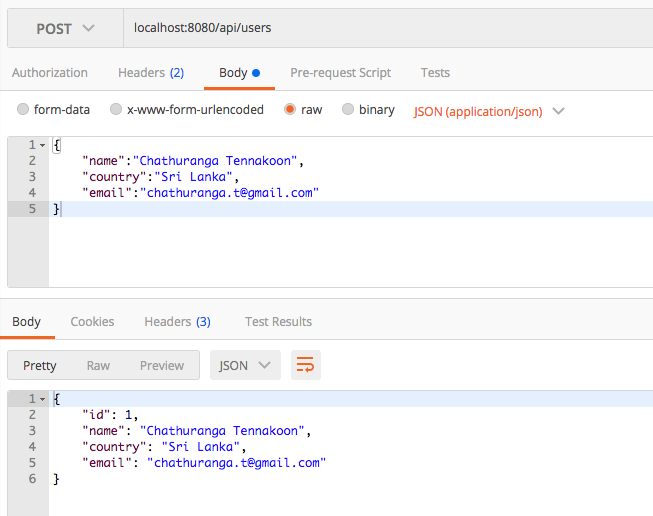
Round 1
POST   /api/users

Content-Type : application/json
Accept : application/json
Request Body and Response Body
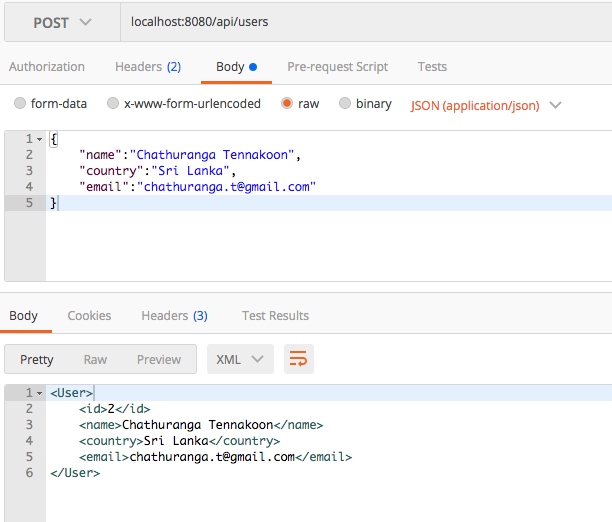
Round 2
POST   /api/users

Content-Type : application/json
Accept : application/xml
Request Body and Response Body
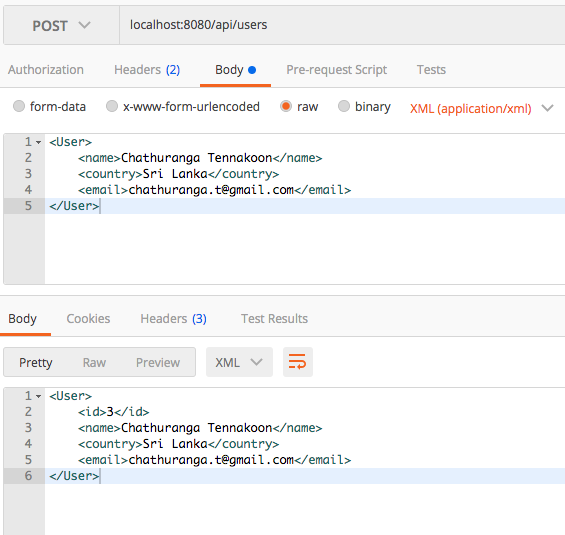
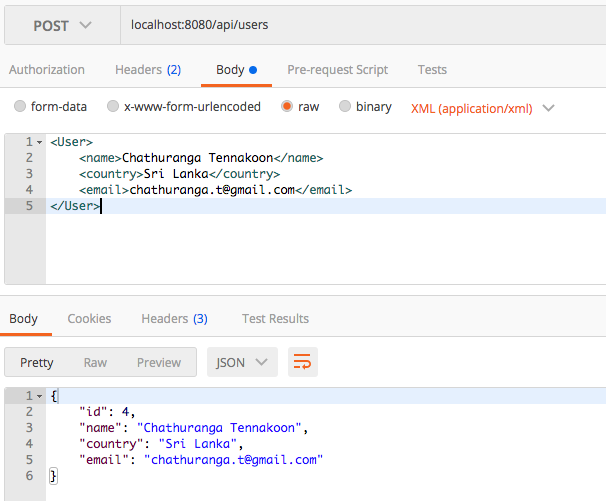
Round 3
POST   /api/users

Content-Type : application/xml
Accept : application/xml
Request Body and Response Body
Round 4
POST   /api/users

Content-Type : application/xml
Accept : application/json
Request Body and Response Body
ResponseEntity
I just wanted to explain you about the ResponseEntity even if it is not mentioned in the code example.
ResponseEntity is a real deal. It represents the entire HTTP response. Good thing about it is that you can control anything that goes into it. You can specify status code, headers, and body. It comes with several constructors to carry the information you want to sent in HTTP Response.