Setting up Keycloak Server

Keycloak can be downloaded at :-  https://www.keycloak.org/downloads.html

Once it is downloaded, extract the binary distribution and execute the standalone.sh available in the keycloak-9.0.3/bin to run the keycloak server.

References:- https://www.keycloak.org/docs/latest/server_installation/index.html


Adding Realm

We need to add a realm first. This can be done by click on Add realm button on top of the server console.

Screen Shot 2020-04-18 at 3.07.35 PM.png


Then add the name for the realm. In my case i have added it as “spring-app-demo-realm“.

1.add_realm.png

Now we have successfully added a realm.


Adding new users

Now we need to add new users for the newly added realm. For the demonstration purpose i am filling only the mandatory data. I will be creating two user accounts.

  • username: app-user    /   password: test123
  • username: app-admin    /   password: test123


Lets create the “app-user” first.

2.add_user.png

Once the user is added, we need to set the password. This can be done as follows.

3.update_password.png

Repeat the above steps again to create the “admin-user” as well.


Create Roles

Now we need to create user roles. we will create following two user roles.

  • ROLE_ADMIN
  • ROLE_USER


4. add role.png


Screen Shot 2020-05-04 at 3.09.23 PM.png

Now we have successfully created the roles.


Assign role(s) for the user

Now this is the time to assign the roles for the user accounts. This can be done as follows.

click on Users. ->  select the user account -> Role Mappings

Assigning the user role for the app-admin user

5. assign role for the user.png

Select the available role(s) -> Add Selected


Assigning the user role for the app-user

Screen Shot 2020-05-04 at 3.15.21 PM.png


Set up client

Now we need to create new client.

6. add client.png


Now we need to do more configurations.

7. configure client.png


Now we are done with the setup and configuration process.


Testing with Postman

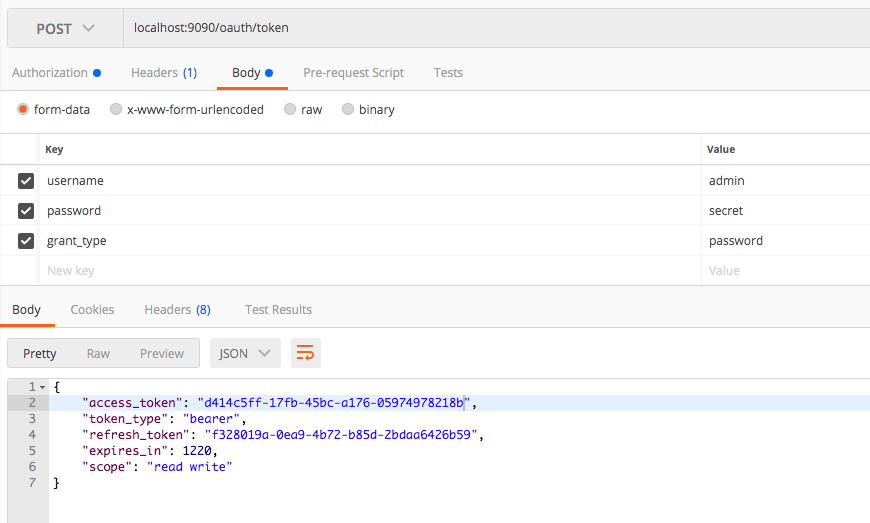
8. testing with POSTman.png


REST endpoint should in the following format.

http://localhost:8080/auth/realms/<realm-name>/protocol/openid-connect/token


Microservices: How to use Spring Security OAuth2 to Secure Spring REST Api (Resource Server Set up) – Part 3

This is the Part 3 of the series of articles written to share my experience on securing REST Api(s) with Spring Security OAuth2.  The other pars of this article series have been listed below.

Part 1 :  Basics of OAuth2, Roles, Grant types and Microservices security.

Part 2 :  Setting up Authorization server with Spring Security OAuth2 using In-memory token store and client details

Part 3 :  Setting up Resource Server with Spring Security OAuth2.

Part 4 :  Enhancing Authorization server to store client app details and tokens in the database (JDBC client and token store)

Part 5 :  Secure REST Api with Spring Security OAuth2 using JWT token

Part 6 :  Token Revoke and Invalidating


Here we will be focusing on how to configure and set up resource server to expose protected resources and allow their access through a valid access token.

In the part 2 of the article, we have looked at how to set up Authorization server and generate token based on valid credentials. In this article, we are going to use the generated access token to access protected resources available.


Generating a Project

You need to generate a spring boot project with following dependencies.

<dependency>
   <groupId>org.springframework.boot</groupId>
   <artifactId>spring-boot-starter-security</artifactId>
</dependency>
<dependency>
   <groupId>org.springframework.boot</groupId>
   <artifactId>spring-boot-starter-web</artifactId>
</dependency>
<dependency>
   <groupId>org.springframework.cloud</groupId>
   <artifactId>spring-cloud-starter-oauth2</artifactId>
</dependency>


REST Api Resources

In WelcomeController, you can see set of endpoints and those are accessible for different user levels (roles). in order to access each endpoint, we need to have a valid token generated against authorized user credentials.


import org.springframework.web.bind.annotation.GetMapping;
import org.springframework.web.bind.annotation.RestController;
import javax.annotation.security.RolesAllowed;
@RestController
public class WelcomeController {
@GetMapping("/public")
public String welcomePublic() {
return "welcome public/guest user";
}
@RolesAllowed({"ROLE_ADMIN"})
@GetMapping("/admin")
public String welcomeAdmin() {
return "welcome admin";
}
@RolesAllowed({"ROLE_USER"})
@GetMapping("/user")
public String welcomeUser() {
return "welcome user";
}
}


/public endpoint can be accessed by any user (both authenticated and non-authenticated). All other endpoints can be accessed only by authenticated users with allowed user roles.  we can declare that behavior as follows.


import org.springframework.context.annotation.Configuration;
import org.springframework.security.config.annotation.method.configuration.EnableGlobalMethodSecurity;
import org.springframework.security.config.annotation.web.builders.HttpSecurity;
import org.springframework.security.oauth2.config.annotation.web.configuration.EnableResourceServer;
import org.springframework.security.oauth2.config.annotation.web.configuration.ResourceServerConfigurerAdapter;
@Configuration
@EnableResourceServer
@EnableGlobalMethodSecurity(securedEnabled = true, prePostEnabled = true, jsr250Enabled = true)
public class ResourceServerConfiguration extends ResourceServerConfigurerAdapter {
@Override
public void configure(HttpSecurity http) throws Exception {
http.authorizeRequests()
.antMatchers("/public").permitAll()
.anyRequest().authenticated();
}
}

according to the above configuration, only the access for the /public will be allowed for the non-authenticated users. all other requests should be authenticated requests.


Verifying and Validating the Tokens

You might be thinking of how the resource server internally verify and check the validity of the tokens received through each request. This is accomplished with the /oauth/check_token endpoint exposed in the resource server.  If you check the application.properties of the resource server, you can see that we have declared the endpoint with client app details.

security.oauth2.client.client-id=client
security.oauth2.client.client-secret=password

security.oauth2.resource.token-info-uri=http://localhost:9090/oauth/check_token


The resource server will extract the token from the request and check the validity through above endpoint.


Accessing the resources with Access Token

Here i have assumed that the authorization server and resource server is already up and running.

since the /public endpoint is permitted to access for all, we should be able to access it without any access token.

Screen Shot 2019-05-25 at 11.03.58 AM.png


Now we will try to access the  /admin endpoint without any token. Since our request is not authenticated (does not contain any token), It should not allow us to access the resource. As you can see that we got 401 unauthorized error.

Screen Shot 2019-05-25 at 11.14.59 AM.png


Now it is clear that we should have a valid access token to access the /admin resource. lets try to generate an access token based on some user credentials.

username : user

password : password

Screen Shot 2019-05-25 at 11.11.51 AM.png


Now we will use the generated access token to access the /admin endpoint.  Here you can see that we have got a different error with different error code.  This is because token will claim only for the ROLE_USER privilege.  In order to access the /admin resource, the token with authority ROLE_ADMIN is required.

Screen Shot 2019-05-25 at 11.14.34 AM.png


Lets re-generate the access token with admin credentials.

Screen Shot 2019-05-25 at 11.22.20 AM.png


Now we will access the /admin endpoint with access token generated using admin user credentials. Yes! we are done.

Screen Shot 2019-05-25 at 11.26.21 AM.png


The Source Code

The Source code of the Resource Server can be found at GitHub. Click here to download it.


Microservices: How to use Spring Security OAuth2 to Secure Spring REST Api (Authorization Server with In-memory set up) – Part 2

This is the Part 2 of the series of articles written to share my experience on securing REST Api(s) with Spring Security OAuth2.  The other pars of this article series have been listed below.

Part 1 :  Basics of OAuth2, Roles, Grant types and Microservices security.

Part 2 :  Setting up Authorization server with Spring Security OAuth2 using In-memory token store and client details

Part 3 :  Setting up Resource Server with Spring Security OAuth2.

Part 4 :  Enhancing Authorization server to store client app details and tokens in the database (JDBC client and token store)

Part 5 :  Secure REST Api with Spring Security OAuth2 using JWT token

Part 6 :  Token Revoke and Invalidating


Here we will be focusing on how to implement Authorization server to handle client registration and token issuing using in-memory mechanism.


Setting up Authorization server


You can create a spring boot based project for Authorization server is as follows. Make sure that you have added the Web, OAuth2-Cloud and Spring Security dependencies correctly.

Screen Shot 2019-05-22 at 11.43.10 PM.png


once the project is generated, make sure that the following dependencies exist in the pom.xml.

<dependency>
   <groupId>org.springframework.boot</groupId>
   <artifactId>spring-boot-starter-security</artifactId>
</dependency>
<dependency>
   <groupId>org.springframework.boot</groupId>
   <artifactId>spring-boot-starter-web</artifactId>
</dependency>
<dependency>
   <groupId>org.springframework.cloud</groupId>
   <artifactId>spring-cloud-starter-oauth2</artifactId>
</dependency>


Once the project is generated, we can add the WebSecurity Configuration as follows.


import org.springframework.beans.factory.annotation.Autowired;
import org.springframework.context.annotation.Bean;
import org.springframework.security.authentication.AuthenticationManager;
import org.springframework.security.config.annotation.authentication.builders.AuthenticationManagerBuilder;
import org.springframework.security.config.annotation.web.configuration.EnableWebSecurity;
import org.springframework.security.config.annotation.web.configuration.WebSecurityConfigurerAdapter;
import org.springframework.security.crypto.password.PasswordEncoder;
@EnableWebSecurity
public class WebSecurityConfiguration extends WebSecurityConfigurerAdapter {
@Autowired
private PasswordEncoder passwordEncoder;
@Bean(name = "authenticationManager")
@Override
public AuthenticationManager authenticationManagerBean() throws Exception {
return super.authenticationManagerBean();
}
@Override
protected void configure(AuthenticationManagerBuilder auth) throws Exception {
auth.inMemoryAuthentication().withUser("user").password(passwordEncoder.encode("secret")).roles("USER");
auth.inMemoryAuthentication().withUser("admin").password(passwordEncoder.encode("secret")).roles("ADMIN");
}
}


The Authorization server will authenticate users and issue tokens to access the protected resources.  Since the authorization server does not maintain/expose any resources, we have nothing to secure here. Therefore we haven’t  declared the HTTP or Web Security configurations here. we have created only the authentication-manager.  The users will be authenticated against the in-memory user details store implemented.


Adding Authorization Server Configuration 

We have added the Authorization server configuration as follows.


import org.springframework.beans.factory.annotation.Autowired;
import org.springframework.context.annotation.Bean;
import org.springframework.context.annotation.Configuration;
import org.springframework.security.authentication.AuthenticationManager;
import org.springframework.security.crypto.password.PasswordEncoder;
import org.springframework.security.oauth2.config.annotation.configurers.ClientDetailsServiceConfigurer;
import org.springframework.security.oauth2.config.annotation.web.configuration.AuthorizationServerConfigurerAdapter;
import org.springframework.security.oauth2.config.annotation.web.configuration.EnableAuthorizationServer;
import org.springframework.security.oauth2.config.annotation.web.configurers.AuthorizationServerEndpointsConfigurer;
import org.springframework.security.oauth2.config.annotation.web.configurers.AuthorizationServerSecurityConfigurer;
import org.springframework.security.oauth2.provider.token.TokenStore;
import org.springframework.security.oauth2.provider.token.store.InMemoryTokenStore;
@Configuration
@EnableAuthorizationServer
public class AuthorizationServerConfiguration extends AuthorizationServerConfigurerAdapter {
@Autowired
private AuthenticationManager authenticationManager;
@Autowired
private TokenStore tokenStore;
@Autowired
private PasswordEncoder passwordEncoder;
@Override
public void configure(ClientDetailsServiceConfigurer clients) throws Exception {
clients.inMemory()
.withClient("client")
.authorizedGrantTypes("password", "authorization_code", "refresh_token", "implicit")
.scopes("read", "write")
.autoApprove(true)
.secret(passwordEncoder.encode("password"));
}
@Override
public void configure(AuthorizationServerEndpointsConfigurer endpoints) throws Exception {
endpoints
.authenticationManager(authenticationManager)
.tokenStore(tokenStore);
}
@Bean
public TokenStore tokenStore() {
return new InMemoryTokenStore();
}
@Override
public void configure(AuthorizationServerSecurityConfigurer oauthServer) throws Exception {
oauthServer.checkTokenAccess("isAuthenticated()");
}
}


clients.inMemory() specifies that we are going to store the services in memory. In a ‘real’ application, we would save it in a database, an LDAP server.As you can see that we have registered one client application in memory.

authorizedGrantTypes – This specifies what are the possible authorization grant types supported by the client application being registered. For this article, we will be using only the password grant type. 

Spring Security OAuth exposes two endpoints for checking tokens (/oauth/check_token and /oauth/token_key). Those endpoints are not exposed by default (have access “denyAll()”).  You can enable those endpoints for authenticated client applications as follows.

oauthServer.checkTokenAccess("isAuthenticated()");

You may add “permitAll()” instead of  “isAuthenticated()


Running the Authorization Sever

Now we have done the required configuration for the OAuth2 Authorization server. lets run it and check whether it is working.

mvn spring-boot:run

The server will be up and running on port 9090.


Generating Access Token and Refresh Token

The following endpoint can be used to generate the access token and refresh token.

POST  /oauth/token


First we need to use the client application credentials to authenticate with Authorization server. Then we can use the user credentials to generate an access token and refresh token for accessing the protected resource.  Please refer the below screenshots.

  • Authenticate using client app credentials

username : client

password :  password

Screen Shot 2019-05-24 at 9.21.31 PM.png

  • Generate access token for the user credentials. 


Screen Shot 2019-05-24 at 9.21.42 PM.png


You can see that access token and refresh token are generated correctly.


Checking and Verifying the Generated Token

You can use the following endpoint to check and verify the generated token.

POST  /oauth/check_token


This can be done as follows.

  • Authenticate with client app credentials

username : client

password :  password

Screen Shot 2019-05-24 at 9.30.28 PM.png


  • Sending the generated token for retrieving the details. 

Screen Shot 2019-05-24 at 9.32.20 PM.png

You can see that the response contains client app id, scopes, user and authorities/roles.

In the next part, we will look at how to set up resource server to keep protected resources and authorize the access to the protected resources only for the valid/authorized tokens.


Source Code

The completed source code of this article can be found at GitHub. Click here to download it.


What is Elasticsearch and Why it is important?


Unlike other articles, here i am going to discuss about the Elasticsearch theoretical background in the form of questions and answers. I hope that this would be more appropriate way to emphasize what is Elasticsearch and its importance. So lets start.


1. What is ElasticSearch?

ElasticSearch is distributed full text search engine based on Apache Lucene. It is kind of NoSQL database stores the data as JSON Documents.  Lucene is the underlying technology that Elasticsearch uses for extremely fast data retrieval.

In ElasticSearch everything is indexed (It index everything in the document to make the search faster). Therefore it provides speed search operations across large data set. ElasticSearch is commonly used to build search engine because it is optimized for it.


ElasticSearch is built by targeting speed and scalability.

SPEED  : Elasticsearch is fast, really fast! Since everything is indexed, you’re never left with index envy. You search and retrieve the data in really speedy manner due the the inbuilt indexing support.

SCALABILITY : Distributed architecture of the ElasticSearch helps to scale it horizontally.


2. What are the advantages of ElasticSearch?

Speed Search

ElasticSearch is really fast because everything is indexed. Therefore complex search queries can be performed on larger data set and retrieve the data in lesser time (speedy manner)

Horizontally Scalable Architecture

ElasticSearch has a distributed architecture and it  supports the horizontal scaling with adding more Nodes. Elasticsearch cluster is not limited to a single machine, you can infinitely scale your system to handle higher traffic and larger data sets.

Easy development and integration

ElasticSearch client libraries are available for many programming languages such as Java, PHP, Python, .Net and much more. In addition, most of the frameworks provide their own libraries and implementations for the accessing the ElasticSearch.  Therefore it is easy to develop the application that uses ElasticSearch for search and data retrieval operations. In addition, it provides a REST api to access data and perform data search queries. 


3. What are the limitations of ElasticSearch with compared to other NoSQL databases?

No Transaction support

ElasticSearch is not a transactional database and it does not support transactions.      Therefore it may lose data and data integrity issues may arise.

Slow on inserting new data

Adding new data may require to create or update indexes. Therefore insertion operation may take a considerable amount of time with compared to other NoSQL databases.

Lack of authentication and authorization.

No default (built in free) authentication and authorization module. You have to buy plugins (like X-Pack) if you need any authentication and authorization support.


4. Can we use the ElasticSearch as the main application database?

There is no direct answer for this question. It depends on the type of application that you are building. ElasticSearch is not a transactional database and does not support transactions. On the other hand, it slows on inserting data  as the indexes need to be updated.

If you are building a search engine and that does not need any database transactional support, you can go head with Elasticsearch as the primary data storage. But in real world, it is hard to find such applications. Every application has a some sort of transactional behaviour and database transactional  support is expected. Therefore Elasticsearch is used as a secondary storage that helps to improve the speed data search and retrieval.

In most of the cases, the recommendation is to use Elasticsearch as the secondary storage along with any transactional persistence storage.  Your primary storage can be any transactional database either relational or NoSQL. Elasticsearch is used to perform speed search operations in the application. Therefore if your application has a large data set and you need to perform the speed search operations on the data set, then you can migrate or replicate the relevant data set to the  ElasticSearch.  The other data can be kept remaining in the primary data storage which is your main persistence storage.

If you already have a working schema in SQL but you have slow search (not necessarily SQL’s strength), then maybe you copy searchable data to ElasticSearch and use it to perform searches.


5. What are the similarities of ElasticSearch and other NoSQL databases? (like mongoDB)

  • Store the data as JSON objects.
  • Allow querying the body of the JSON Objects.   


6. Why transactional support is much important in NoSQL databases?

In NoSQL databases, data is not normalized (they are denormalized). Unlike relational database, the data is not split up into multiple collections. In the relational database, the data will be normalized and will be split up into multiple tables. The related data will be connected and referred through foreign key constraints.

In NoSQL world, this is completely different. Data is denormalized and related referrencial data will be managed as nested documents.

E.g:- think about the employee and department relationship. Each employee document will contain the department (nested) document that has the information about the employee departments.

In NoSQL, data is duplicated in each document. Therefore whenever the data is changed, it need to be updated and reflected in all the required documents (multiple documents need to be updated). Since the elasticsearch does not support transactions, we cannot guarantee on the integrity of the data after performing such operations. This is because the partially updating of the documents will not rollback the operations (partially updated data) due to the lack of the transaction support. Therefore this will lead to arise data integrity issues.


7. What is the difference between mongoDB and the Elasticsearch?

mongoDB is a general purpose database that can be used as the main persistence storage. It provides transactional support. If we need to speed up the data retrieval, we can create the indexes on the collections. But It is optional and it is decided by the developer.

Elasticsearch is a full text based search engine and it does not provide transactional support. It performs speed search operations since everything (everything in the document)  is indexed. Therefore insertion operation is slower when compared to the insertion operation of the mongoDB. This is because the index need to be created/updated whenever new entry is added. In addition, everything is indexed by default and developer cannot control that behaviour.


8. Why do we need the ElasticSearch? Why can’t we use the full text search feature of the mongoDB ?

mongoDB also provides the full text search feature. It is ok to proceed with the mongodb’s full text search feature when you need a basic full text search feature on medium scale data set. If you plan to proceed with mongoDB, make sure that the indexes are created on the relevant fields.  

If the data set it too large and searching is complex, then it is better to go with Elasticsearch. It has been developed and optimized to work as a full text search engine with speed data retrieval.


Hope this gives you a proper introduction and overview of elasticsearch with  its importance.

Upload and Delete files with Amazon S3 and Spring Boot

Introduction

As a developer, i am pretty sure that you may have come across with scenarios where you need to store images (either user uploaded or application itself) of your application.  There are several possibilities to store file(s) as follows.

  • Store the file(s) somewhere in the hosting server where the application is deployed (if it is a web application).
  • Store the file(s) in the database as binary files.
  • Store the file using cloud storage services.

Here we are going to evaluate the third option (given above) which is “Store the file using cloud storage services“.

Amazon Simple Storage Service (S3) is an AWS object storage platform which helps you to store the files in form of objects, and, store and retrieve any amount of data from anywhere.  Each file stored in Amazon S3 (as an object) is represented using a key.


Spring Boot Application and Amazon S3 Cloud  


Untitled Diagram (12).png

AWS Java SDK supports various APIs related to Amazon S3 service for working with files stored in S3 bucket.


Amazon S3 Account Configuration

Please follow the instructions given in the Amazon S3 official documentation for creating and configuring the S3 account and bucket.

Click here to visit the official documentation. 

I will list down the steps in below for your convenience.

Continue reading “Upload and Delete files with Amazon S3 and Spring Boot”

Message Driven Microservices with Spring Cloud Stream and RabbitMQ (Publish and Subscribe messages) – using @StreamListener for header based routing – Part 3

In this article, i am not going to explain the basics of Spring Cloud Stream OR the process of creating publishers and subscribers.  Those have been clearly described in the Part 1 and Part 2 of this article series.

It is possible to send messages with headers. In the receiving end (consumer application), there can be multiple message handlers (@StreamListener annotated methods) those accepts messages based on the headers of the message.

A copy of the message will be sent to every handler method and they will accept the message if it matches the given condition . The condition is a SpEL expression (Spring Expression Language) that performs checks on header values.  The sample condition is given as follows.

e.g:-

@StreamListener(target = OrderSink.INPUT,condition = "headers['payment_mode']=='credit'")

(Please refer the source code the complete code)

In that way, you can use the headers to route messages (message routing) among multiple message handlers.  Here we will look at, how to deliver the messages to the correct recipient based on the header.

Continue reading “Message Driven Microservices with Spring Cloud Stream and RabbitMQ (Publish and Subscribe messages) – using @StreamListener for header based routing – Part 3”

Message Driven Microservices with Spring Cloud Stream and RabbitMQ (Publish and Subscribe messages) with custom bindings – Part 2

In the previous part, we have tried Spring Cloud Stream pre-built component such as Sink, Source and Processor for building message driven microservices.

In this part, we will look at how to create custom binding classes with custom channels for publishing and retrieving messages with RabbitMQ.


Setting up the publisher application

The publisher application is almost similar as the previous article except the bindings and related configurations.

The previous article uses Source class (Spring Cloud Stream built-in component) for configuring the output message channel (@Output) for publishing messages.  Here we are not going to use the built-in component and we will be developing a custom output binding class to build and configure the output message channel.


import org.springframework.cloud.stream.annotation.Output;
import org.springframework.messaging.MessageChannel;
public interface OrderSource
{
String OUTPUT = "orderPublishChannel";
@Output(OUTPUT)
MessageChannel create();
}


we have declared a custom Source class with “orderPublishChannel” as the output message channel.

Now we need to bind this OrderSource class in the OrderController.


@Slf4j
@EnableBinding(OrderSource.class)
@RestController
public class OrderController
{
@Autowired
private OrderSource source;
@PostMapping("/orders/publish")
public String publishOrder(@RequestBody Order order)
{
source.create().send(MessageBuilder.withPayload(order).build());
log.info(order.toString());
return "order_published";
}
}


source.create() will configure the output message channel whose name is “orderPublishChannel“.  The published messages will be delegated to the RabbitMQ exchange through the “orderPublishChannel“. 

We need to change the application.properties based on the channel name as follows.

spring.cloud.stream.bindings.orderPublishChannel.destination=orders-exchange


Now we have completed the development of the publisher application with custom source bindings for publishing messages.  Lets move forward with developing the consumer application.


Setting up the consumer application.

The consumer application is almost similar as the previous article except the bindings and related configurations.

The previous article uses Sink class (Spring Cloud Stream built-in component) for configuring the input message channel (@Input) for retrieving messages.  Here we are not going to use the built-in component and we will be developing a custom input binding class to build and configure the input message channel.

Continue reading “Message Driven Microservices with Spring Cloud Stream and RabbitMQ (Publish and Subscribe messages) with custom bindings – Part 2”

Message Driven Microservices with Spring Cloud Stream and RabbitMQ (Publish and Subscribe messages) with Sink, Source and Processor bindings – Part 1


What is Spring Cloud Stream?

Spring Cloud Stream is a framework that helps in developing message driven or event driven microservices. Spring Cloud Stream uses an underlying message broker (such as RabbitMQ or Kafka) that is used to send and receive messages between services.

When i am writing this article, there are two implementations of the Spring Cloud Stream.

  1. Spring Cloud Stream implementation that uses RabbitMQ as the underlying message broker.
  2. Spring Cloud Stream implementation that uses Apache Kafka as the underlying message broker.


High Level Overview of Spring Cloud Stream


application-core.png

source:- https://ordina-jworks.github.io/img/spring-cloud-stream/application-core.png

An application defines Input and Output channels which are injected by Spring Cloud Stream at runtime. Through the use of so-called Binder implementations, the system connects these channels to external brokers.

The difficult parts are abstracted away by Spring, leaving it up to the developer to simply define the inputs and outputs of the application. How messages are being transformed, directed, transported, received and ingested are all up to the binder implementations. (e.g:- RabbitMQ or Kafka)

Continue reading “Message Driven Microservices with Spring Cloud Stream and RabbitMQ (Publish and Subscribe messages) with Sink, Source and Processor bindings – Part 1”

Spring Cloud Config : Using Git Webhook to Auto Refresh the config changes with Spring Cloud Stream, Spring Cloud Bus and RabbitMQ (Part 3)


You can refer the previous parts of this article as follows.

Click here for Part 1 

Click here for Part 2


The Problem

In the previous article (Part 2 of this series),  we have discussed how to use Spring Cloud Bus to broadcast the refresh event ( /actuator/bus-refresh) across all the connected services. In here the refresh event should be manually triggered on any service that is connected to the Spring Cloud Bus. (You can select any service as you wish. The only requirement is that it should connect to the Spring Cloud Bus).

The main problem here is that whenever the properties are changed, the refresh event should be manually triggered. Even if it is for just one service, it is still a manual process. What will happen if the developer forgets to manually trigger the refresh event after updating the properties in the remote repository? 

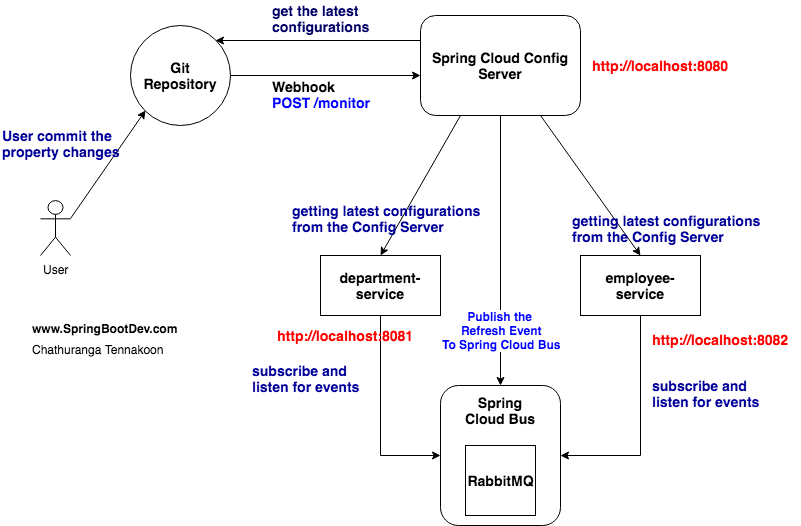
Wouldn’t be nicer if there is any way to automate this refresh event triggering  whenever the remote repository is changed. In order to achieve this, the config server may need to listen for the events of the remote repository.  This can be done with webhook event feature provided by the remote repository providers.


The Solution

Here is the architecture of the proposed solution.


Untitled Diagram (10).png

Continue reading “Spring Cloud Config : Using Git Webhook to Auto Refresh the config changes with Spring Cloud Stream, Spring Cloud Bus and RabbitMQ (Part 3)”

Spring Cloud Config : Refreshing the config changes with Spring Cloud Bus (Part 2)

You can refer the part 1 of this article as follows.

Click here for Part 1 


The Problem

The previous article (click here to visit it) has described how to use Spring Cloud Config Server as a centralized location for keeping the configuration properties related to the application services (microservices).  The application services will act as Config Clients who will communicate with Config Server to retrieve the properties related to them.

If any property is changed, the related service need to be notified by triggering a refresh event with Spring Boot Actuator (/actuator/refresh). The user will have to manually trigger this refresh event. Once the event is triggered, all the beans annotated with @RefreshScope will be reloaded (the configurations will be re-fetched) from the Config Server.

In a real microservice environment, there will be a large number of independent application services. Therefore is it not practical for the user to manually trigger the refresh event for all the related services whenever a property is changed.

Continue reading “Spring Cloud Config : Refreshing the config changes with Spring Cloud Bus (Part 2)”