In your software development life, you might be having an experience about different application environments such as DEVELOPMENT, STAGING and PRODUCTION. The developed applications are normally deployed in these environments. The most of the time these environments are set up in separate servers and they are known as :
- Development Server
- Staging Server
- Production Server
Each of these server environments has their own configuration and connection details. These details might be different from one server to another.
e.g:-
MySQL or some other database connection details
RabbitMQ server and connection details etc....
Therefore we should maintain separate configuration/properties files for each server environment and we need to pick up the right configuration file based on the server environment.
In traditional way, this is achieved by manually defining related configuration file when building and deploying the application. This requires few manual steps with some human resource involvement. Therefore there is a probability to arise deployment related issues. In addition, there are some limitations with the traditional approach.
What we should do if there is a requirement to programmatically register a bean based on the environment?
e.g:- The staging environment should have a separate bean implementation while development and production environments are having their own bean instances with different implementations.
The Spring Framework has come up with the solutions for above problems and made our life easier with annotation called @Profile.
@Profile
In spring the above deployment environments (development, staging and production) are treated as separate profiles. @Profile annotation is used to separate the configuration for each profile. When running the application, we need to activate a selected profile and based on activated profile the relevant configurations will be loaded.
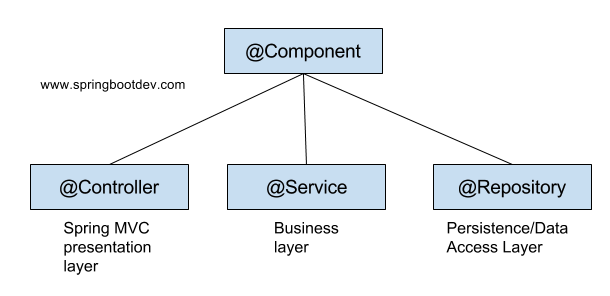
The purpose of @Profile is to separate/segregate the creating and registering of beans based on the profiles. Therefore @Profile can be used with any annotation that has the purpose of either creating or registering bean in Spring IOC container. So the @Profile can be used with following annotations.
- Any stereo type annotations (mainly used with @Component and @Service)
- @Configuration and @Bean annotations
After reading the above note, the first question you might be asking yourself is that “Why @Profile is used mainly with @Component and @Service? “. Lets figure it out before moving forward.
Why @Profile annotation is used mainly with @Component and @Service annotations?
@Component designates the class as a spring managed component and @Service designates the class as the spring managed service. It makes a sense if the application creates different services and managed components based on the activated profiles. This is very logical and this should be the expected behavior of profiling.
Do you think that creating separate controllers and repositories based on different profiles make any sense? Is it logically acceptable? Different Controller for production environment and different ones for staging and development? Isn’t it crazy?
On the other hand, do you think that we need separate repositories based on profiles. Separate ones for development, staging and production? wait… wait.. wait… I agree with you that we need different database configurations and connection details for each of these environments. Does it mean that we need separate repositories? No right? The separate database connection details does not have any relation with repository.
Now i think you can understand why @Profile is not used with @Controller and @Repository.
What will happen if it is used with other stereotype annotations such as @Controller and @Repository?
It will work fine. I just just explained you the logical reasons behind of not using @Profile with @Controller and @Repository.
If you can logically prove that using @Profile with @Controller and @Repository annotations just do the right job for you, then you are free to go for it. But again think twice before proceeding.
Ok. Now you have an idea of how @Profile helps to create and register the relevant beans based on activated profiles. But i didn’t explain you how relevant application.properties file is picked up based on the activated profile. Lets look at it now.
Picking up the correct application.properties file with spring boot
According to our discussion, the application can be deployed in several server environments. Therefore the application should have different application.properties file for the deployment profile(or server environment). When the profile is activated, the corresponding application.properties file should be picked up.
How the properties files are named based on the profile and Spring Boot picks up the correct application.properties file?
We can have property file specific to a profile with the convention application-{profile}.properties. In this way we can have separate property file for different environment. If we have activated a profile, then the corresponding property file will be used by the spring boot application. We can also have a property file for default profile.
Suppose we have profiles as dev for development environment , prod for production environment and staging for staging environment. Then the property file will be listed as below.
application-prod.properties
application-dev.properties
application-staging.properties
Ok lets do some fantastic coding example with Spring @Profile. We will try to cover most of the concepts we discussed here.
What we are going to build.
We will build a simple REST api application that persists some data to MySQL database with Spring Data JPA. Here i am focused only with demonstrating @Profile and if you need to learn more about Spring Data JPA, please refer my article on that.
Click here to go to Spring Data JPA article.
This application has three different databases that represents three different deployment profiles. deployment profiles are dev, staging and prod.
app_development_db  - database for the dev profile/environment
app_staging_db - database for the staging profile/environment
app_production_db  - database for the prod  profile/environment.
(If you want to run this application and see the output, make sure that you have created above three databases in the MySQL server)
The source code of this example can be found at GitHub.
Click here to download the source code.
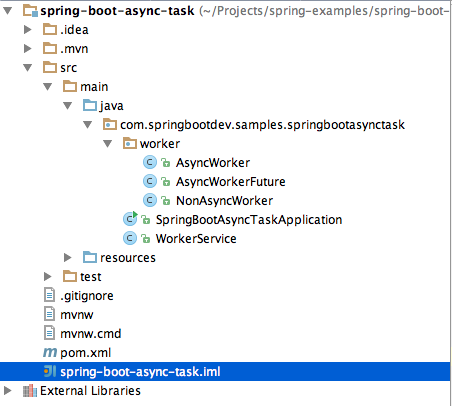
If you open up the project in your IDE, you can see the following files structure.
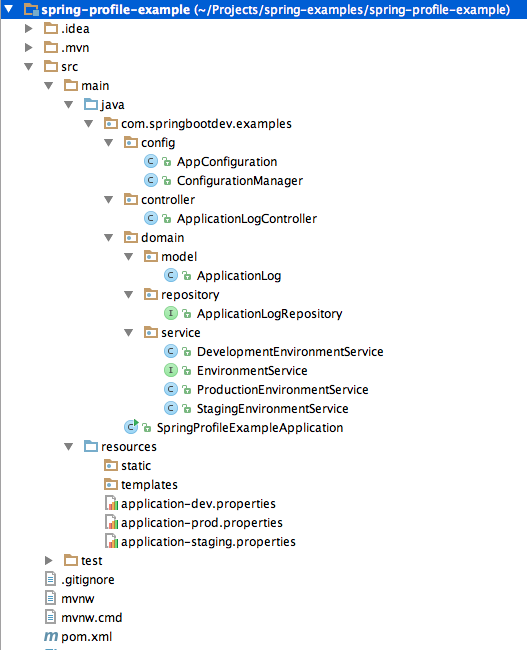
You can notice that we have created separate application.properties files for each profile.
So lets dig into some of the important source files.
This file contains bidirectional Unicode text that may be interpreted or compiled differently than what appears below. To review, open the file in an editor that reveals hidden Unicode characters.
Learn more about bidirectional Unicode characters
| @Configuration | |
| public class ConfigurationManager | |
| { | |
| @Bean | |
| @Profile("dev") | |
| public AppConfiguration getDevelopmentConfiguration() | |
| { | |
| return new AppConfiguration("development_config"); | |
| } | |
| @Bean | |
| @Profile("staging") | |
| public AppConfiguration getStagingConfiguration() | |
| { | |
| return new AppConfiguration("staging_config"); | |
| } | |
| @Bean | |
| @Profile("prod") | |
| public AppConfiguration getProductionConfiguration() | |
| { | |
| return new AppConfiguration("production_config"); | |
| } | |
| } |
ConfigurationManager is responsible for creating and registering the relevant/corresponding bean based on the activated profile.
EnvironmentService has different implementations for each profile. Based on the activated profile, the corresponding service bean will be created and registered.
This file contains bidirectional Unicode text that may be interpreted or compiled differently than what appears below. To review, open the file in an editor that reveals hidden Unicode characters.
Learn more about bidirectional Unicode characters
| import org.springframework.context.annotation.Profile; | |
| import org.springframework.stereotype.Service; | |
| @Service | |
| @Profile("dev") | |
| public class DevelopmentEnvironmentService implements EnvironmentService | |
| { | |
| @Override | |
| public String getCurrentEnvironment() | |
| { | |
| return "development_environment"; | |
| } | |
| } |
This file contains bidirectional Unicode text that may be interpreted or compiled differently than what appears below. To review, open the file in an editor that reveals hidden Unicode characters.
Learn more about bidirectional Unicode characters
| @Service | |
| @Profile("prod") | |
| public class ProductionEnvironmentService implements EnvironmentService | |
| { | |
| @Override | |
| public String getCurrentEnvironment() | |
| { | |
| return "production_environment"; | |
| } | |
| } |
This file contains bidirectional Unicode text that may be interpreted or compiled differently than what appears below. To review, open the file in an editor that reveals hidden Unicode characters.
Learn more about bidirectional Unicode characters
| @Service | |
| @Profile("staging") | |
| public class StagingEnvironmentService implements EnvironmentService | |
| { | |
| @Override | |
| public String getCurrentEnvironment() | |
| { | |
| return "staging_environment"; | |
| } | |
| } |
Finally we will look at our ApplicationLogController.
This file contains bidirectional Unicode text that may be interpreted or compiled differently than what appears below. To review, open the file in an editor that reveals hidden Unicode characters.
Learn more about bidirectional Unicode characters
| @RestController | |
| public class ApplicationLogController | |
| { | |
| @Autowired | |
| private AppConfiguration appConfiguration; | |
| @Autowired | |
| private EnvironmentService environmentService; | |
| @Autowired | |
| private ApplicationLogRepository repository; | |
| @PostMapping("/logs") | |
| public ApplicationLog createApplicationLog() | |
| { | |
| ApplicationLog applicationLog = new ApplicationLog(); | |
| applicationLog.setConfiguration(appConfiguration.getName()); | |
| applicationLog.setEnvironment(environmentService.getCurrentEnvironment()); | |
| return repository.save(applicationLog); | |
| } | |
| } |
ApplicationLogController has exposed following REST endpoint.
POST /logs
This will persists the ApplicationLog entries with the aid of ApplicationLogRepository. After that it reruns the persisted log entry. This can be seen in the body of the HTTP Response.
AppConfiguration has been auto-wired with the registered configuration bean based on the activated profile.
EnvironmentService will also be auto-wired with the created service bean based on the activated profile.
Ultimately, the persisting database will be decided on the selected properties file based activated profile.
Since everything depends on the activated profile, we need to run this application by activating any of these three profiles. Then we can see the result and understand how it works.
Running the Application by activating profiles.
The profile can be activated with following command.
-Dspring.profiles.active=<<profile-name>>
Therefore the practical uses of the command can be given as follows.
Running spring boot application by enabling “prod” profile
mvn spring-boot:run -Dspring.profiles.active=prod
Running the application as a jar file by enabling the dev profile
java -jar -Dspring.profiles.active=dev target/spring-profile-example-0.0.1-SNAPSHOT.jar
Lets run the application and examine how the profile works. In order to identify how it works, please check all three databases after each REST api call.
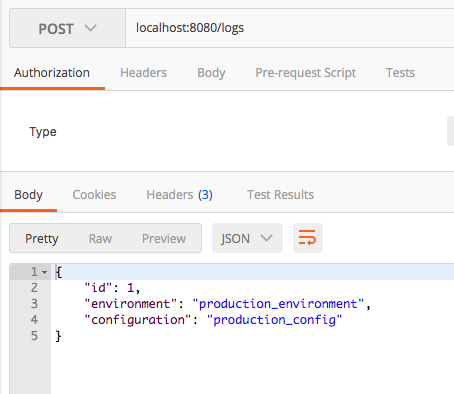
Run the application by activating “prod” profile
java -jar -Dspring.profiles.active=prod target/spring-profile-example-0.0.1-SNAPSHOT.jar
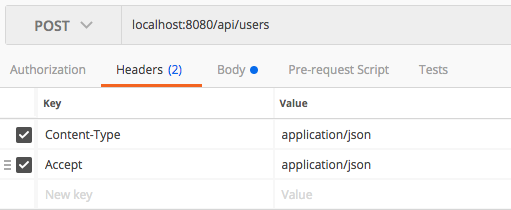
Making the REST api call.
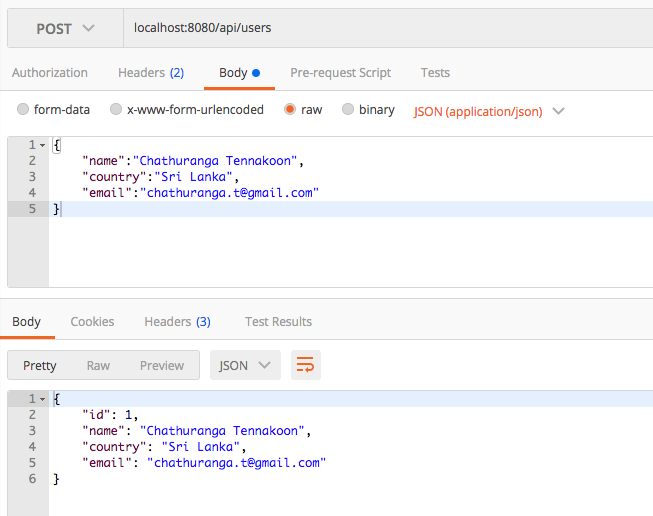
/POST localhost:8080/logs
The HTTP response will be as follows.
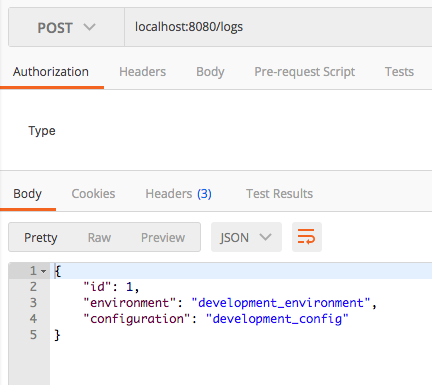
Run the application by activating “dev” profile
java -jar -Dspring.profiles.active=dev target/spring-profile-example-0.0.1-SNAPSHOT.jar
Making the REST api call.
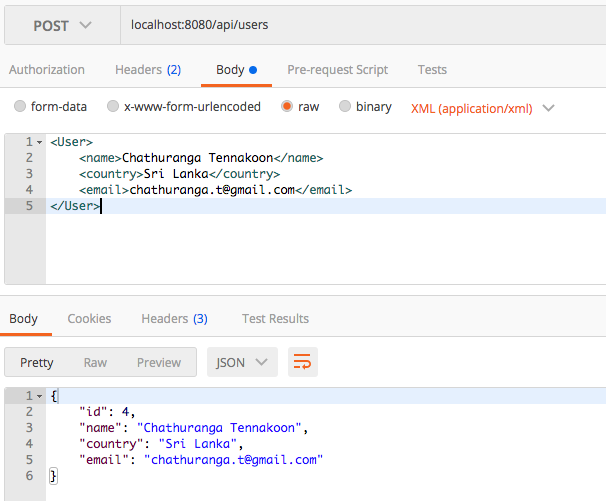
/POST localhost:8080/logs
The HTTP response will be as follows.
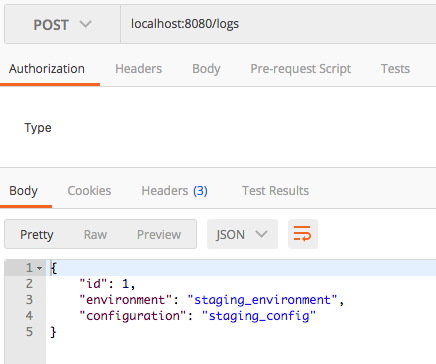
Run the application by activating “staging” profile
java -jar -Dspring.profiles.active=staging target/spring-profile-example-0.0.1-SNAPSHOT.jar
Making the REST api call.
/POST localhost:8080/logs
The HTTP response will be as follows.
As i have already mentioned, please check all three database after each REST api call. Then you will notice that only the corresponding application.properties file is picked up and the connection for the given database is made.