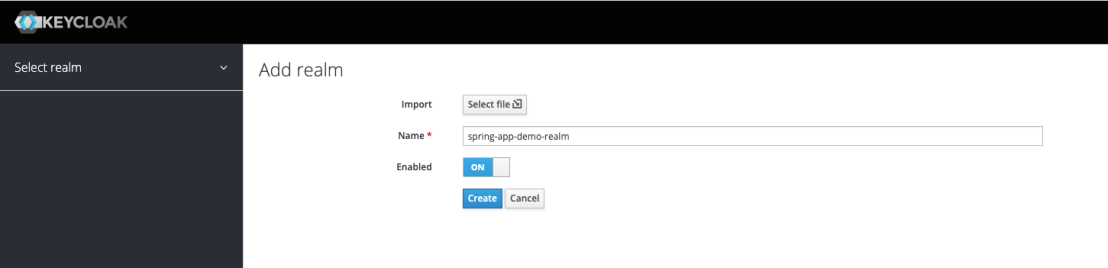
We need to add a realm first. This can be done by click on Add realm button on top of the server console.
Then add the name for the realm. In my case i have added it as “spring-app-demo-realm“.
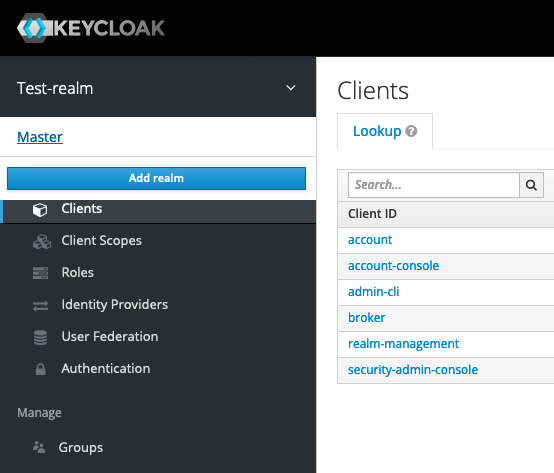
Now we have successfully added a realm.
Adding new users
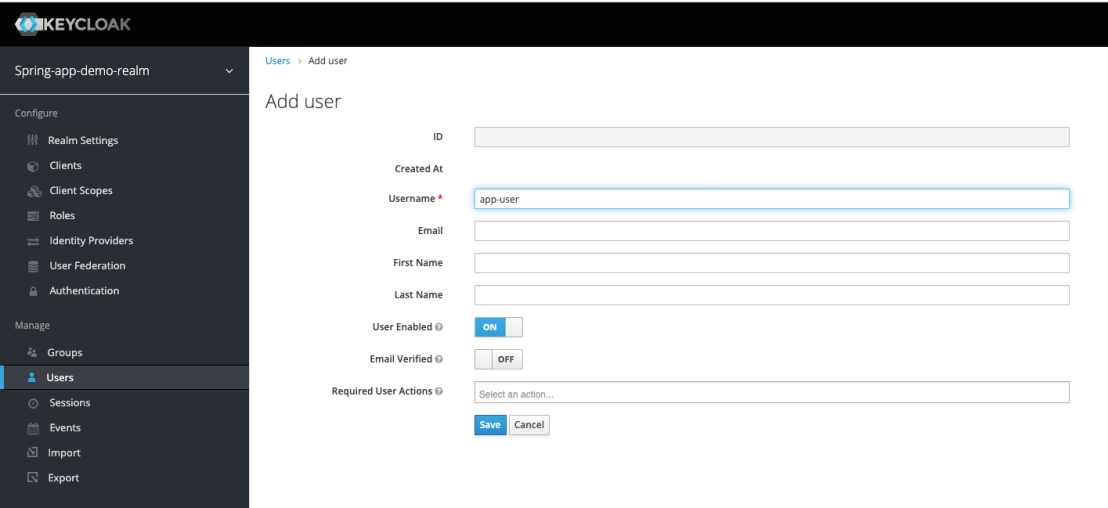
Now we need to add new users for the newly added realm. For the demonstration purpose i am filling only the mandatory data. I will be creating two user accounts.
username: app-user / password: test123
username: app-admin / password: test123
Lets create the “app-user” first.
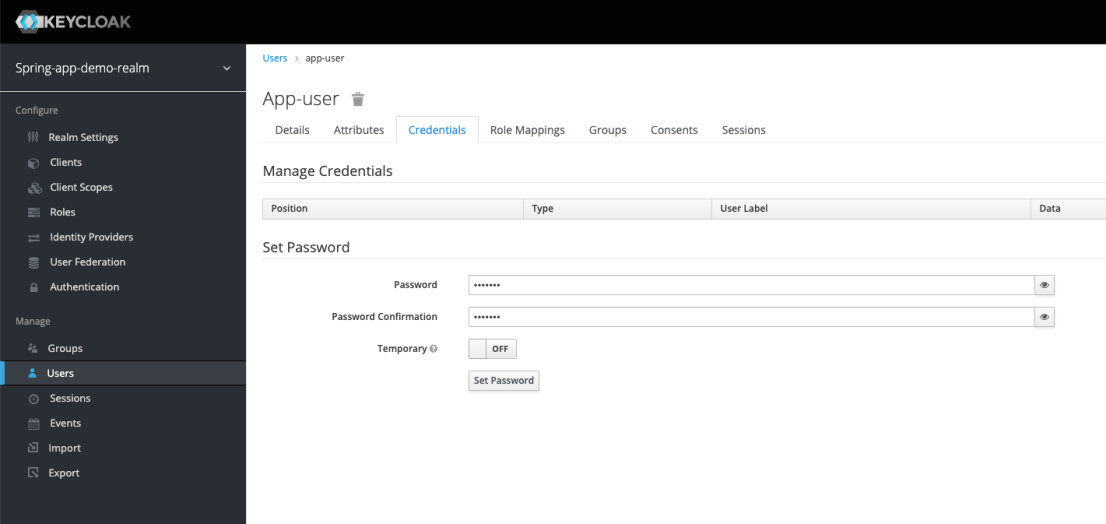
Once the user is added, we need to set the password. This can be done as follows.
Repeat the above steps again to create the “admin-user” as well.
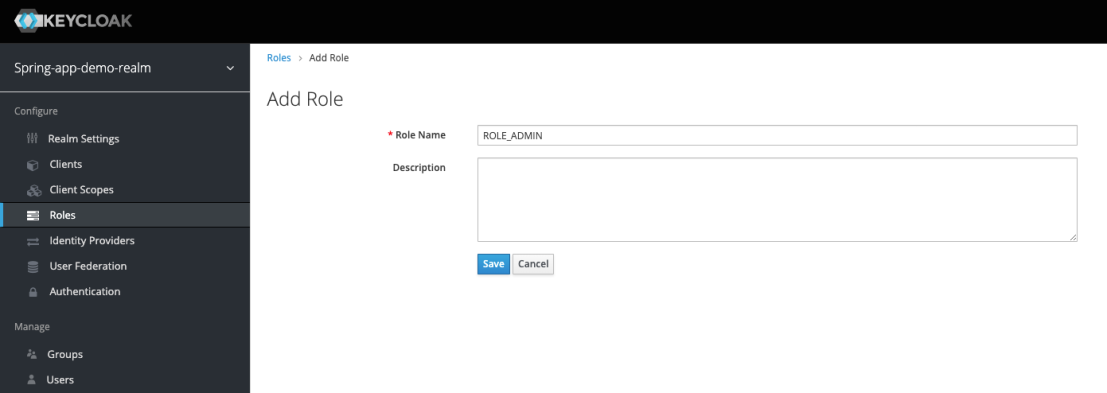
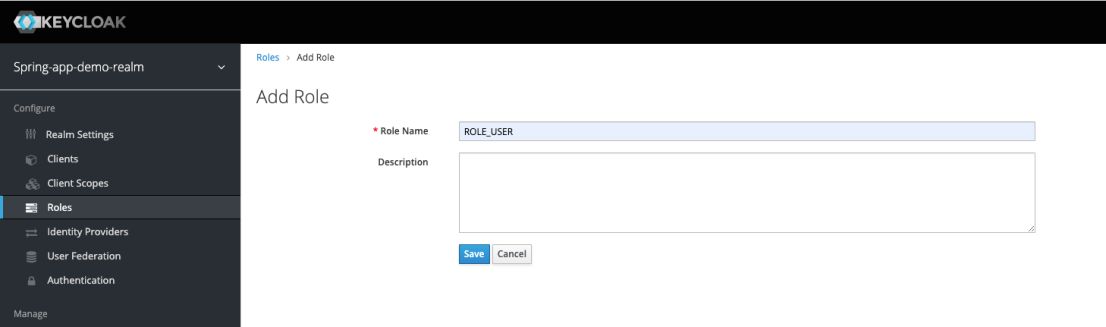
Create Roles
Now we need to create user roles. we will create following two user roles.
ROLE_ADMIN
ROLE_USER
Now we have successfully created the roles.
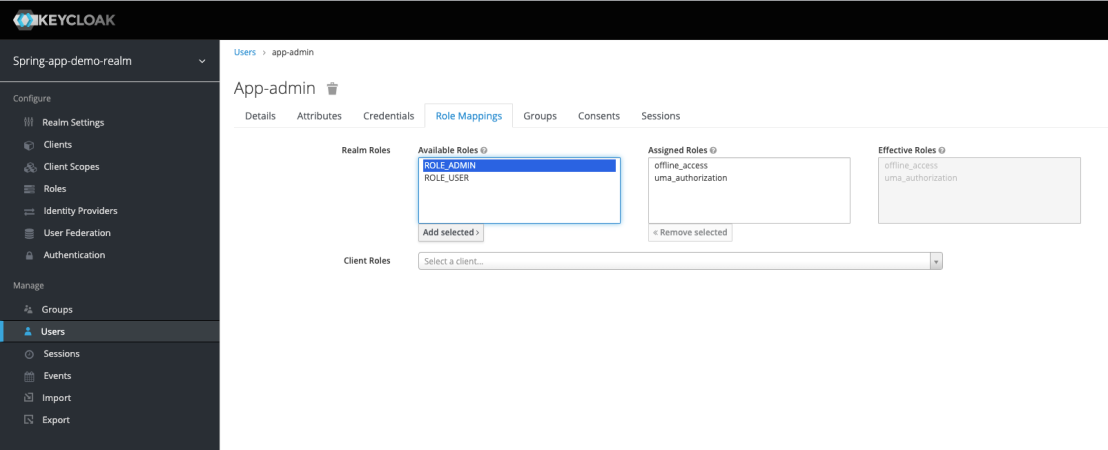
Assign role(s) for the user
Now this is the time to assign the roles for the user accounts. This can be done as follows.
click on Users. -> select the user account -> Role Mappings
Assigning the user role for the app-admin user
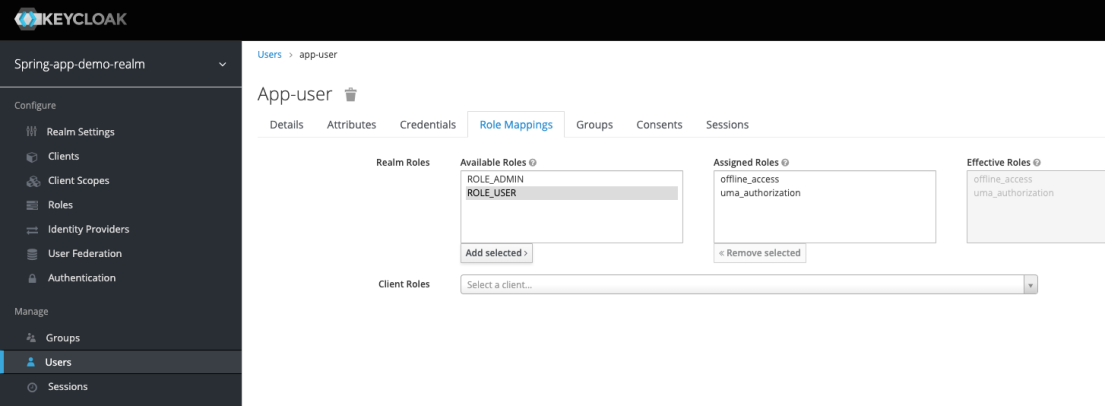
Select the available role(s) -> Add Selected
Assigning the user role for the app-user
Set up client
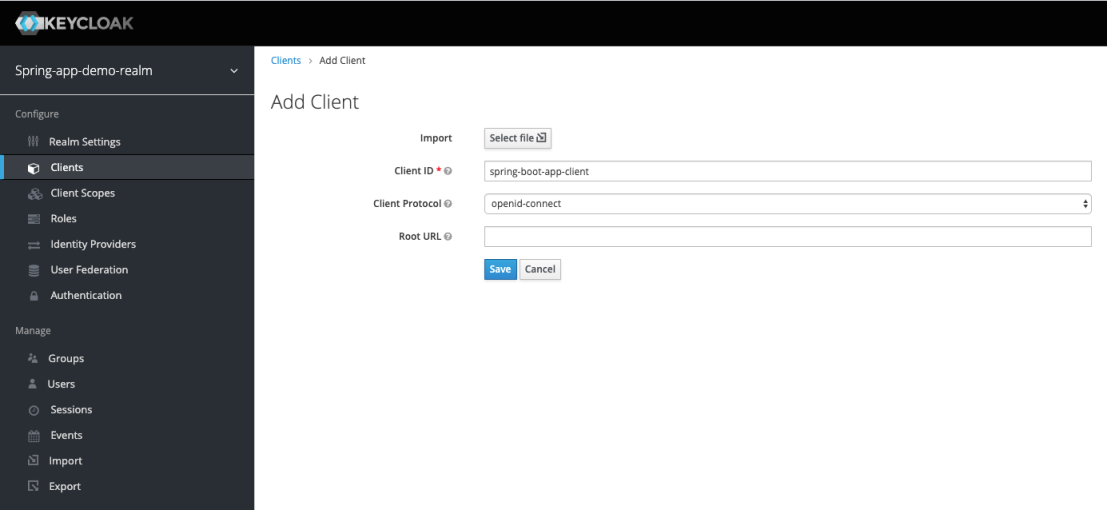
Now we need to create new client.
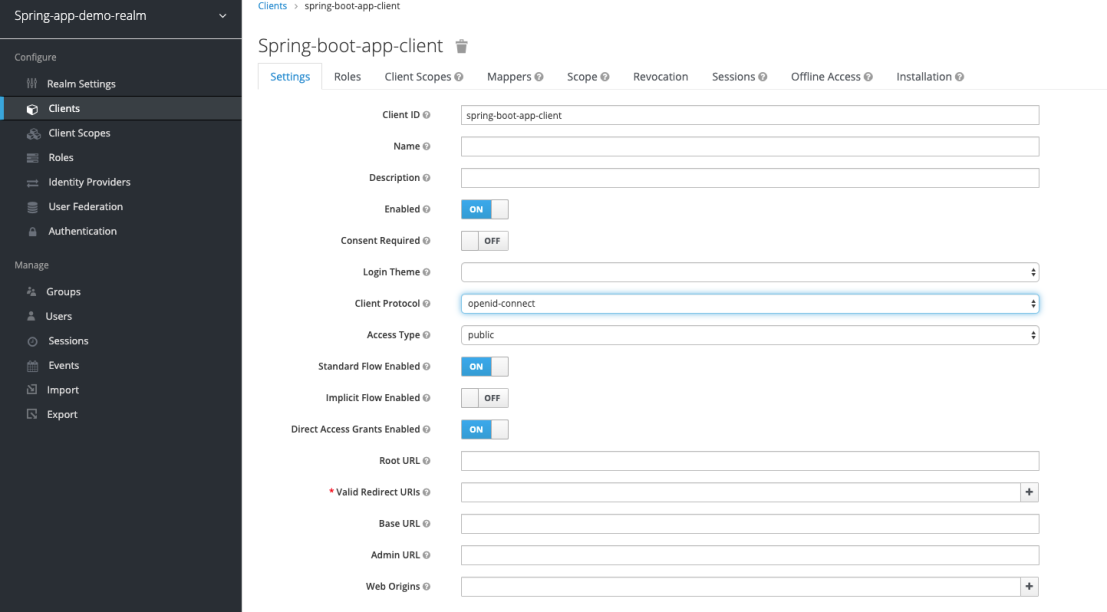
Now we need to do more configurations.
Now we are done with the setup and configuration process.
This is the Part 3 of the series of articles written to share my experience on securing REST Api(s) with Spring Security OAuth2. The other pars of this article series have been listed below.
Part 1 : Basics of OAuth2, Roles, Grant types and Microservices security.
Part 2 : Setting up Authorization server with Spring Security OAuth2 using In-memory token store and client details
Part 3 : Setting up Resource Server with Spring Security OAuth2.
Part 4 : Enhancing Authorization server to store client app details and tokens in the database (JDBC client and token store)
Part 5 : Secure REST Api with Spring Security OAuth2 using JWT token
Part 6 : Token Revoke and Invalidating
Here we will be focusing on how to configure and set up resource server to expose protected resources and allow their access through a valid access token.
In the part 2 of the article, we have looked at how to set up Authorization server and generate token based on valid credentials. In this article, we are going to use the generated access token to access protected resources available.
Generating a Project
You need to generate a spring boot project with following dependencies.
In WelcomeController, you can see set of endpoints and those are accessible for different user levels (roles). in order to access each endpoint, we need to have a valid token generated against authorized user credentials.
This file contains bidirectional Unicode text that may be interpreted or compiled differently than what appears below. To review, open the file in an editor that reveals hidden Unicode characters. Learn more about bidirectional Unicode characters
/public endpoint can be accessed by any user (both authenticated and non-authenticated). All other endpoints can be accessed only by authenticated users with allowed user roles. we can declare that behavior as follows.
This file contains bidirectional Unicode text that may be interpreted or compiled differently than what appears below. To review, open the file in an editor that reveals hidden Unicode characters. Learn more about bidirectional Unicode characters
according to the above configuration, only the access for the /public will be allowed for the non-authenticated users. all other requests should be authenticated requests.
Verifying and Validating the Tokens
You might be thinking of how the resource server internally verify and check the validity of the tokens received through each request. This is accomplished with the /oauth/check_token endpoint exposed in the resource server. If you check the application.properties of the resource server, you can see that we have declared the endpoint with client app details.
The resource server will extract the token from the request and check the validity through above endpoint.
Accessing the resources with Access Token
Here i have assumed that the authorization server and resource server is already up and running.
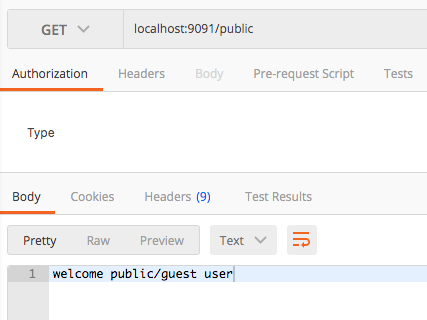
since the /public endpoint is permitted to access for all, we should be able to access it without any access token.
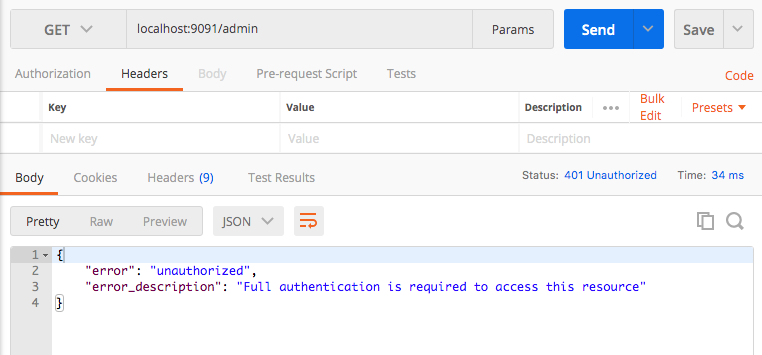
Now we will try to access the /admin endpoint without any token. Since our request is not authenticated (does not contain any token), It should not allow us to access the resource. As you can see that we got 401 unauthorized error.
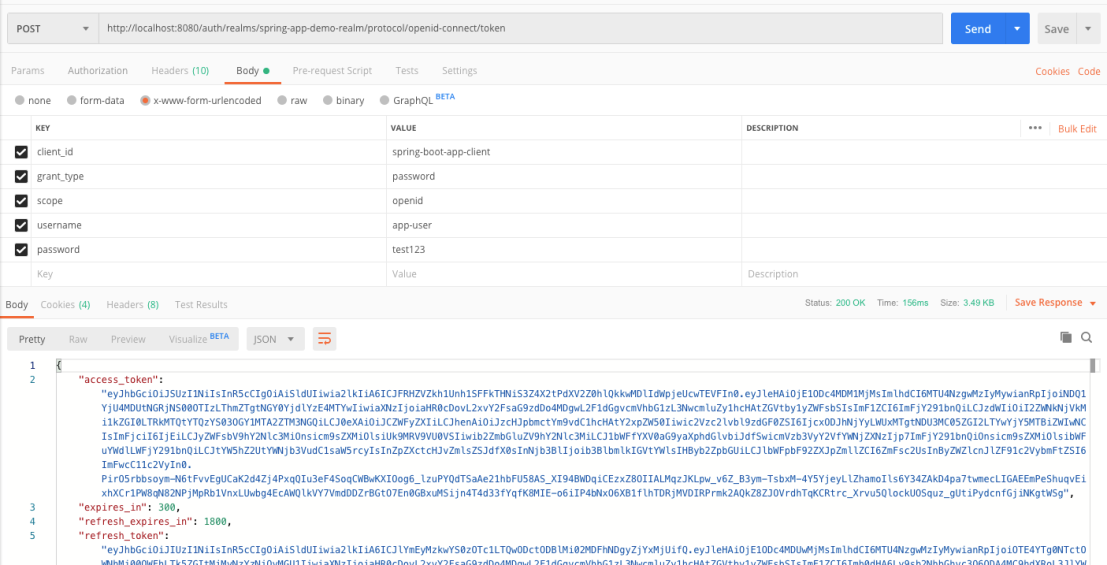
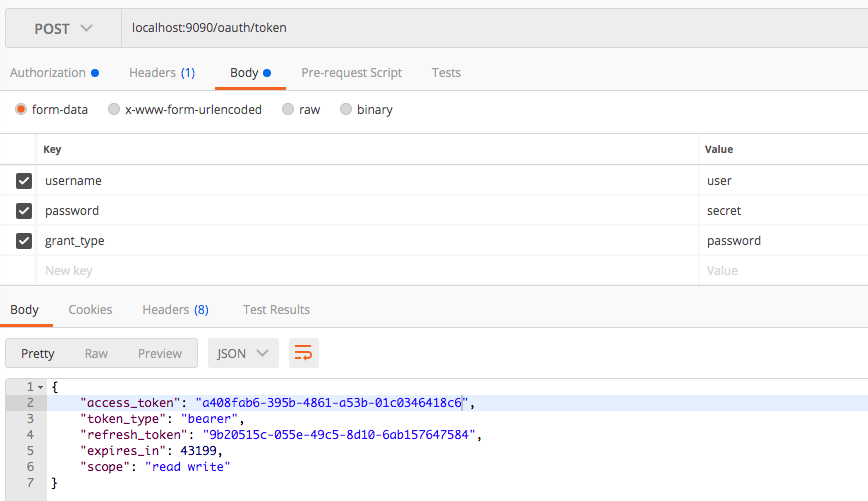
Now it is clear that we should have a valid access token to access the /admin resource. lets try to generate an access token based on some user credentials.
username : user
password : password
Now we will use the generated access token to access the /admin endpoint. Here you can see that we have got a different error with different error code. This is because token will claim only for the ROLE_USER privilege. In order to access the /admin resource, the token with authority ROLE_ADMIN is required.
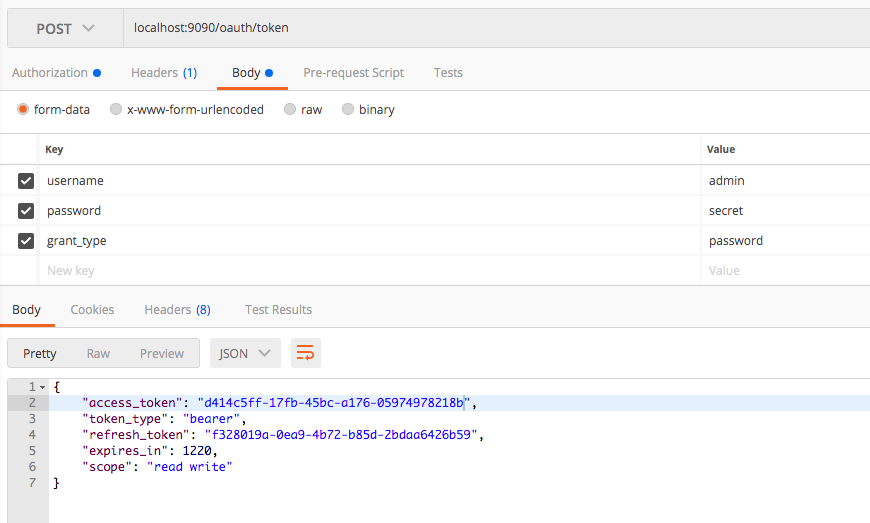
Lets re-generate the access token with admin credentials.
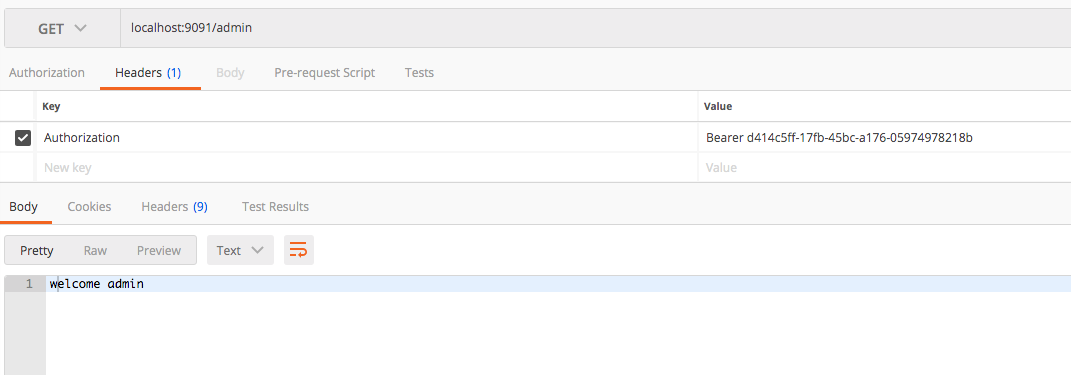
Now we will access the /admin endpoint with access token generated using admin user credentials. Yes! we are done.
The Source Code
The Source code of the Resource Server can be found at GitHub. Click here to download it.
This is the Part 2 of the series of articles written to share my experience on securing REST Api(s) with Spring Security OAuth2. The other pars of this article series have been listed below.
Part 1 : Basics of OAuth2, Roles, Grant types and Microservices security.
Part 2 : Setting up Authorization server with Spring Security OAuth2 using In-memory token store and client details
Part 3 : Setting up Resource Server with Spring Security OAuth2.
Part 4 : Enhancing Authorization server to store client app details and tokens in the database (JDBC client and token store)
Part 5 : Secure REST Api with Spring Security OAuth2 using JWT token
Part 6 : Token Revoke and Invalidating
Here we will be focusing on how to implement Authorization server to handle client registration and token issuing using in-memory mechanism.
Setting up Authorization server
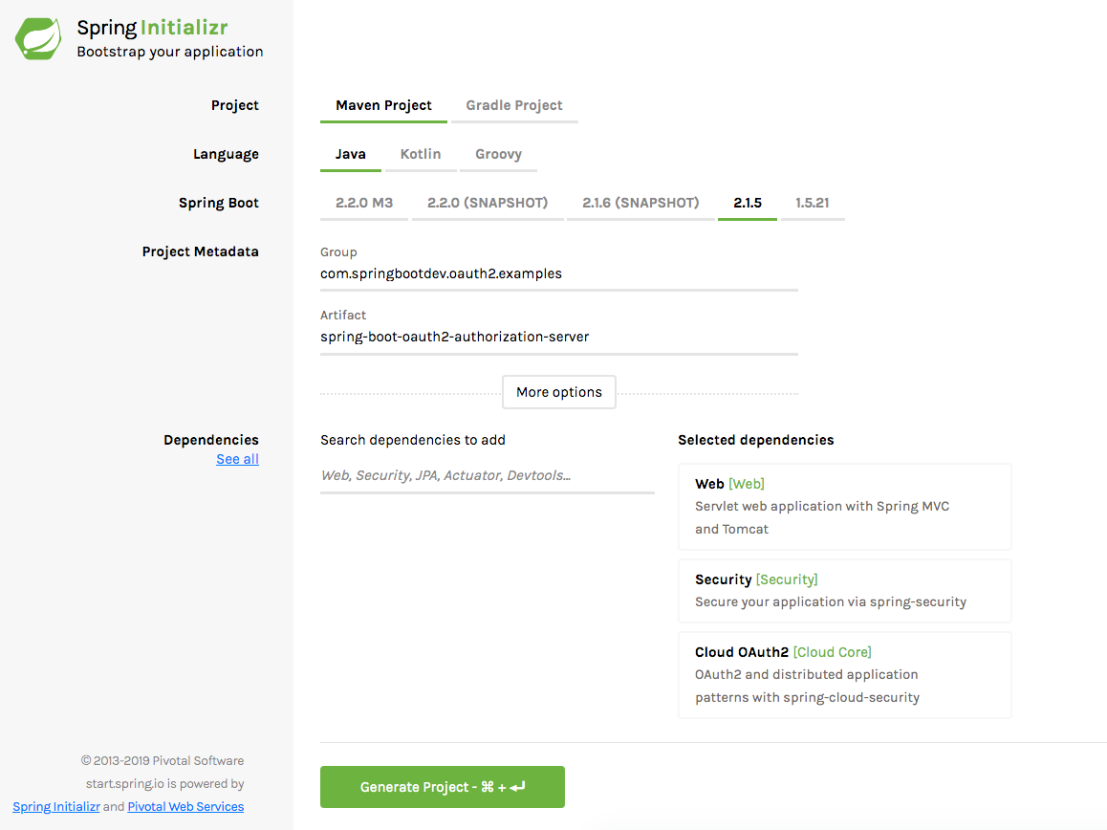
You can create a spring boot based project for Authorization server is as follows. Make sure that you have added the Web, OAuth2-Cloud and Spring Security dependencies correctly.
once the project is generated, make sure that the following dependencies exist in the pom.xml.
Once the project is generated, we can add the WebSecurity Configuration as follows.
This file contains bidirectional Unicode text that may be interpreted or compiled differently than what appears below. To review, open the file in an editor that reveals hidden Unicode characters. Learn more about bidirectional Unicode characters
The Authorization server will authenticate users and issue tokens to access the protected resources. Since the authorization server does not maintain/expose any resources, we have nothing to secure here. Therefore we haven’t declared the HTTP or Web Security configurations here. we have created only the authentication-manager. The users will be authenticated against the in-memory user details store implemented.
Adding Authorization Server Configuration
We have added the Authorization server configuration as follows.
This file contains bidirectional Unicode text that may be interpreted or compiled differently than what appears below. To review, open the file in an editor that reveals hidden Unicode characters. Learn more about bidirectional Unicode characters
clients.inMemory() specifies that we are going to store the services in memory. In a ‘real’ application, we would save it in a database, an LDAP server.As you can see that we have registered one client application in memory.
authorizedGrantTypes – This specifies what are the possible authorization grant types supported by the client application being registered. For this article, we will be using only the password grant type.
Spring Security OAuth exposes two endpoints for checking tokens (/oauth/check_tokenand/oauth/token_key). Those endpoints are not exposed by default (have access “denyAll()”). You can enable those endpoints for authenticated client applications as follows.
You may add “permitAll()” instead of “isAuthenticated()”
Running the Authorization Sever
Now we have done the required configuration for the OAuth2 Authorization server. lets run it and check whether it is working.
mvn spring-boot:run
The server will be up and running on port 9090.
Generating Access Token and Refresh Token
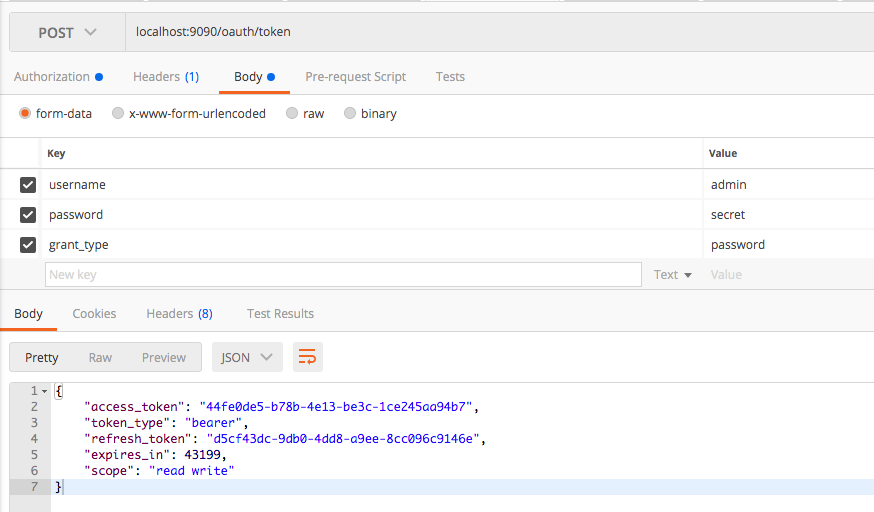
The following endpoint can be used to generate the access token and refresh token.
POST /oauth/token
First we need to use the client application credentials to authenticate with Authorization server. Then we can use the user credentials to generate an access token and refresh token for accessing the protected resource. Please refer the below screenshots.
Authenticate using client app credentials
username : client
password : password
Generate access token for the user credentials.
You can see that access token and refresh token are generated correctly.
Checking and Verifying the Generated Token
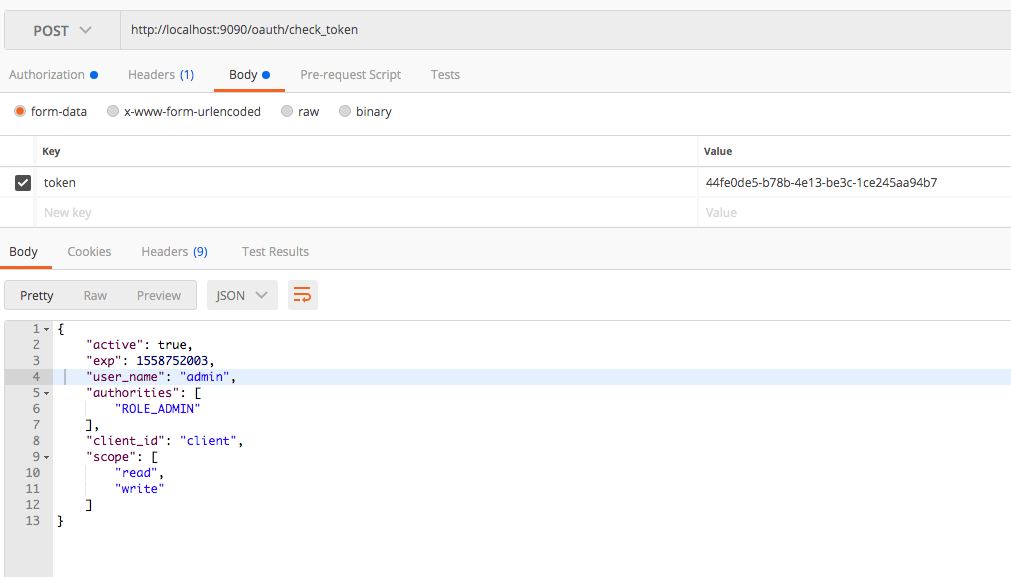
You can use the following endpoint to check and verify the generated token.
POST /oauth/check_token
This can be done as follows.
Authenticate with client app credentials
username : client
password : password
Sending the generated token for retrieving the details.
You can see that the response contains client app id, scopes, user and authorities/roles.
In the next part, we will look at how to set up resource server to keep protected resources and authorize the access to the protected resources only for the valid/authorized tokens.
Source Code
The completed source code of this article can be found at GitHub. Click here to download it.
Here i am going to show you how to execute spring test cases on REST endpoints that are secured with Spring Security and required HTTP Basic Authentication. Here we are going to use the TestRestTemplate as the REST client for invoking REST endpoints.
TestRestTemplate
TestRestTemplate is a convenience alternative to Spring’s RestTemplate that is useful in integration tests. If you use the @SpringBoootTest annotation , with one of the following webEnviroment attribute, you can use fully configured TestRestTemplate in your Test class.
@SpringBootTest(webEnvironment = WebEnvironment.RANDOM_PORT)
                        OR
@SpringBootTest(webEnvironment = WebEnvironment.DEFINED_PORT)
There are different ways that can be used to perform Basic Authentication with TestRestTemplate.
Authentication headers
‘withBasicAuth’ method
With Authenticated TestRestTemplate object.
Lets look at each of those approaches in detailed as follows.
@SpringBootTest annotation will load the fully ApplicationContext. Therefore it is highly used for writing the integration testing in web server environment. This will not use slicing and scan for all the stereotype annotations (@Component, @Service, @Respository and @Controller / @RestController) and loads the full application context. Therefore this is more good at in the context of writing integration testing for the application.
@WebMvcTest annotation will load only the controller layer of the application. This will scan only the @Controller/ @RestController annotation and will not load the fully ApplicationContext. If there is any dependency in the controller layer (has some dependency to other beans from your service layer), you need to provide them manually by mocking those objects.
Therefore @SpringBootTest is widely used for Integration Testing purpose and @WebMvcTest is used for controller layer Unit testing.
Swagger is a set of open-source tools built around the OpenAPI Specification that can help you design, build, document and consume REST APIs.
Swagger is mostly used as an open source project for describing and documenting RESTful APIs. Swagger-UI an another tool which provides the capability of displaying the REST Api documentation in the browser. Besides rendering documentation, Swagger UI allows other API developers or consumers to interact with the API’s resources without having any of the implementation logic in place.
The more details can be found through following documentations.
The Swagger 2 specification, which is known as OpenAPI specification has several implementations. Currently, Springfox that has replaced Swagger-SpringMVC (Swagger 1.2 and older) is popular for Spring Boot applications.
In Spring Security, a request for a protected resource, will go through a chain of spring security filters for fulfilling Authentication and Authorization requirements.
You might be little bit confused about how your web application is interacting with spring security for authentication and authorization purposes. you might be questioning yourself about following facts. Continue reading “Spring Security : DelegatingFilterProxy”→
One of the great feature in spring security is, it has the ability of providing both URL based security and method level security. All these annotations – @Secured , @RolesAllowed, @PreAuthorize / @PostAuthorize are used to achieve the method level security.
The complete code of this article can be found at GitHub
AbstractSecurityInterceptor
We will refresh our knowledge about spring security authorization. In spring security, the initial authorization for the user request will be handled by the AbstractSecurityInterceptor.
How Basic Authentication works in Spring Security?
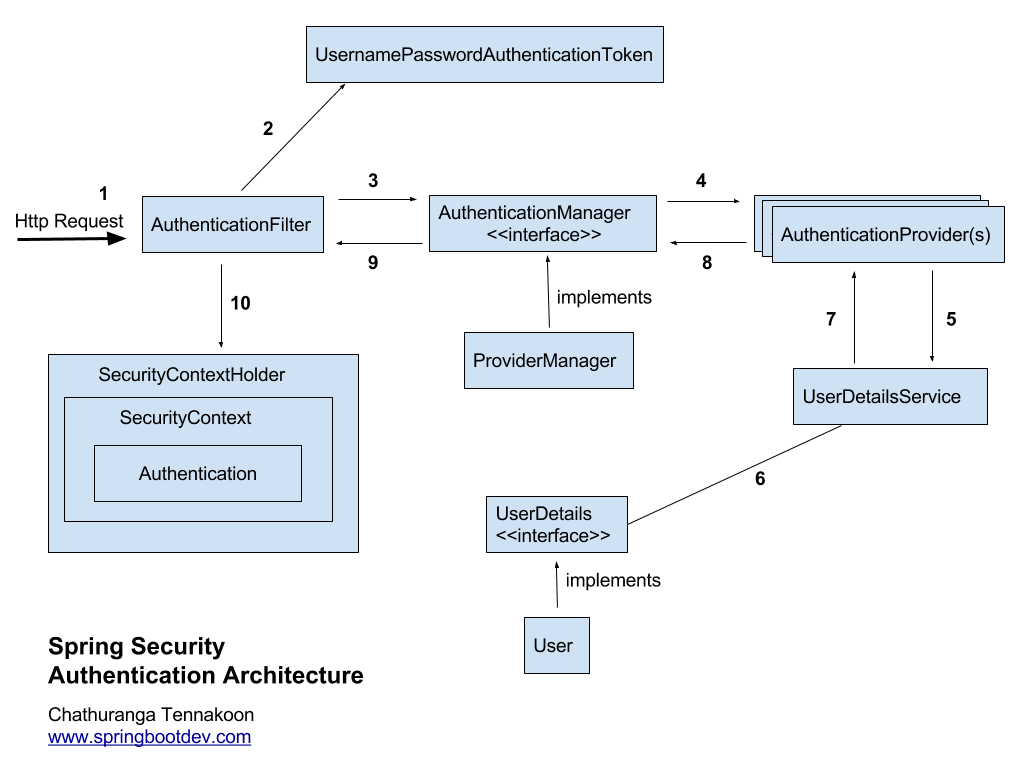
I have already described the Spring Security Authentication Architecture in a previous article. So i am not going to repeat the same thing again in this article. If you do not know about the general authentication architecture of spring security, it is highly recommend to take a look at article about Spring Security Authentication Architecture before continue with this article.
Here it is expected to point out the major components and classes that are related to HTTP Basic authentication. Here is the architectural flow of HTTP Basic Authentication implementation in spring security.
How to configure Spring Security for HTTP Basic Authentication?
When you use the httpBasic() configuration element (In HttpSecurity configuration), Spring Security BasicAuthenticationFilter comes into action.
In Spring Security, the following two classes are the main core (important) classes that supports to implement HTTP Basic Authentication.
BasicAuthenticationFilter
BasicAuthenticationEntryPoint
A BasicAuthenticationEntryPoint strategy will be configured into the ExceptionTranslationFilter on startup.