As a developer, i am pretty sure that you may have come across with scenarios where you need to store images (either user uploaded or application itself) of your application. There are several possibilities to store file(s) as follows.
Store the file(s) somewhere in the hosting server where the application is deployed (if it is a web application).
Store the file(s) in the database as binary files.
Store the file using cloud storage services.
Here we are going to evaluate the third option (given above) which is “Store the file using cloud storage services“.
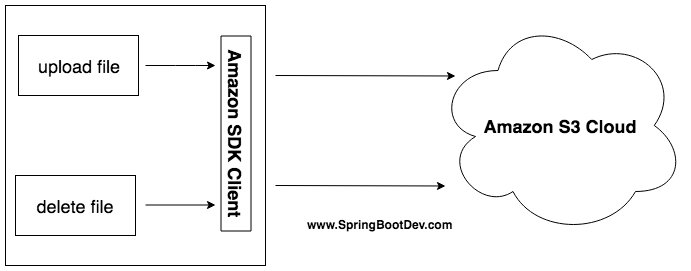
Amazon Simple Storage Service (S3)is an AWS object storage platform which helps you to store the files in form of objects, and, store and retrieve any amount of data from anywhere. Each file stored in Amazon S3 (as an object) is represented using a key.
Spring Boot Application and Amazon S3 Cloud
AWS Java SDK supports various APIs related to Amazon S3 service for working with files stored in S3 bucket.
Amazon S3 Account Configuration
Please follow the instructions given in the Amazon S3 official documentation for creating and configuring the S3 account and bucket.
I believe that SLF4J is not a new concept for most of the java developers. Here we are going to look at the MDC feature of the logging framework. If you need to brush up your knowledge on SLF4J, here it is the time.
The Simple Logging Facade for Java (SLF4J) serves as a simple facade or abstraction for various logging frameworks, such as java.util.logging, logback and log4j.
SLF4J allows the end-user to plug in the desired logging framework at deployment time.
In this article, i am going to explain how to use SonarQube and JaCoCo as a Code Coverage and Source Code Quality analysis tool for Spring Boot application.
What is Code Coverage and why it is important?
Code Coverage is an important topic when it comes to Test Driven Development (TDD). most of the developers are curious to know how percentage of source code is covered with test cases developed (for both unit and integration tests).
Code Coverage shows the stats of how much of source code is covered and tested with test cases (both unit and integration) developed for the application. Therefore the code coverage analysis is an important fact of measuring the quality of the source code. we need to write the test cases to achieve higher code coverage which will increase the maintainability of the source code.
Technology Stack
The following technologies will be used for this article.
SonarQube
Docker
JaCoCo
Spring Boot Application with maven
Install and Run SonarQube with Docker
The most of the developers know the “SonarQube” as a code quality analysis tool. This has the capability of the executing Unit and Integration tests with given library/tool (such as Cobertura, JaCoCo etc..) and it gives a detailed analysis of code coverage of the source code. In this article, we will run SonarQube as a docker image. Therefore we need to have docker installed in our development environment.
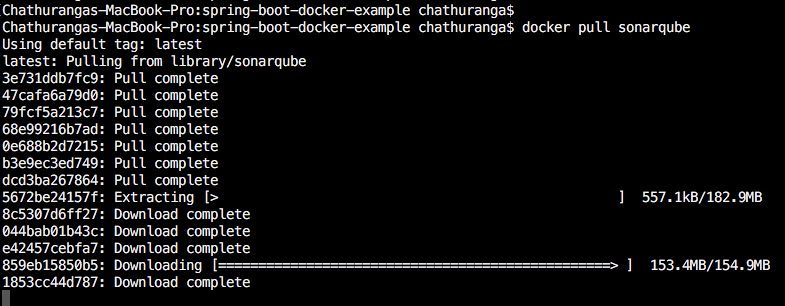
If you do not have SonarQube in your local development environment, you can download it with following command.
docker pull sonarqube
Once the SonarQube docker image is retrieved, it can be run with following command.
docker run -d --name sonarqube -p 9000:9000 -p 9092:9092 sonarqube
This will start a docker container based on the sonarqube image and give it the name sonarqube. Adding the -d means the container will run in detached mode (background). The -p 9000:9000 and 9092:9092 means that we expose port 9000 and 9092 to the host using the same port numbers.
Now you can navigate to http://localhost:9000 and you will see your local SonarQube dashboard.
JaCoCo Maven configuration
JaCoCo is a one of the famous code coverage library available for java based applications. In oder to add JaCoCo for the project, you have to add the following maven plugin (under the plugins) for the pom.xml of the project.
This file contains bidirectional Unicode text that may be interpreted or compiled differently than what appears below. To review, open the file in an editor that reveals hidden Unicode characters. Learn more about bidirectional Unicode characters
(This should be added under the plugins section of the pom.xml of the project)
JaCoCo Test Coverage Analysis with SonarQube
First you need to run the test cases with maven before sending the report for the Sonar server. This can be done with following command.
mvn test
SonarQube has a really good integration with test code coverage. It allows you to analyze which parts of the code should be better covered, and you can correlate this with many other stats. If you want to send your report to your Sonar server the only thing you need to do is to execute the following command in the terminal. (make sure that you have run the mvn test command successfully before executing the below command)
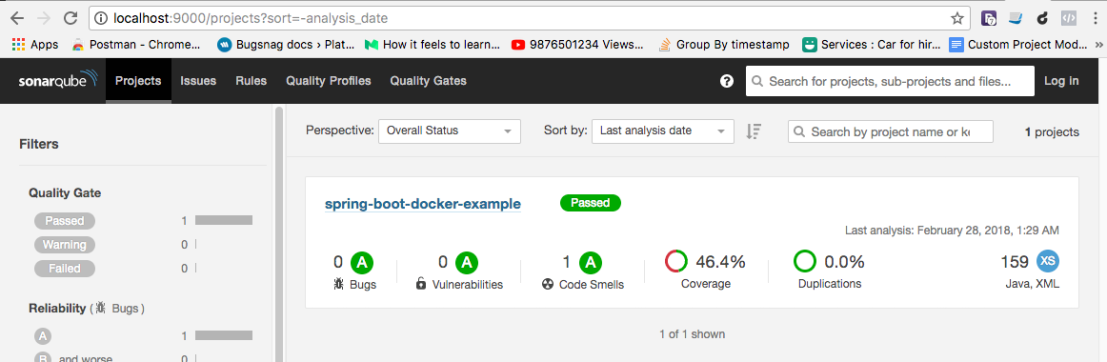
Then it will send the inspection report to the SonarQube and you can access thedetailed report through http://localhost:9000 using the specified login credentials.
username : admin
password : admin
Run as a Single Command
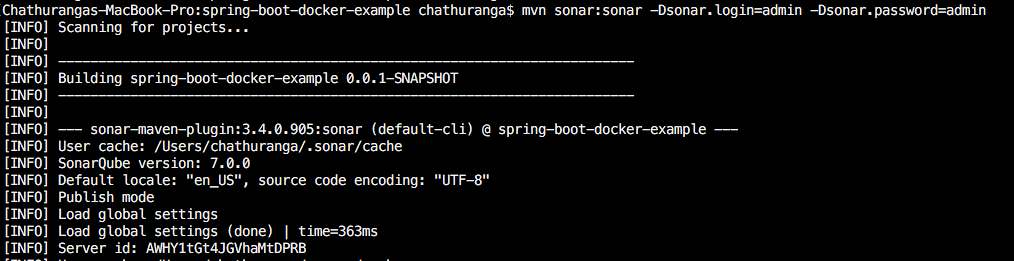
As you can see that we have used two separate commands for integrating test result analysis with sonar.
Both of above commands can be composed into one single command as follows.
mvn test sonar:sonar -Dsonar.login=admin -Dsonar.password=admin
Exclude Classes from Code Coverage Analysis
In the code coverage analysis we focus only about the classes that should be covered with unit and integration tests. that mens the controllers, repositories, services and domain specific classes. There are some classes which are not covered by either unit or integration tests. In order to get the correct figure of code coverage analysis, it is required to exclude those non related classes when performing code coverage analysis.
E.g:- configuration related classes (SpringBootApplication configuration class, SpringSecurityApplication configuration class etc..) should be avoided
This can be done with adding the classes as classes to be excluded under the “properties” section of pom.xml.
You can add multiple exclusions and each of them should be separated by comma. According to the above configuration, SpringBootDockerExampleApplication and any class under the config package will be excluded/ignored when performing code coverage analysis.
In this tutorial, i am going to show you how to develop an Spring Boot REST Api application that runs on docker container. This is just a brief and quick demo of setting up spring boot application with docker. In this article, i have focused only on showing the steps of integrating docker support (for building and running image) for the spring boot web application.
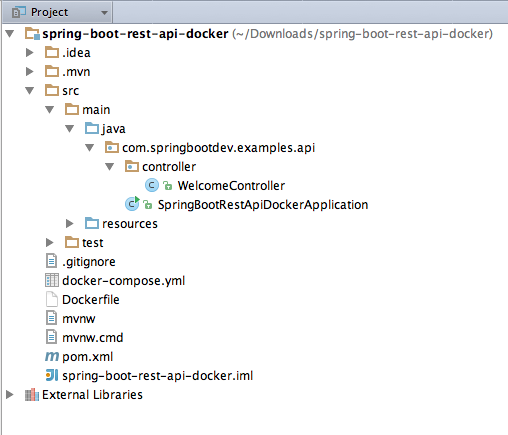
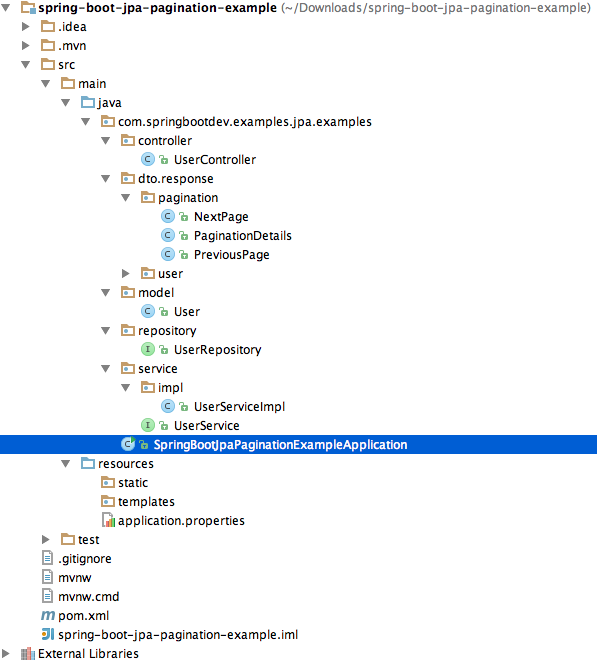
The fully source code of the application can be found at GitHub. Click here to download. The project file structure will be as follows.
Here is the implementation of the WelcomeController.java
This file contains bidirectional Unicode text that may be interpreted or compiled differently than what appears below. To review, open the file in an editor that reveals hidden Unicode characters. Learn more about bidirectional Unicode characters
Dockerfile contains the command and instructions for building the docker image from the project. The contents of the Dockerfile related to this project, can be given as follows.
This file contains bidirectional Unicode text that may be interpreted or compiled differently than what appears below. To review, open the file in an editor that reveals hidden Unicode characters. Learn more about bidirectional Unicode characters
java8 will be identified as the base image for this application. Therefore the final docker image for this application should be built based on java8 docker image. (in other words, in order to run this application, java8 docker image is required)
WORKDIR /app
working directory has been set as the /app. This directory will be created in the container and run the specified commands from this directory.
COPY
The copy command will copy the file from local project environment to docker image being built. The file target/spring-boot-docker-example-0.0.1-SNAPSHOT.jar in the local project environment will be copied as /app/spring-boot-app.jar.
ENTRYPOINT
The specified command will be executed once the docker image is successfully deployed and container is booted up.
docker-compose.yml
docker-compose is a utility/tool that is used to run multi container docker applications. docker-compose utility will read the docker-compose.yml file for setting up the related services for the application. This file should contains the declaration of the services that are required to run the application. If you need to run any service as a separate docker container, then you should declare it in the docker-compose.yml file.
The content of the docker-compose.yml file related to this project can be shown as follows.
This file contains bidirectional Unicode text that may be interpreted or compiled differently than what appears below. To review, open the file in an editor that reveals hidden Unicode characters. Learn more about bidirectional Unicode characters
The document complies with docker-compose document version 3.
The service name is “spring-boot-rest-api-app” andimage name is “spring-boot-rest-docker-image“. The service should be deployed form the given image and if the image does not exist, it should be built with the Dockerfile available in the current working directory.
The port 8080 of the docker container should be mapped to the port 8087 of the docker host. So the service can be externally accessed with port 8087.
spring-boot-rest-api-app container will use the /data/spring-boot-app volume for managing data.
Building the project with maven
Since the Dockerfile depends on the final built artifact of the project (that is target/spring-boot-rest-api-docker-0.0.1-SNAPSHOT.jar), we need to build final deployable artifact before moving forward with building the docker image. This can be done with following command.
mvn clean install
Now the project is successfully built and we can move forward with building docker image and running it in a docker container.
Building the docker image
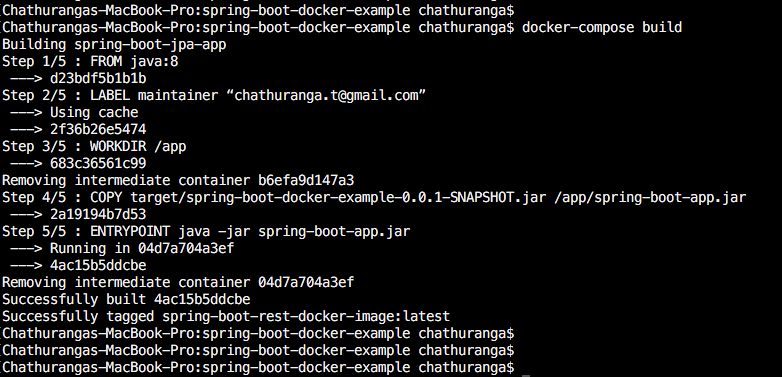
In terminal, go to the directory where your docker-compose.yml file is available. Then run the following command for building the docker image.
docker-compose build
This command can be used to build new image or rebuild existing images. That means if there is no docker image available for the given name, then it will directly build the image. Otherwise the existing image (already available image for the given name) will be removed and rebuild the image.
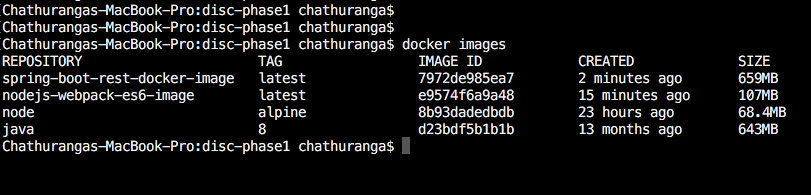
you can get a list of docker images available in the docker platform with following command and verify wether the image has been successfully built.
docker images
you can notice that the “spring-boot-rest-docker-image” is successfully built and available under the list of images.
Running application with docker-compose
This can be done with following command.
docker-compose up
After executing the above command, it will look for the services declared in the docker-compose.yml file and deploy and start each service in separate docker container.
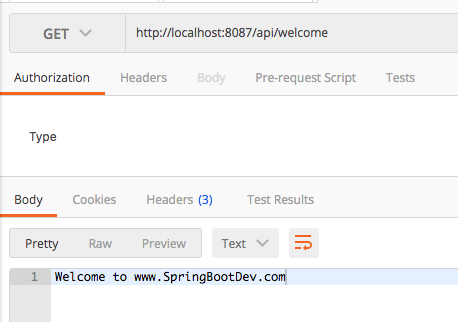
Now, we should be able to access the REST api endpoint available in the WelcomeController.
The purpose of this article is to demonstrate the Pagination and its related features with Spring Boot and Spring Data JPA. Therefore in order to keep this article simple and well focused, i will discuss only the pagination related topics with Spring Data JPA. Here i have assumed that you have a prior (basic) knowledge of Spring Boot and Spring Data JPA and you know how to develop a basic application.
The following command can be executed to run the application.
mvn spring-boot:run
Now the sample application is up and running.
UserController
This file contains bidirectional Unicode text that may be interpreted or compiled differently than what appears below. To review, open the file in an editor that reveals hidden Unicode characters. Learn more about bidirectional Unicode characters
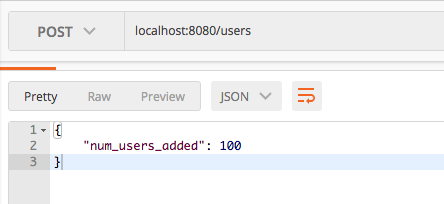
createUsers :- As described above, this endpoint is used to create set of dummy data required to run this demonstration application.
Now your users table of the targeted database is populated with some dummy data entries. Lets look at the paginated REST api endpoints implementation in detailed.
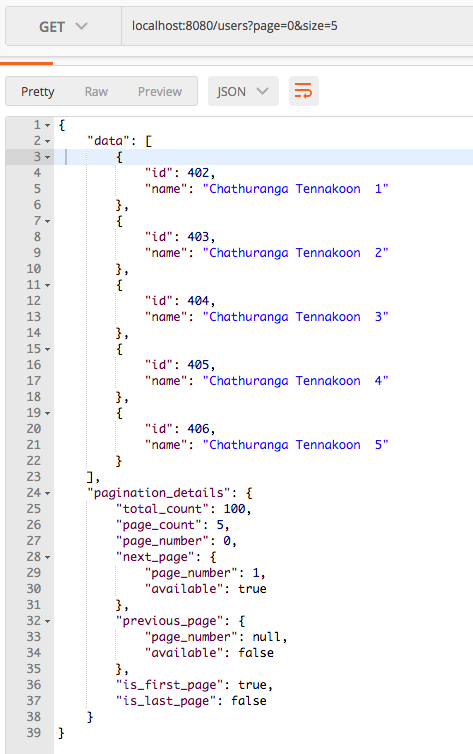
Pagination: – User specified page and page size
In here the the related page that need to be fetched and page size (number of items need to be fetched) can be specified runtime (when the REST endpoint is invoked)
The page number should start from zero and it may increase based on the number of records available and page size.
Here you can see that the page is 0 (first page) and size (number of items per page) is 5. You can invoke the above REST api endpoints by changing page and size parameters.
Lets look at the code of the method responsible for handling above REST Api invocation.
@GetMapping("/users")
public UserResponse getUsers(Pageable pageable)
{
   Page page = userService.findUsers(pageable);
   return new UserResponse(page);
}
Notice that we haven’t passed RequestParams to our handler method . When the endpoint /users?page=0&size=5 is hit, Spring would automatically resolve the page and size parameters and create a Pageable instance with those values . We would then pass this Pageable instance to the Service layer ,which would pass it to our Repository layer .
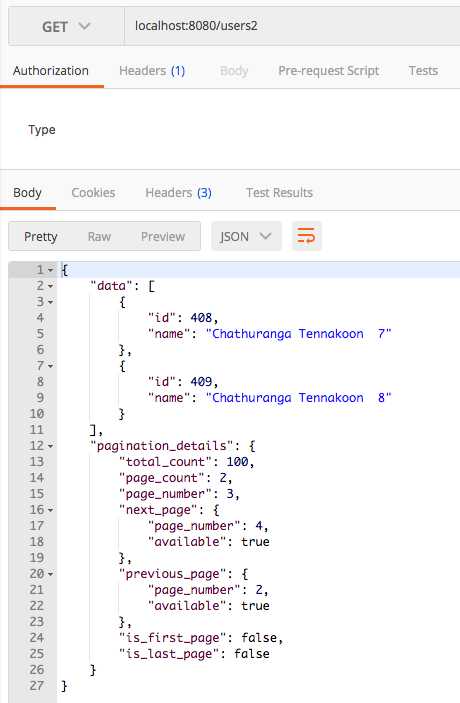
Pagination: – Application specified page and page size
In here the, page and page size is set by the application itself. The user does not have to provide any parameter and it is delated in the application with some pre-defined classes.
Here is the method responsible for handling above REST api invocation. (Note: “users2“)
@GetMapping("/users2")
public UserResponse getUsers2()
{
 int pageNumber = 3;
 int pageSize = 2;

 Page page = userService.findUsers(PageRequest.of(pageNumber, pageSize));
 return new UserResponse(page);
}
Here you can see that the page is 3 and size (number of items per page) is 2. After invoking above endpoint, you will get the following result.
UserRepository is not directly extended from PagingAndSortingRepository
If you look a the the source code of the UserRepository class, you will notice that it is not directly inherited from the PagingAndSortingRepository. You might be wondering how this pagination works without extending the PagingAndSortingRepository.
Let me explain. UserRepository is extended from the JpaRepository.
If you examine the source code of the JpaRepository, you will notice that it is extended from PagingAndSortingRepository. Therefore any repository which is inherited from the JpaRepository will have the related methods and functionalities related to pagination.
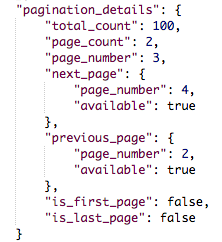
Pagination related details (more)
If you go through the source code, you can find three classes (application specific) that are developed to encapsulate the pagination related details. They can be listed as follows. (please find some time to go through those classes)
PaginationDetails
NextPage
PreviousPage
Those three classes help to display the paginated related details in well formatted and descriptive manner as follows.
We have called the method of PagingAndSortingRepository:
Page<T> findAll(Pageable pageable);
It returns a Page. Page contains the information about pagination and actual data being retrieved.
getContent() method of Page can be used to get the data as a List.
In addition, Page has set of methods (inherited from Slice) those can be used to retrieve different pagination related details.
If you have any queries, related to this article, please feel free to drop a comment or contact me.
In your software development life, you might be having an experience about different application environments such as DEVELOPMENT, STAGING and PRODUCTION. The developed applications are normally deployed in these environments. The most of the time these environments are set up in separate servers and they are known as :
Development Server
Staging Server
Production Server
Each of these server environments has their own configuration and connection details. These details might be different from one server to another.
e.g:-
MySQL or some other database connection details
RabbitMQ server and connection details etc....
Therefore we should maintain separate configuration/properties files for each server environment and we need to pick up the right configuration file based on the server environment.
In traditional way, this is achieved by manually defining related configuration file when building and deploying the application. This requires few manual steps with some human resource involvement. Therefore there is a probability to arise deployment related issues. In addition, there are some limitations with the traditional approach.
What we should do if there is a requirement to programmatically register a bean based on the environment?
e.g:- The staging environment should have a separate bean implementation while development and production environments are having their own bean instances with different implementations.
The Spring Framework has come up with the solutions for above problems and made our life easier with annotation called @Profile.
@Profile
In spring the above deployment environments (development, staging and production) are treated as separate profiles. @Profile annotation is used to separate the configuration for each profile. When running the application, we need to activate a selected profile and based on activated profile the relevant configurations will be loaded.
The purpose of @Profile is to separate/segregate the creating and registering of beans based on the profiles. Therefore @Profile can be used with any annotation that has the purpose of either creating or registering bean in Spring IOC container. So the @Profile can be used with following annotations.
Any stereo type annotations (mainly used with @Component and @Service)
@Configuration and @Bean annotations
After reading the above note, the first question you might be asking yourself is that “Why @Profile is used mainly with @Component and @Service? “. Lets figure it out before moving forward.
Why @Profile annotation is used mainly with @Component and @Service annotations?
@Component designates the class as a spring managed component and @Service designates the class as the spring managed service. It makes a sense if the application creates different services and managed components based on the activated profiles. This is very logical and this should be the expected behavior of profiling.
Do you think that creating separate controllers and repositories based on different profiles make any sense? Is it logically acceptable? Different Controller for production environment and different ones for staging and development? Isn’t it crazy?
On the other hand, do you think that we need separate repositories based on profiles. Separate ones for development, staging and production? wait… wait.. wait… I agree with you that we need different database configurations and connection details for each of these environments. Does it mean that we need separate repositories? No right? The separate database connection details does not have any relation with repository.
Now i think you can understand why @Profile is not used with @Controller and @Repository.
What will happen if it is used with other stereotype annotations such as @Controller and @Repository?
It will work fine. I just just explained you the logical reasons behind of not using @Profile with @Controller and @Repository.
If you can logically prove that using @Profile with @Controller and @Repository annotations just do the right job for you, then you are free to go for it. But again think twice before proceeding.
Ok. Now you have an idea of how @Profile helps to create and register the relevant beans based on activated profiles. But i didn’t explain you how relevant application.properties file is picked up based on the activated profile. Lets look at it now.
Picking up the correct application.properties file with spring boot
According to our discussion, the application can be deployed in several server environments. Therefore the application should have different application.properties file for the deployment profile(or server environment). When the profile is activated, the corresponding application.properties file should be picked up.
How the properties files are named based on the profile and Spring Boot picks up the correct application.properties file?
We can have property file specific to a profile with the convention application-{profile}.properties. In this way we can have separate property file for different environment. If we have activated a profile, then the corresponding property file will be used by the spring boot application. We can also have a property file for default profile.
Suppose we have profiles as dev for development environment , prod for production environment and staging for staging environment. Then the property file will be listed as below.
Ok lets do some fantastic coding example with Spring @Profile. We will try to cover most of the concepts we discussed here.
What we are going to build.
We will build a simple REST api application that persists some data to MySQL database with Spring Data JPA. Here i am focused only with demonstrating @Profile and if you need to learn more about Spring Data JPA, please refer my article on that.
This application has three different databases that represents three different deployment profiles. deployment profiles are dev, staging and prod.
app_development_db  - database for the dev profile/environment
app_staging_db - database for the staging profile/environment
app_production_db  - database for the prod  profile/environment.
(If you want to run this application and see the output, make sure that you have created above three databases in the MySQL server)
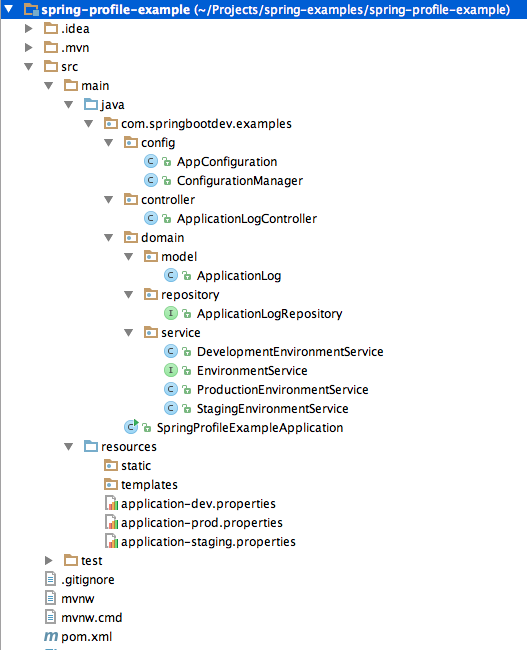
The source code of this example can be found at GitHub.
If you open up the project in your IDE, you can see the following files structure.
You can notice that we have created separateapplication.properties files for each profile.
So lets dig into some of the important source files.
This file contains bidirectional Unicode text that may be interpreted or compiled differently than what appears below. To review, open the file in an editor that reveals hidden Unicode characters. Learn more about bidirectional Unicode characters
ConfigurationManager is responsible for creating and registering the relevant/corresponding bean based on the activated profile.
EnvironmentService has different implementations for each profile. Based on the activated profile, the corresponding service bean will be created and registered.
This file contains bidirectional Unicode text that may be interpreted or compiled differently than what appears below. To review, open the file in an editor that reveals hidden Unicode characters. Learn more about bidirectional Unicode characters
This file contains bidirectional Unicode text that may be interpreted or compiled differently than what appears below. To review, open the file in an editor that reveals hidden Unicode characters. Learn more about bidirectional Unicode characters
This file contains bidirectional Unicode text that may be interpreted or compiled differently than what appears below. To review, open the file in an editor that reveals hidden Unicode characters. Learn more about bidirectional Unicode characters
Finally we will look at our ApplicationLogController.
This file contains bidirectional Unicode text that may be interpreted or compiled differently than what appears below. To review, open the file in an editor that reveals hidden Unicode characters. Learn more about bidirectional Unicode characters
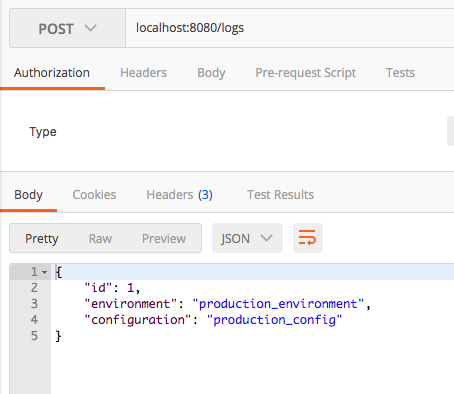
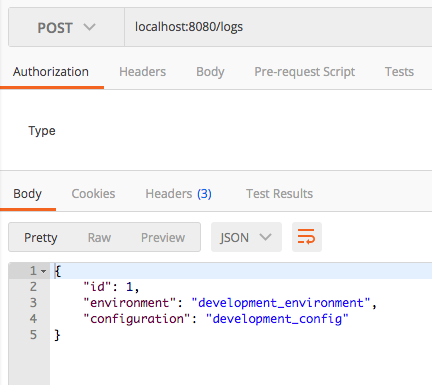
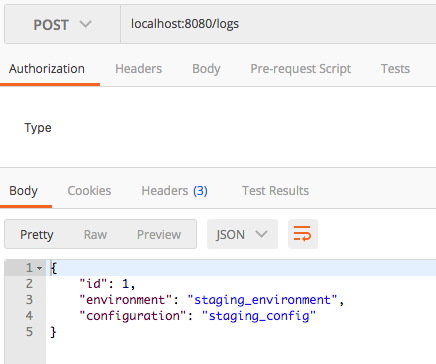
ApplicationLogController has exposed following REST endpoint.
POST /logs
This will persists the ApplicationLog entries with the aid of ApplicationLogRepository. After that it reruns the persisted log entry. This can be seen in the body of the HTTP Response.
AppConfiguration has been auto-wired with the registered configuration bean based on the activated profile.
EnvironmentService will also be auto-wired with the created service bean based on the activated profile.
Ultimately, the persisting database will be decided on the selected properties file based activated profile.
Since everything depends on the activated profile, we need to run this application by activating any of these three profiles. Then we can see the result and understand how it works.
Running the Application by activating profiles.
The profile can be activated with following command.
-Dspring.profiles.active=<<profile-name>>
Therefore the practical uses of the command can be given as follows.
Running spring boot application by enabling “prod” profile
mvn spring-boot:run -Dspring.profiles.active=prod
Running the application as a jar file by enabling the dev profile
Lets run the application and examine how the profile works. In order to identify how it works, please check all three databases after each REST api call.
As i have already mentioned, please check all three database after each REST api call. Then you will notice that only the corresponding application.properties file is picked up and the connection for the given database is made.
Sometimes you may have noticed that some of the spring application projects (specially spring boot applications) uses @EntityScan and @EnableJpaRepositories annotations as a part of configuring Spring Data JPA support for the application.
But some of the spring boot applications managed to complete their configurations and run the applications with Spring Data JPA WITHOUT those two annotations.
You might be having a little confusion about the real usages of those two annotations and when to use them? that is fine. The purpose of this article is to describe about the real usages of those two annotations and giving a full picture/idea of how to and when to use them properly.
What is the Spring Boot main application package?
It is the package that contains the Spring Boot main configuration class that is annotated with @SpringBootApplication annotation.
@SpringBootApplication annotation
This annotation automatically provides the features of the following annotations
@Configuration
@EnableAutoConfiguration
@ComponentScan
Spring Boot Auto-Configuration Feature with @EnableAutoConfiguration
If you want to get the maximum advantage of spring boot’s auto configuration feature, it is expected to put all your class packages under spring boot main application package (directly in main package or indirectly as sub packages).
The @EnableAutoConfiguration will scan the main package and its sub packages when executing the spring boot auto configuration feature for class path dependencies. If any class or package that is outside from the main application package and it is required for completing auto configuration for some dependency, then should be declared in the main configuration class properly (with related annotation).
Then the @EnableAutoConfiguration will scan for those declared packages for detecting the required classes in the process of completing/doing the auto configuration for the application dependency declared in the class path. Those can de described as follows.
@EnableJpaRepositories
This will enable the JPA repositories that contains in the given package(s).
For instance, Enabling auto configuration support for Spring Data JPA required to know the path of the JPA the repositories. By default, it will scan only the main application package and its sub packages for detecting the JPA repositories. Therefore, if the JPA repositories are placed under the main application package or its sub package, then it will be detected by the @EnableAutoConfiguration as a part of auto configuring the spring based configurations. If the repository classes are not placed under the main application package or its sub package, then the relevant repository package(s) should be declared in the main application configuration class with @EnableJpaRepositories annotation. Then this will enable the JPA repositories contains in the given/declared package(s).
If the entity classes are not placed in the main application package or its sub package(s), then it is required to declare the package(s) in the main configuration class with @EntityScan annotation. This will tells spring boot to where to scan for detecting the entities for the application. Basically @EnableAutoConfiguration will scan the given package(s) for detecting the entities.
Lets look at some fun and real code examples. Here i am not going to explain you the Spring Data JPA here. It has already been discussed in my following article.
If you open the project in your IDE, you will notice that repository and entity packages are not placed in the main application package.
main application package
com.springbootdev.examples
JPA repository classes are in package
com.springbootdev.domain.repository
entity classes are in package
com.springbootdev.domain.entity
Therefore the entity classes location and JPA repositories location should be declared and enabled with @EntityScan and @EnableJpaRepositories annotations respectively. Otherwise the application will fail to load.
Please refer the following Spring Boot main configuration class.
This file contains bidirectional Unicode text that may be interpreted or compiled differently than what appears below. To review, open the file in an editor that reveals hidden Unicode characters. Learn more about bidirectional Unicode characters
Today i am going to explain how to develop simple CRUD (Create,Retrieve,Update and Delete data) application with Spring Boot and Spring Data JPA. the application will be simple web application and which will expose few REST endpoints for CRUD related operations.
What is Spring Data JPA?
Spring Data JPA is a sub project that comes under the Spring Data project and it is under the umbrella/shelter of Spring family. This will implements the JPA (Java Persistence Api) specification and have classes and methods for accessing and managing the data tier of the application. It tries to simplify the complexity associated with the data access layer of the application. As i have already mentioned, Spring Data JPA has following objectives.
provides a better implementation for the JPA Specification.
avoid the complexity associated with the Data Access layer of the application (by providing a framework that is easy to implement and having robust features)
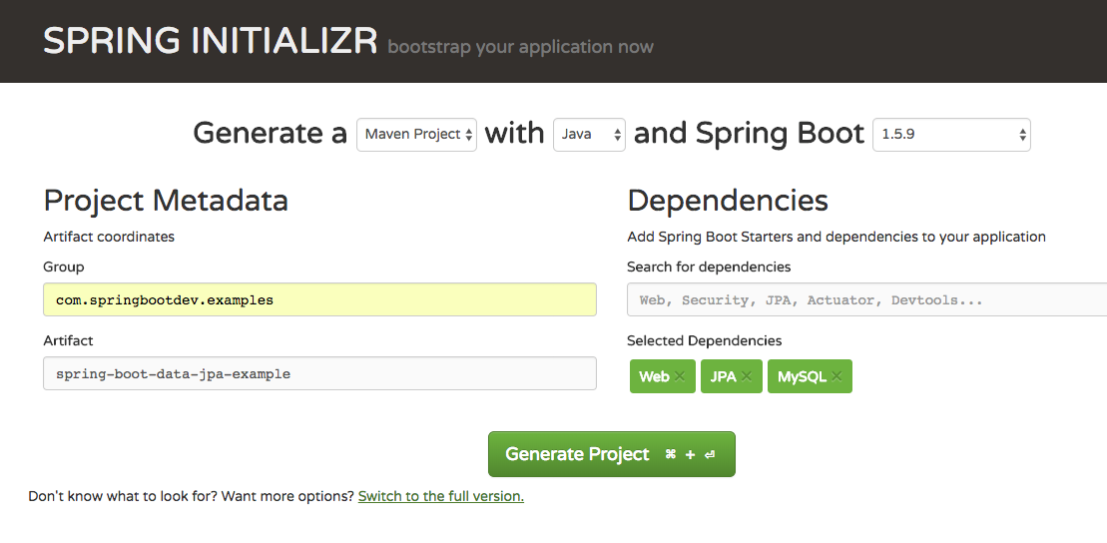
So it is enough with theories. lets explore and play with the framework. As usual. i have used the https://start.spring.io/ for generating the project.
As you can see in the generation wizard, we are using two dependencies other than web dependency. That is JPA and MySQL.
JPA – Represents the maven dependency for Spring Data JPA.
MySQL – Represents the maven dependency for mysql-jdbc-connector
So Lets Open the pom.xml file and look at the dependency section for identifying those dependencies.
This file contains bidirectional Unicode text that may be interpreted or compiled differently than what appears below. To review, open the file in an editor that reveals hidden Unicode characters. Learn more about bidirectional Unicode characters
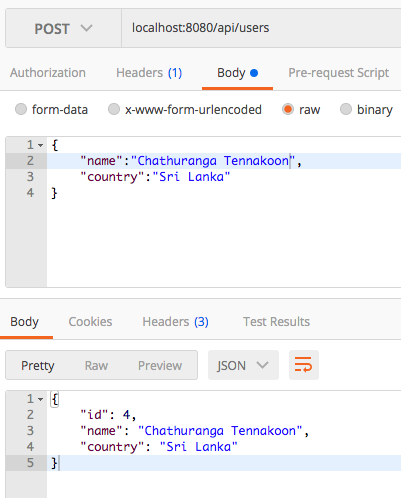
We will do CRUD related operations with a user object and ultimately we will build a REST api application with four endpoints for CRUD related operations.
HTTP POST /api/users For creating the user
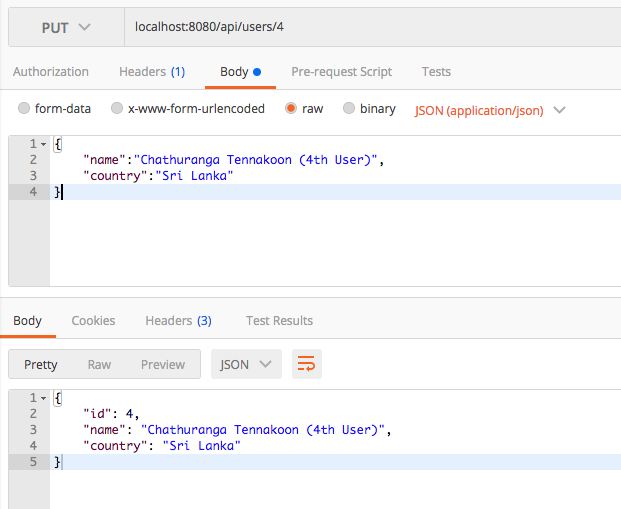
HTTP PUT /api/users For updating the user
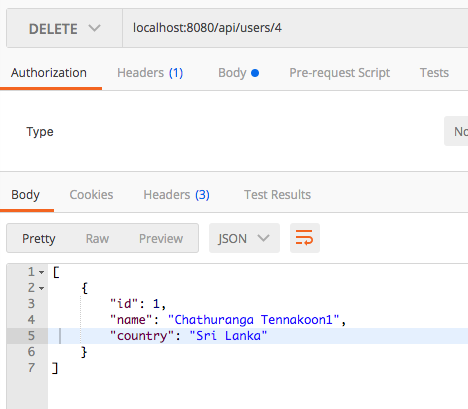
HTTP DELETE /api/users/:user_id For deleting the user
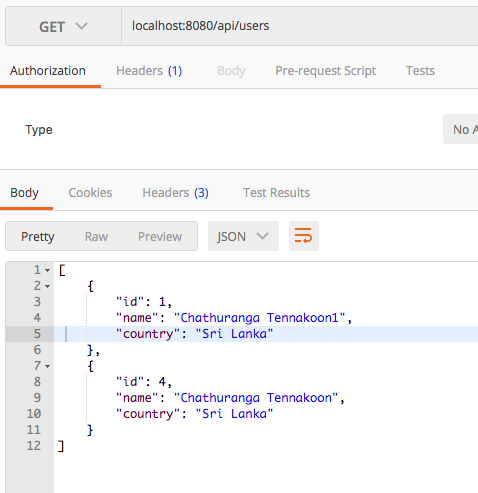
HTTP GET /api/users For retrieving all the users
Where do we start?
Spring Data JPA is all about creating Entities and Repositories.
Entity lives in between java object (java class) and relational table. It helps to map the java object to relational table and relational table back to java object.
Repository helps to perform CRUD related operations with Entity.
The actual definition of Entity and Repository might be different from the explanation that i have given. Basically i just wanted to simply point out the exact purpose/role of Entity and Repository.
So Lets create our Entity and Repository.
Creating the Entity
The Entity class will be the following class.
This file contains bidirectional Unicode text that may be interpreted or compiled differently than what appears below. To review, open the file in an editor that reveals hidden Unicode characters. Learn more about bidirectional Unicode characters
The most important thing that you should note here is that we have used java persistence api (JPA annotations) based annotation here. No any framework specific annotation used. This is to compatible with other JPA implemented/supported ORM frameworks. For instance, if you have developed the data layer to compliant/adherent with JPA specification, then it will be possible to switch with different JPA implementations with minimal effort.
Creating the Repository
Creating a JPA based repository is very simple. You have to create an interface that extends the JpaRepository interface by providing the generic parameter, the Entity class and ID type. Here is the sample code for implementing UserRepository.
This file contains bidirectional Unicode text that may be interpreted or compiled differently than what appears below. To review, open the file in an editor that reveals hidden Unicode characters. Learn more about bidirectional Unicode characters
All the methods required for the CRUD related operations will be inherited from the super level/parent interfaces. Therefore we do not have to explicitly add or implement CRUD related methods.
Now we have created both Entity class and Repository. Next step is to configure/provide the mysql connection details. It can be provided in the application.properties file.
This file contains bidirectional Unicode text that may be interpreted or compiled differently than what appears below. To review, open the file in an editor that reveals hidden Unicode characters. Learn more about bidirectional Unicode characters
This will try to connect to the database “spring_examples_db” running on local mysql server “localhost” on port “3306” by providing the username “root” and password “test123“. You should change these properties based on your mysql server details.
Now we should implement our REST endpoints for creating, updating, removing and listing users etc…. Please refer the below UserController.
This file contains bidirectional Unicode text that may be interpreted or compiled differently than what appears below. To review, open the file in an editor that reveals hidden Unicode characters. Learn more about bidirectional Unicode characters
 @PostMapping("/users")
 public User create(@RequestBody User user)
 {
      return userRepository.save(user);
 }
@RequestBody – The body of the HTTP request will be mapped to the User class.
@ResponseBody – The retuned object will be mapped to the body of the HTTP response.
Retrieving all the users
GET /api/users
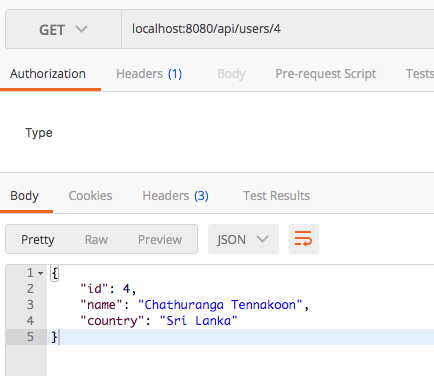
Retrieving a specific User/Resource
GET /api/users/{user_id}
Updating a Specific User/Resource
PUT /api/users/{user_id}
Removing a Specific User/Resource
DELETE /api/users/{user_id}
Once the requested resource is successfully removed, it will return a list of available users.
Ok. we have completed all the REST endpoints for managing users with Spring Data JPA.
Finally we will look at the Spring Boot main configuration class.
This file contains bidirectional Unicode text that may be interpreted or compiled differently than what appears below. To review, open the file in an editor that reveals hidden Unicode characters. Learn more about bidirectional Unicode characters
The configuration class is very simple and we have fully utilized the advantages of spring boot and no additional configurations have been made. We have taken fully advantage of spring boot auto configuration feature.
Why didn’t we use @EntityScan or @EnableJpaRepositories annotations here?
The package that contains the main Spring Boot Application configuration class (that is annotated with @SpringBootApplication) is known as the main application package.
If the entity classes and repository classes are placed under the spring boot main application package or its sub package, the spring boot will take care of detecting and scanning of entities and repositories. In such case wed do not have to explicitly declare the packages of Entities and Repositories with @EntityScan and @EnableJpaRepositories annotations respectively.
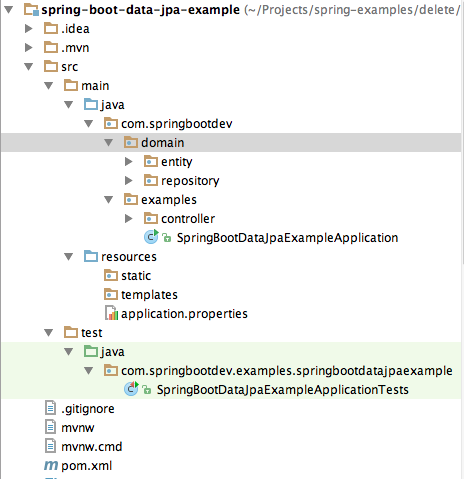
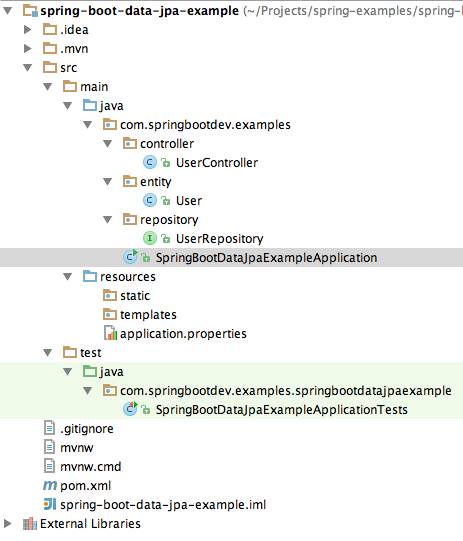
Please refer the below project structure.
If you look at the project file structure, you can notice that entity and repository packages are sub packages of the main application package. Therefore the entities and repositories placed under those packages will be automatically scanned and detected when the spring boot application is loaded.
In this article, i am expected discuss about the Spring’s Asynchronous task execution capability with @Async annotation. In software development, we have found some situations/scenarios where we need to execute some code segments/piece of logics asynchronously. The following situations can be given as the examples.
sending email or sms for a user.
complex logic/data processing
Assume that you are trying to register for http://www.facebook.com and you are filling the registration form. once the registration form is summited, facebook should send you a confirmation email to activate your account. It will take considerable amount of time to send the confirmation email to the user. This is because, the facebook application may need to connect with the email server to send the email. Assume that it takes around 15 seconds to send the email. Then what will be your user experience.
Synchronous way: You need to stay on the registration page until the application send you the confirmation email. Once the email is sent, the application will return a success response back to the application. No choice. You have to hang on the registration page for at least 15 seconds (as we have agreed) to get the success notification on the registration. In the technical point of view, the caller Thread will get blocked (will have to wait) until all the logics are get executed.
Asynchronous way: The task of sending email is delegated to a separate thread and it will be executed in the background (in a separate thread). Then the application does not wait until the email is sent and immediately send the success response back to the caller (ma be for the front end application). In technical point of view, the caller does not have to wait until the all the logics get executed. Those will be executed in background threads.
The optimal and correct way to execute these tasks as asynchronous background tasks.
Spring support for Asynchronous task execution
In spring it is possible to execute asynchronous tasks with @Async annotation. The logic inside the method that is annotated with @Async will be executed in a new separate thread. It does not execute in the caller’s thread.
Spring configuration for Asynchronous
@EnableAsync
This is a class level annotation and should be applied for any of the configuration class. This will enable the spring asynchronous task execution support for your application. Normally, this can be applied in the main configuration class of the application. The following code segment demonstrates the use of @EnableAsync with spring boot project.
@SpringBootApplication
@EnableAsync
public class SpringBootApplication{
(configuration class means a class that is annotated with @Cofiguration )
Is it required to use @EnableAsync ?
If you do not have applied this annotation for any of your configuration classes, the methods with @Async annotation will executed in the same thread. (caller thread)
@Async
This is a method level annotation. The code inside the annotated method will be executed in a new background thread (apart from the main thread).
Simply, if you need to execute a piece of code in a new background thread (Other than the calling thread), then put them inside a method that is annotated with @Async.
Few Rules with @Async
In order to apply the @Async for a method, it should meet the following requirements.
method should have the public access level.
method should have the void return type or the actual return type must be wrapped with Future interface (java.util.concurrent.Future).
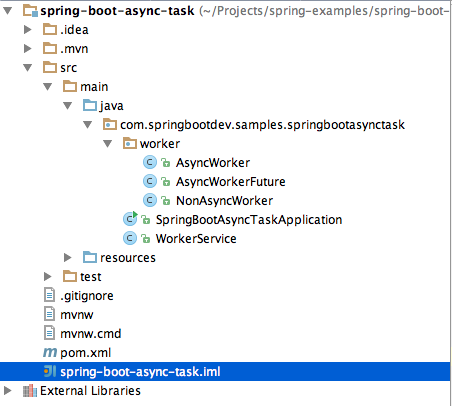
I have assumed that you have cloned the source code and open it in your preferable IDE. Now you will see the project structure as follows.
You will see that we have three workers.
AsyncWorker – for demonstrating spring asynchronous method execution.
NonAsyncWorker – for demonstrating the consequences of not using Spring asynchronous method execution. (executing the tasks in synchronous manner)
AsyncWorkerFuture – for demonstrating how the result of asynchronous method execution is retrieved with Future interface.
Building and Running the Project
This file contains bidirectional Unicode text that may be interpreted or compiled differently than what appears below. To review, open the file in an editor that reveals hidden Unicode characters. Learn more about bidirectional Unicode characters
By looking at the spring boot configuration file, you can see that this application is developed to be run as a command line application. In order to invoke the relevant worker, you need to provide the matching command line argument.
command for building the application.
mvn clean install
Executing the NonAsyncWorker
For executing the NonAsyncWorker, it is required to run the application with “non-async” as the command line argument.
when this command is run, the runNonAsyncWorkers() method of the WorkerService will get executed.
This file contains bidirectional Unicode text that may be interpreted or compiled differently than what appears below. To review, open the file in an editor that reveals hidden Unicode characters. Learn more about bidirectional Unicode characters
runNonAsyncWorkers() will repeatedly invoke the execute() method of the NonAsyncWorker five times. once all the invocation are over, it will log the total execution time before completing the method execution.
Here is the code of the NonAsyncWorker.
This file contains bidirectional Unicode text that may be interpreted or compiled differently than what appears below. To review, open the file in an editor that reveals hidden Unicode characters. Learn more about bidirectional Unicode characters
NonAsyncWorker has a one method called execute(). it will print the current thread name and wait for 3 seconds before completing the method.
Here is the console output after executing the NonAsyncWorker.
Now it is obvious that the WorkerService is started by the main thread and all the invocations of the NonAsyncWorker are also handled by the same thread (that is main thread). All of them will be executed in a sequential manner. Each invocation is guaranteed to be executed for at least 3 seconds. Therefore it should take at least 15 seconds to complete all interactions. If you properly examine the time log in console output, you will notice that our calculations has been proven.
Executing the AsyncWorker
In this way, each invocation will be handled in a separate thread apart from the calling(main) thread.
For executing the AsyncWorker, it is required to run the application with “async” as the command line argument.
java -jar target/spring-async-task-app.jar async
when this command is run, the runAsyncWorkers() method of the WorkerService will get executed.
This file contains bidirectional Unicode text that may be interpreted or compiled differently than what appears below. To review, open the file in an editor that reveals hidden Unicode characters. Learn more about bidirectional Unicode characters
runAsyncWorkers() will repeatedly invoke the execute() method of the AsyncWorker five times. once all the invocation are over, it will log the total execution time before completing the method execution.
Here is the code of the AsyncWorker.
This file contains bidirectional Unicode text that may be interpreted or compiled differently than what appears below. To review, open the file in an editor that reveals hidden Unicode characters. Learn more about bidirectional Unicode characters
AsyncWorker has a one method called execute(). it will print the current thread name and wait for 3 seconds before completing the method. Once the sleeping time is completed, it will log the name of the thread as completed.
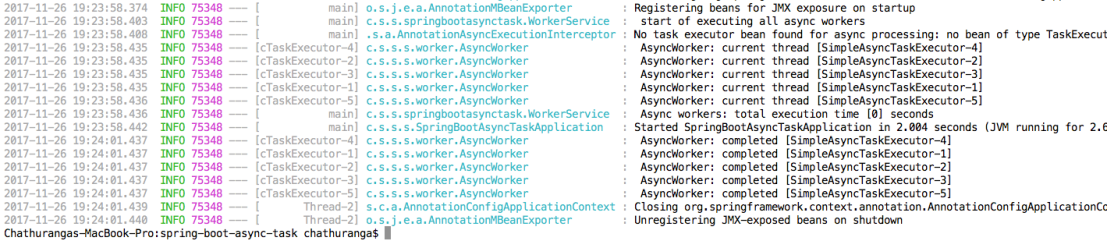
Here is the console output after executing the NonAsyncWorker.
You can see that all the invocations has been happened in the same time (even if it is not shown here, there should be milliseconds of delay between each invocation and that can be neglected). In addition, you can notice that each invocation is handled by a separate thread apart from the main thread. once the main thread has completed all iterations for method invocations, it will continue the main thread. you can see that all the interactions has been completed with less than 1 second. that is why it is logged as 0 seconds.(as i mentioned earlier, definitely there will be a milliseconds of duration)
each invocation has been waited/slept for 3 seconds and logged as completed with their handling thread name. If you look at the starting time and completing time of each thread, that is somewhere around 3 seconds. since all invocations has happened concurrently, it has taken only 3 seconds to complete all 5 invocations.
Executing Async work with Return (AsyncWorkerFuture)
In this way, each invocation will be handled in a separate thread apart from the calling(main) thread and main thread will wait to retrieve the result of the async task .
For executing the AsyncWorkerFuture, it is required to run the application with “async” as the command line argument.
java -jar target/spring-async-task-app.jar future
when this command is run, the runAsyncWorkersWithFutureReturnType() method of the WorkerService will get executed.
This file contains bidirectional Unicode text that may be interpreted or compiled differently than what appears below. To review, open the file in an editor that reveals hidden Unicode characters. Learn more about bidirectional Unicode characters
This file contains bidirectional Unicode text that may be interpreted or compiled differently than what appears below. To review, open the file in an editor that reveals hidden Unicode characters. Learn more about bidirectional Unicode characters
isDone() method of the Future can be used to check whether future is completed with the returned output. if it is completed, the get() method can be used to retrieve the result.
Here is the console output of the execution.
Hope you have got a good understanding of how to handle asynchronous method execution in spring.
You can use https://start.spring.io to generate the spring boot application as you are already aware.
It is very easy to create a spring boot application that is run on command line. You need to follow only two simple steps.
implements the CommandLineRunner interface.
override the run() method
if you have done above two steps, you are done with building the command line application with spring boot. here is the sample code segment.
This file contains bidirectional Unicode text that may be interpreted or compiled differently than what appears below. To review, open the file in an editor that reveals hidden Unicode characters. Learn more about bidirectional Unicode characters