database auditing means that keeping a track and log of the events (specially create and update) associated with the persistent entities. It keeps a track of who created or changed an entity and when the change happened.
I have seen projects storing these things manually. Doing so becomes very complex because you will need to write it completely on your own, which will definitely require lots of code — and lots of code means less maintainability and less focus on writing business logic.
But why should someone need to go to this path when both JPA and Hibernate provide automatic auditing, which we can be easily configured in your project? Basically the following information are maintained with database auditing.
created user (who created)
created date (when created)
last updated user (who updated)
last updated date (when updated)
Auditing with Spring Data JPA
Spring Data JPA provides some set of convenient and useful annotations for database auditing. It helps to keep a track of who did the change and when it was done.
Here in this article, I will discuss how we can configure JPA to automatically persist the audit related columns (created and modified information) for any entity with following annotations. (All these annotations are owned by the Spring Data JPA)
The purpose of this article is to demonstrate the Pagination and its related features with Spring Boot and Spring Data JPA. Therefore in order to keep this article simple and well focused, i will discuss only the pagination related topics with Spring Data JPA. Here i have assumed that you have a prior (basic) knowledge of Spring Boot and Spring Data JPA and you know how to develop a basic application.
The following command can be executed to run the application.
mvn spring-boot:run
Now the sample application is up and running.
UserController
This file contains bidirectional Unicode text that may be interpreted or compiled differently than what appears below. To review, open the file in an editor that reveals hidden Unicode characters. Learn more about bidirectional Unicode characters
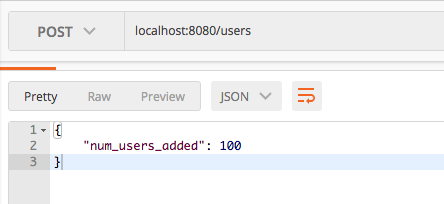
createUsers :- As described above, this endpoint is used to create set of dummy data required to run this demonstration application.
Now your users table of the targeted database is populated with some dummy data entries. Lets look at the paginated REST api endpoints implementation in detailed.
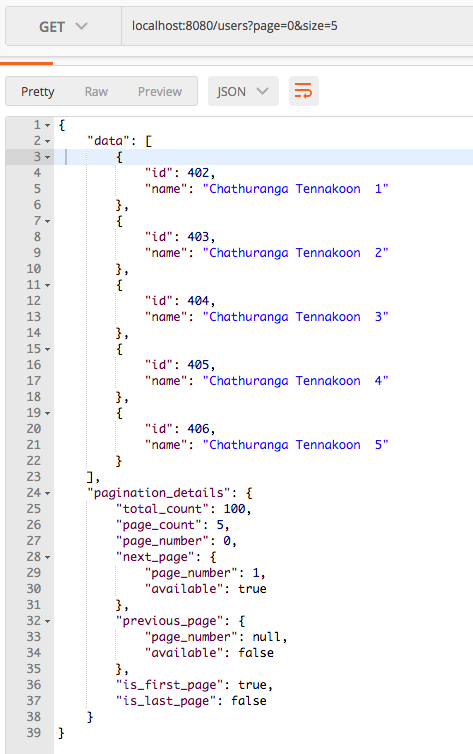
Pagination: – User specified page and page size
In here the the related page that need to be fetched and page size (number of items need to be fetched) can be specified runtime (when the REST endpoint is invoked)
The page number should start from zero and it may increase based on the number of records available and page size.
Here you can see that the page is 0 (first page) and size (number of items per page) is 5. You can invoke the above REST api endpoints by changing page and size parameters.
Lets look at the code of the method responsible for handling above REST Api invocation.
@GetMapping("/users")
public UserResponse getUsers(Pageable pageable)
{
   Page page = userService.findUsers(pageable);
   return new UserResponse(page);
}
Notice that we haven’t passed RequestParams to our handler method . When the endpoint /users?page=0&size=5 is hit, Spring would automatically resolve the page and size parameters and create a Pageable instance with those values . We would then pass this Pageable instance to the Service layer ,which would pass it to our Repository layer .
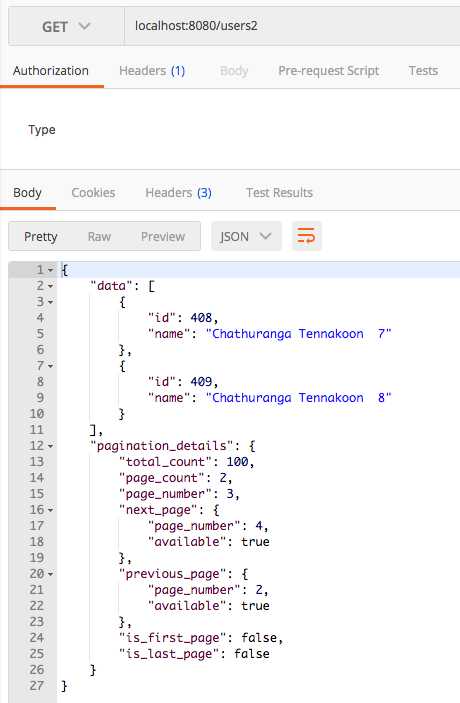
Pagination: – Application specified page and page size
In here the, page and page size is set by the application itself. The user does not have to provide any parameter and it is delated in the application with some pre-defined classes.
Here is the method responsible for handling above REST api invocation. (Note: “users2“)
@GetMapping("/users2")
public UserResponse getUsers2()
{
 int pageNumber = 3;
 int pageSize = 2;

 Page page = userService.findUsers(PageRequest.of(pageNumber, pageSize));
 return new UserResponse(page);
}
Here you can see that the page is 3 and size (number of items per page) is 2. After invoking above endpoint, you will get the following result.
UserRepository is not directly extended from PagingAndSortingRepository
If you look a the the source code of the UserRepository class, you will notice that it is not directly inherited from the PagingAndSortingRepository. You might be wondering how this pagination works without extending the PagingAndSortingRepository.
Let me explain. UserRepository is extended from the JpaRepository.
If you examine the source code of the JpaRepository, you will notice that it is extended from PagingAndSortingRepository. Therefore any repository which is inherited from the JpaRepository will have the related methods and functionalities related to pagination.
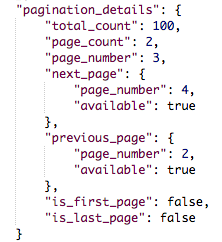
Pagination related details (more)
If you go through the source code, you can find three classes (application specific) that are developed to encapsulate the pagination related details. They can be listed as follows. (please find some time to go through those classes)
PaginationDetails
NextPage
PreviousPage
Those three classes help to display the paginated related details in well formatted and descriptive manner as follows.
We have called the method of PagingAndSortingRepository:
Page<T> findAll(Pageable pageable);
It returns a Page. Page contains the information about pagination and actual data being retrieved.
getContent() method of Page can be used to get the data as a List.
In addition, Page has set of methods (inherited from Slice) those can be used to retrieve different pagination related details.
If you have any queries, related to this article, please feel free to drop a comment or contact me.
Sometimes you may have noticed that some of the spring application projects (specially spring boot applications) uses @EntityScan and @EnableJpaRepositories annotations as a part of configuring Spring Data JPA support for the application.
But some of the spring boot applications managed to complete their configurations and run the applications with Spring Data JPA WITHOUT those two annotations.
You might be having a little confusion about the real usages of those two annotations and when to use them? that is fine. The purpose of this article is to describe about the real usages of those two annotations and giving a full picture/idea of how to and when to use them properly.
What is the Spring Boot main application package?
It is the package that contains the Spring Boot main configuration class that is annotated with @SpringBootApplication annotation.
@SpringBootApplication annotation
This annotation automatically provides the features of the following annotations
@Configuration
@EnableAutoConfiguration
@ComponentScan
Spring Boot Auto-Configuration Feature with @EnableAutoConfiguration
If you want to get the maximum advantage of spring boot’s auto configuration feature, it is expected to put all your class packages under spring boot main application package (directly in main package or indirectly as sub packages).
The @EnableAutoConfiguration will scan the main package and its sub packages when executing the spring boot auto configuration feature for class path dependencies. If any class or package that is outside from the main application package and it is required for completing auto configuration for some dependency, then should be declared in the main configuration class properly (with related annotation).
Then the @EnableAutoConfiguration will scan for those declared packages for detecting the required classes in the process of completing/doing the auto configuration for the application dependency declared in the class path. Those can de described as follows.
@EnableJpaRepositories
This will enable the JPA repositories that contains in the given package(s).
For instance, Enabling auto configuration support for Spring Data JPA required to know the path of the JPA the repositories. By default, it will scan only the main application package and its sub packages for detecting the JPA repositories. Therefore, if the JPA repositories are placed under the main application package or its sub package, then it will be detected by the @EnableAutoConfiguration as a part of auto configuring the spring based configurations. If the repository classes are not placed under the main application package or its sub package, then the relevant repository package(s) should be declared in the main application configuration class with @EnableJpaRepositories annotation. Then this will enable the JPA repositories contains in the given/declared package(s).
If the entity classes are not placed in the main application package or its sub package(s), then it is required to declare the package(s) in the main configuration class with @EntityScan annotation. This will tells spring boot to where to scan for detecting the entities for the application. Basically @EnableAutoConfiguration will scan the given package(s) for detecting the entities.
Lets look at some fun and real code examples. Here i am not going to explain you the Spring Data JPA here. It has already been discussed in my following article.
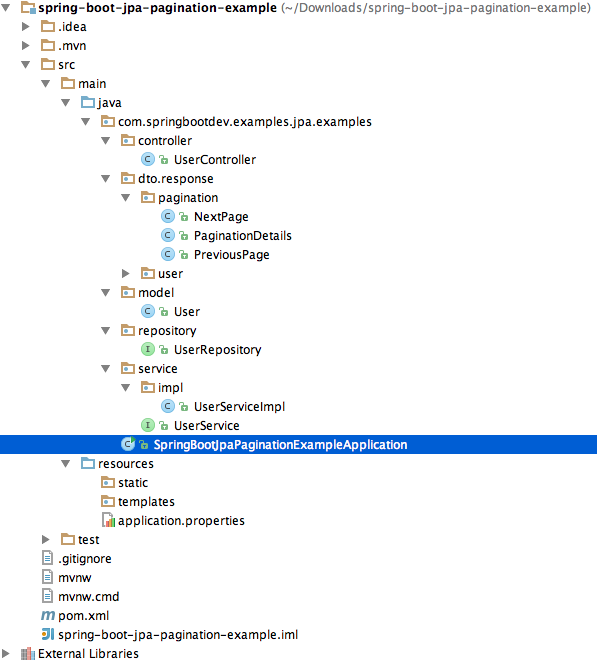
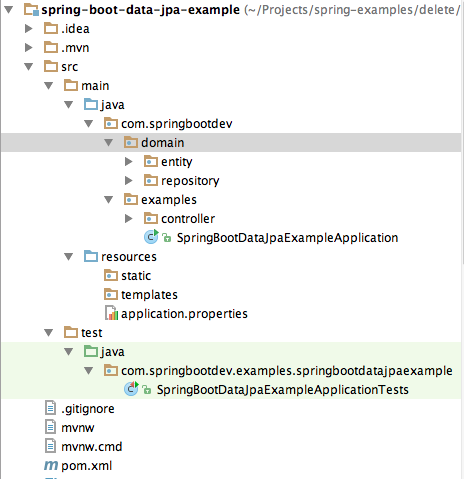
If you open the project in your IDE, you will notice that repository and entity packages are not placed in the main application package.
main application package
com.springbootdev.examples
JPA repository classes are in package
com.springbootdev.domain.repository
entity classes are in package
com.springbootdev.domain.entity
Therefore the entity classes location and JPA repositories location should be declared and enabled with @EntityScan and @EnableJpaRepositories annotations respectively. Otherwise the application will fail to load.
Please refer the following Spring Boot main configuration class.
This file contains bidirectional Unicode text that may be interpreted or compiled differently than what appears below. To review, open the file in an editor that reveals hidden Unicode characters. Learn more about bidirectional Unicode characters
Today i am going to explain how to develop simple CRUD (Create,Retrieve,Update and Delete data) application with Spring Boot and Spring Data JPA. the application will be simple web application and which will expose few REST endpoints for CRUD related operations.
What is Spring Data JPA?
Spring Data JPA is a sub project that comes under the Spring Data project and it is under the umbrella/shelter of Spring family. This will implements the JPA (Java Persistence Api) specification and have classes and methods for accessing and managing the data tier of the application. It tries to simplify the complexity associated with the data access layer of the application. As i have already mentioned, Spring Data JPA has following objectives.
provides a better implementation for the JPA Specification.
avoid the complexity associated with the Data Access layer of the application (by providing a framework that is easy to implement and having robust features)
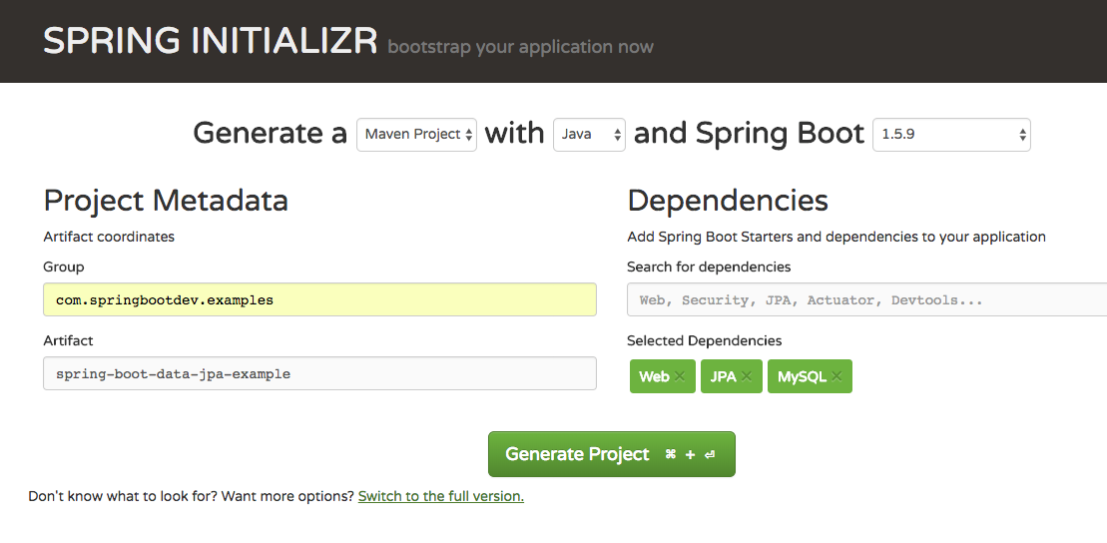
So it is enough with theories. lets explore and play with the framework. As usual. i have used the https://start.spring.io/ for generating the project.
As you can see in the generation wizard, we are using two dependencies other than web dependency. That is JPA and MySQL.
JPA – Represents the maven dependency for Spring Data JPA.
MySQL – Represents the maven dependency for mysql-jdbc-connector
So Lets Open the pom.xml file and look at the dependency section for identifying those dependencies.
This file contains bidirectional Unicode text that may be interpreted or compiled differently than what appears below. To review, open the file in an editor that reveals hidden Unicode characters. Learn more about bidirectional Unicode characters
We will do CRUD related operations with a user object and ultimately we will build a REST api application with four endpoints for CRUD related operations.
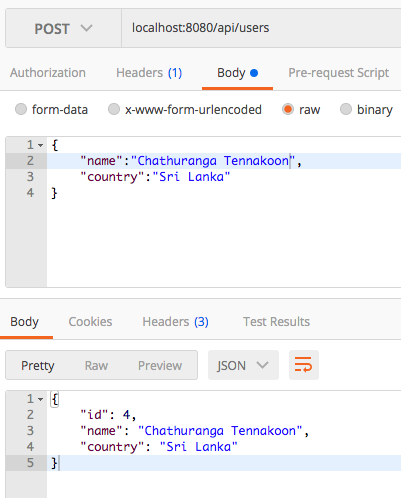
HTTP POST /api/users For creating the user
HTTP PUT /api/users For updating the user
HTTP DELETE /api/users/:user_id For deleting the user
HTTP GET /api/users For retrieving all the users
Where do we start?
Spring Data JPA is all about creating Entities and Repositories.
Entity lives in between java object (java class) and relational table. It helps to map the java object to relational table and relational table back to java object.
Repository helps to perform CRUD related operations with Entity.
The actual definition of Entity and Repository might be different from the explanation that i have given. Basically i just wanted to simply point out the exact purpose/role of Entity and Repository.
So Lets create our Entity and Repository.
Creating the Entity
The Entity class will be the following class.
This file contains bidirectional Unicode text that may be interpreted or compiled differently than what appears below. To review, open the file in an editor that reveals hidden Unicode characters. Learn more about bidirectional Unicode characters
The most important thing that you should note here is that we have used java persistence api (JPA annotations) based annotation here. No any framework specific annotation used. This is to compatible with other JPA implemented/supported ORM frameworks. For instance, if you have developed the data layer to compliant/adherent with JPA specification, then it will be possible to switch with different JPA implementations with minimal effort.
Creating the Repository
Creating a JPA based repository is very simple. You have to create an interface that extends the JpaRepository interface by providing the generic parameter, the Entity class and ID type. Here is the sample code for implementing UserRepository.
This file contains bidirectional Unicode text that may be interpreted or compiled differently than what appears below. To review, open the file in an editor that reveals hidden Unicode characters. Learn more about bidirectional Unicode characters
All the methods required for the CRUD related operations will be inherited from the super level/parent interfaces. Therefore we do not have to explicitly add or implement CRUD related methods.
Now we have created both Entity class and Repository. Next step is to configure/provide the mysql connection details. It can be provided in the application.properties file.
This file contains bidirectional Unicode text that may be interpreted or compiled differently than what appears below. To review, open the file in an editor that reveals hidden Unicode characters. Learn more about bidirectional Unicode characters
This will try to connect to the database “spring_examples_db” running on local mysql server “localhost” on port “3306” by providing the username “root” and password “test123“. You should change these properties based on your mysql server details.
Now we should implement our REST endpoints for creating, updating, removing and listing users etc…. Please refer the below UserController.
This file contains bidirectional Unicode text that may be interpreted or compiled differently than what appears below. To review, open the file in an editor that reveals hidden Unicode characters. Learn more about bidirectional Unicode characters
 @PostMapping("/users")
 public User create(@RequestBody User user)
 {
      return userRepository.save(user);
 }
@RequestBody – The body of the HTTP request will be mapped to the User class.
@ResponseBody – The retuned object will be mapped to the body of the HTTP response.
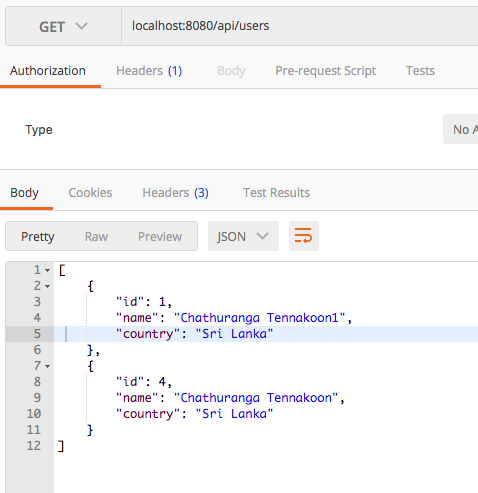
Retrieving all the users
GET /api/users
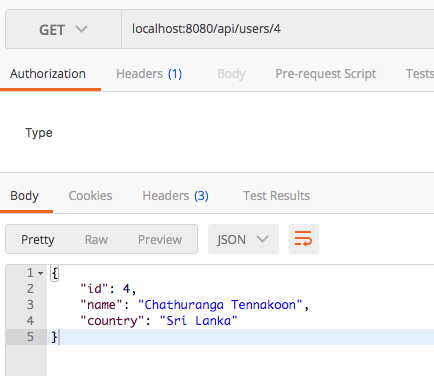
Retrieving a specific User/Resource
GET /api/users/{user_id}
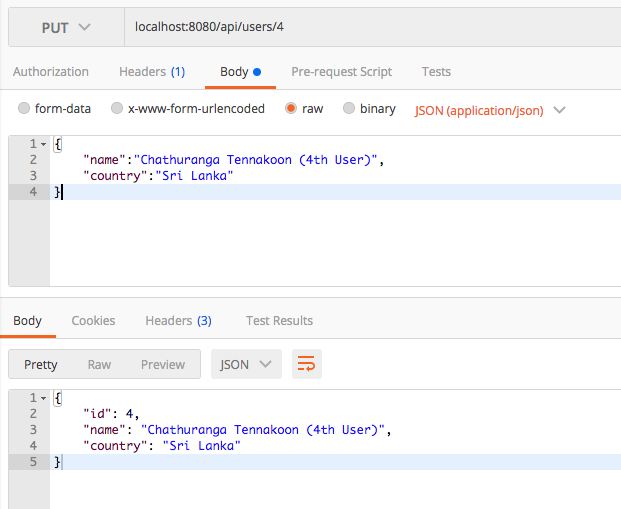
Updating a Specific User/Resource
PUT /api/users/{user_id}
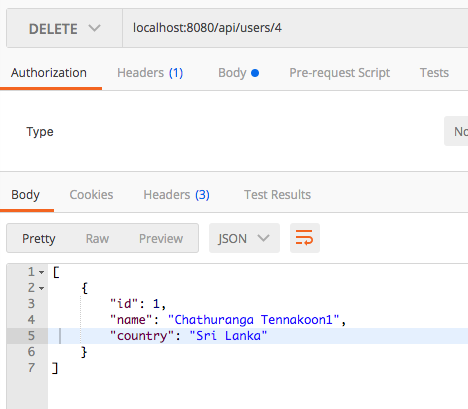
Removing a Specific User/Resource
DELETE /api/users/{user_id}
Once the requested resource is successfully removed, it will return a list of available users.
Ok. we have completed all the REST endpoints for managing users with Spring Data JPA.
Finally we will look at the Spring Boot main configuration class.
This file contains bidirectional Unicode text that may be interpreted or compiled differently than what appears below. To review, open the file in an editor that reveals hidden Unicode characters. Learn more about bidirectional Unicode characters
The configuration class is very simple and we have fully utilized the advantages of spring boot and no additional configurations have been made. We have taken fully advantage of spring boot auto configuration feature.
Why didn’t we use @EntityScan or @EnableJpaRepositories annotations here?
The package that contains the main Spring Boot Application configuration class (that is annotated with @SpringBootApplication) is known as the main application package.
If the entity classes and repository classes are placed under the spring boot main application package or its sub package, the spring boot will take care of detecting and scanning of entities and repositories. In such case wed do not have to explicitly declare the packages of Entities and Repositories with @EntityScan and @EnableJpaRepositories annotations respectively.
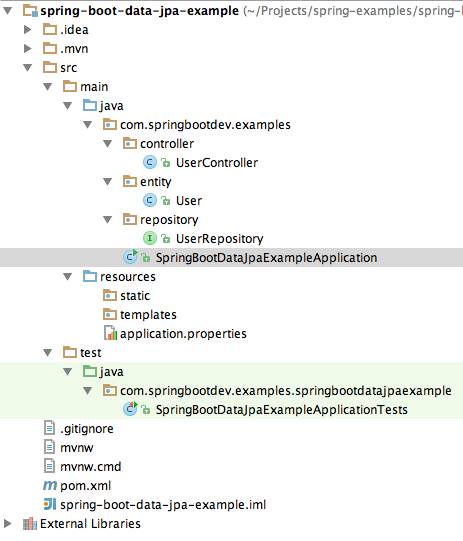
Please refer the below project structure.
If you look at the project file structure, you can notice that entity and repository packages are sub packages of the main application package. Therefore the entities and repositories placed under those packages will be automatically scanned and detected when the spring boot application is loaded.
In a previous article (click here to visit it), we have discussed about how to map many to many relationship with @ManyToMany annotation. The @ManyToMany annotation is useful only in situations where we need to map only the many to many relationship between entities. It helps to generate a joined table with only the foreign keys that refer the participant tables.
But there are some situations where we need to add some extra columns to the joined table (newly generated intermediate table). In such case, we cannot use the @ManyToMany annotation for mapping many to many relationship between entities.
In this article, i am going to show you how to map many to many relationship and add extra column(s) to the joined table.
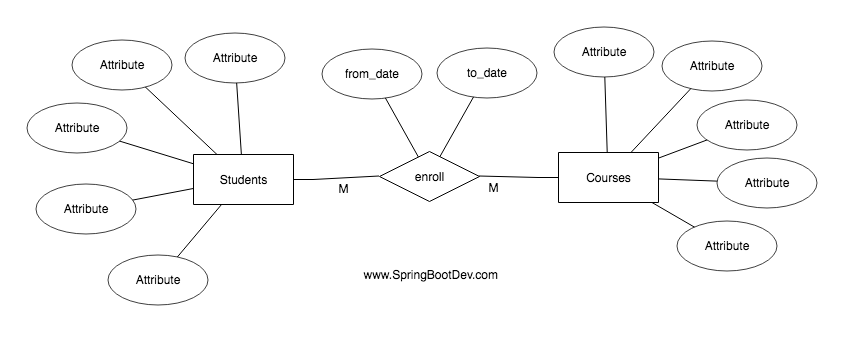
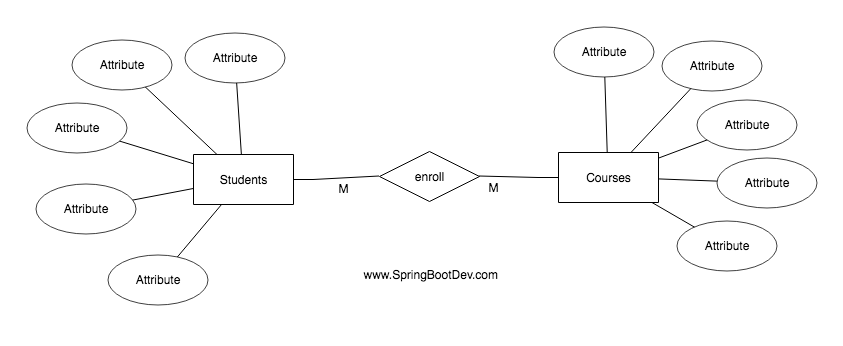
Please refer the following ER diagram.
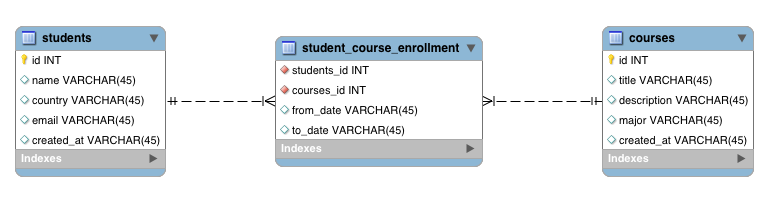
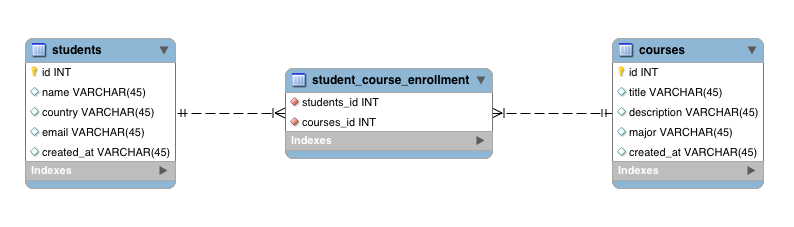
You can see that the relationship has two attributes known as from_date and to_date. When we convert the above ER-Diagram into the relational table structure, we should get the following tables.
you can see that the attributes in the relationship has been added to the joined(intermediate) table which represents the relationship .
With @ManyToMany annotation, we just maintain only two entities. The intermediate(joined) table is generated as a result of mapping the many to many relationship between two entities.
But in this approach (adding extra columns) we need to maintain the relationship as a separate entity. So here we will be maintaining three separate entities.
Lets look at each class in detailed.
StudentCourseEnrollment
This is used to represent the many to many relationship between Student and Course entities. All the extra columns that need to be added for the joined table will be declared here.
This file contains bidirectional Unicode text that may be interpreted or compiled differently than what appears below. To review, open the file in an editor that reveals hidden Unicode characters. Learn more about bidirectional Unicode characters
As you can see that all the extra columns known as from_date and to_date has been declared here. In addition the relationship from StudentCourseEnrollment to Student and Course has been declared.
Many StudentCourseEnrollment entries can refer a single entry in the Course. Therefore the relationship from StudentCourseEnrollment to Course is many-to-one
Many StudentCourseEnrollment entries can refer a single entry in the Student. Therefore the relationship from StudentCourseEnrollment to Student is many-to-one
The joined table (intermediate table) will have a composite primary key which is composed with student_id and course_id. Since it is a composite key, it will be declared in a separate class and added with @IdClass annotation.
This file contains bidirectional Unicode text that may be interpreted or compiled differently than what appears below. To review, open the file in an editor that reveals hidden Unicode characters. Learn more about bidirectional Unicode characters
If you observe the StudentCourseId class properly, you may have noticed following points.
It contains only the properties that are required to form the primary key (composite primary key) of the StudentCourseEnrollment entity.
The property names of StudentCourseId class are exactly the same as the names in the related properties of the StudentCourseEnrollment class.
It must implements Serializable interface.
Student
This file contains bidirectional Unicode text that may be interpreted or compiled differently than what appears below. To review, open the file in an editor that reveals hidden Unicode characters. Learn more about bidirectional Unicode characters
Here we are not going to map the direct relationship from Student to Course. We have used an intermediate entity called StudentCourseEnrollment. The relationship from Student to StudentCourseEnrollment is one-to-many. One student can enroll for many number of courses. The same theory is applied to the relationship from Course to StudentCourseEnrollment too. mappedBy attributes is used to denote the property who owns the relationship.
This file contains bidirectional Unicode text that may be interpreted or compiled differently than what appears below. To review, open the file in an editor that reveals hidden Unicode characters. Learn more about bidirectional Unicode characters
You can get the source code related to this project from GitHub (Click here). Please change the database configuration in application.properties based on your development environment. The run the following command to build the project.
mvn spring-boot:run
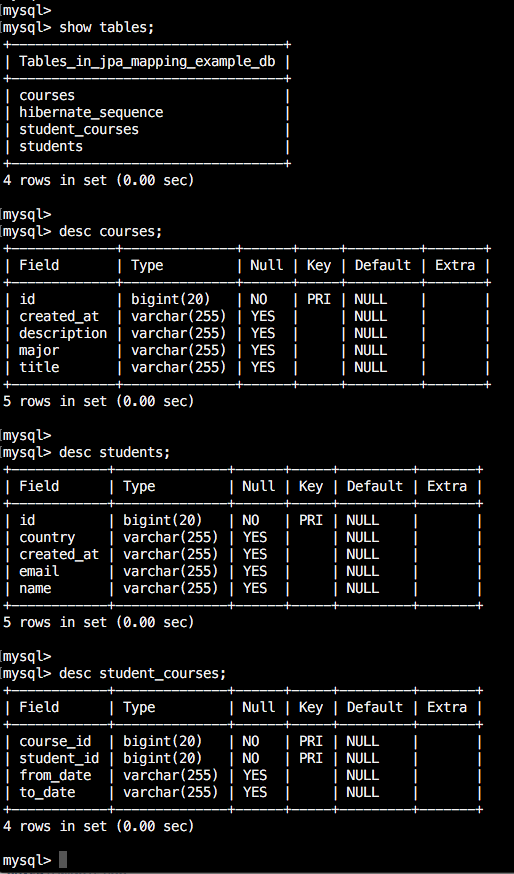
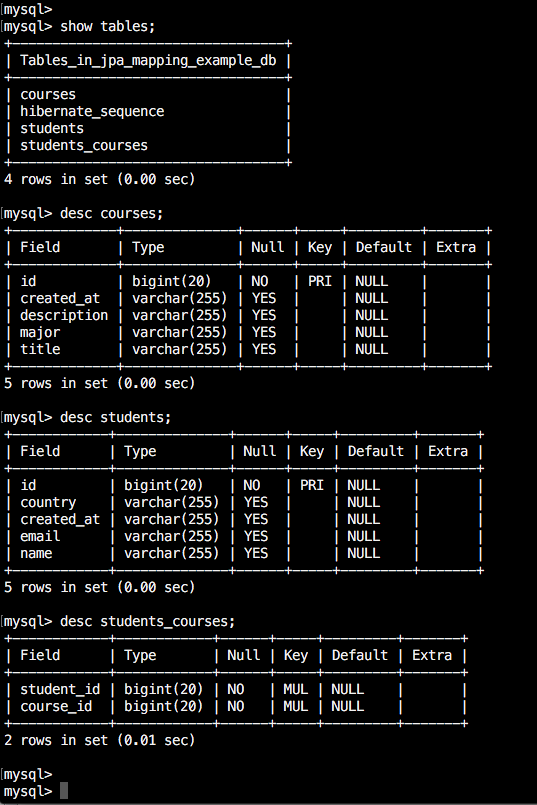
After executing the above command successfully, the table structure will be created with all declared properties.
Here i have shown you how to map many to many relationship with extra columns for the joined table. In here we have not used @ManyToMany annotation and we have used some alternative different approach.
This file contains bidirectional Unicode text that may be interpreted or compiled differently than what appears below. To review, open the file in an editor that reveals hidden Unicode characters. Learn more about bidirectional Unicode characters
In Student class we are going the map the relationship from Student to Course. As you are already aware, it is a many to many relationship and there should be an intermediate table (joined table) to map the relationship. Therefore we have used the @JoinTable annotation to define the joined/intermediate table with its properties.
The name of the joined table (newly created intermediate table) will be “student_courses” as declared. In addition, there will be two join columns.
student_id – This will refer the “id” column of the “students” table.
course_id – This will refer the “id” column of the “courses” table.
Here is the Course class.
This file contains bidirectional Unicode text that may be interpreted or compiled differently than what appears below. To review, open the file in an editor that reveals hidden Unicode characters. Learn more about bidirectional Unicode characters
In Course class, we just declare only the relationship from Course to Student. Since the relationship is many to many, it is just declared with @ManyToMany annotation. We are not going to map the relationship as it is already mapped by Student class and it is denoted with mappedBy attribute.
What is “mappedBy” attribute here?
mappedBy attributes defines the owner of the relationship. As you can see that relationship has been defined and owned by the courses property of the Student class. Therefore in the Course class it is declared with mappedBy=”courses”.
This will tells that the relationship has been mapped and owned by the courses property of the Student class.
Run and Test the source code.
You can get the source code related to this project from GitHub (Click here). Please change the database configuration in application.properties based on your development environment. The run the following command to build the project.
mvn spring-boot:run
After executing the above command successfully, the table structure will be created with all defined properties.
Here you can see that the joined table contains only the foreign key for reference entities/tables. we have not added any extra column for the joined table.