In this article, i am going to demonstrate how to user JWT (Json Web Token) Authentication with Spring boot and Spring Security. In here, i am not going to discuss the basic theory and details about the JWT and you can search google and find a lot of resources related to that.
GitHub URL :- https://github.com/chathurangat/spring-rest-jwt-auth-example
I will update a screenshot of my project structure to get an idea of project structure and class/files locations. Don’t worry! This is just to get an idea. We will be doing everything one by one as we are proceeding.
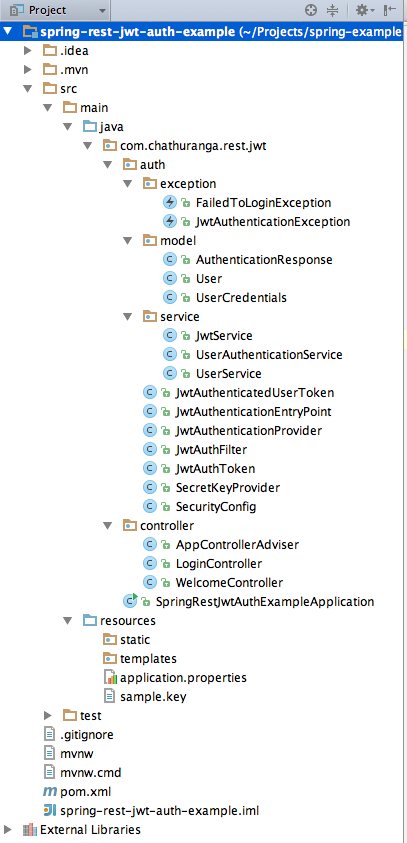
Before starting with the development, i will briefly give you an idea about the classes that we are going to develop in this article.
First step is to create spring boot web project. This can be easily created with Spring Initializer (https://start.spring.io/). Remember to add web and spring security dependencies for your app. In addition to that, it is important to add JWT dependency.
Required dependencies in pom.xml
<?xml version="1.0" encoding="UTF-8"?>
	<dependencies>

		<dependency>
			<groupId>org.springframework.boot</groupId>
			<artifactId>spring-boot-starter-security</artifactId>
		</dependency>

		<dependency>
			<groupId>org.springframework.boot</groupId>
			<artifactId>spring-boot-starter-web</artifactId>
		</dependency>

        <dependency>
            <groupId>io.jsonwebtoken</groupId>
            <artifactId>jjwt</artifactId>
            <version>0.6.0</version>
        </dependency>

	</dependencies>
Then create a JwtService class as below. The JwtService class will be used for following two purposes.
- Generate JWT token based on username upon successful user login.
- Validate /Authenticate JWT token (user send along with every request) and extract user information from the token.
JwtService.java
import com.chathuranga.rest.jwt.auth.SecretKeyProvider;
import io.jsonwebtoken.Claims;
import io.jsonwebtoken.Jws;
import io.jsonwebtoken.Jwts;
import io.jsonwebtoken.SignatureAlgorithm;
import org.springframework.beans.factory.annotation.Autowired;
import org.springframework.stereotype.Component;

import java.io.IOException;
import java.net.URISyntaxException;
import java.time.LocalDateTime;
import java.util.Date;

import static java.time.ZoneOffset.UTC;

@Component
public class JwtService {

    private static final String ISSUER = "com.chathuranga.examples";

    @Autowired
    private SecretKeyProvider secretKeyProvider;

    public String generateToken(String username) throws IOException, URISyntaxException {
        byte[] secretKey = secretKeyProvider.getKey();
        Date expiration = Date.from(LocalDateTime.now(UTC).plusHours(2).toInstant(UTC));
        return Jwts.builder()
                .setSubject(username)
                .setExpiration(expiration)
                .setIssuer(ISSUER)
                .signWith(SignatureAlgorithm.HS512, secretKey)
                .compact();
    }

    public String verifyToken(String token) throws IOException, URISyntaxException {
        byte[] secretKey = secretKeyProvider.getKey();
        Jws<Claims> claims = Jwts.parser().setSigningKey(secretKey).parseClaimsJws(token);
        //returning authenticated/verified username
        return claims.getBody().getSubject();
    }
}
Now we need to create a LoginController for authenticating users with their credentials (username and password) and issue JWT token (using JwtService) upon successful authentication
LoginController.java
import com.chathuranga.rest.jwt.auth.exception.FailedToLoginException;
import com.chathuranga.rest.jwt.auth.model.AuthenticationResponse;
import com.chathuranga.rest.jwt.auth.model.UserCredentials;
import com.chathuranga.rest.jwt.auth.service.UserAuthenticationService;
import org.springframework.beans.factory.annotation.Autowired;
import org.springframework.http.HttpStatus;
import org.springframework.web.bind.annotation.*;

@RestController
public class LoginController {

    @Autowired
    private UserAuthenticationService authenticationService;

    @ResponseStatus(HttpStatus.OK)
    @RequestMapping(value = "/login", method = RequestMethod.POST)
    public AuthenticationResponse userLogin(@RequestBody UserCredentials userCredentials) throws FailedToLoginException {

        if (userCredentials == null || (userCredentials.getUsername() == null || userCredentials.getPassword() == null)) {
            throw new FailedToLoginException("Missing login credentials ");
        }

        String token = authenticationService.authenticateUser(userCredentials.getUsername(), userCredentials.getPassword());

        if (token != null) {
            AuthenticationResponse authenticationResponse = new AuthenticationResponse();
            authenticationResponse.setUsername(userCredentials.getUsername());
            authenticationResponse.setToken(token);
            return authenticationResponse;
        }
        throw new FailedToLoginException(String.format(" unable to authenticate user [%s] ", userCredentials.getUsername()));
    }
}
Here is the Implementation of the UserAuthenticationService class. For the demonstration purpose i have hard coded two user credentials. But in production environment, you need to implement JPA based user repository or some other mechanism like LDAP or OpenId.
UserAuthenticationService.java
import com.chathuranga.rest.jwt.auth.exception.FailedToLoginException;
import com.chathuranga.rest.jwt.auth.exception.JwtAuthenticationException;
import com.chathuranga.rest.jwt.auth.model.User;
import org.springframework.beans.factory.annotation.Autowired;
import org.springframework.stereotype.Component;

import java.io.IOException;
import java.net.URISyntaxException;
import java.util.List;

@Component
public class UserAuthenticationService {

    @Autowired
    private JwtService jwtService;

    @Autowired
    private UserService userService;

    public String authenticateUser(String username, String password) throws FailedToLoginException {
        boolean isAuthenticated = false;
        if (username.equals("chathuranga") && password.equals("test123")) {
            isAuthenticated = true;
        } else if (username.equals("bob") && password.equals("test123")) {
            isAuthenticated = true;
        }

        if (isAuthenticated) {
            try {
                return jwtService.generateToken(username);
            } catch (URISyntaxException | IOException e) {
                throw new FailedToLoginException(e.getMessage());
            }
        }
        throw new FailedToLoginException(String.format("unable to authenticate user [%s]", username));
    }

    public User authenticateToken(String jwtToken) throws JwtAuthenticationException {

        try {
            String username = jwtService.verifyToken(jwtToken);
            List<String> userRoles = userService.getUserRoles(username);

            User user = new User();
            user.setUsername(username);
            user.setUserRoles(userRoles);
            return user;
        } catch (IOException | URISyntaxException e) {
            throw new JwtAuthenticationException(e.getMessage(), e);
        }
    }
}
One more thing! I forgot to show you the implementation of AuthenticationResponse class.
This is just a POJO class implemented to return the successful authentication response back to the client. Here is the implementation. You will notice that we are returning username and JWT token back to the client.
AuthenticationResponse.java
package com.chathuranga.rest.jwt.auth.model;

public class AuthenticationResponse {

    private String username;
    private String token;

    public String getToken() {
        return token;
    }

    public void setToken(String token) {
        this.token = token;
    }

    public String getUsername() {
        return username;
    }

    public void setUsername(String username) {
        this.username = username;
    }
}
Once this LoginController is fully developed, we should be able to authenticate users with their credentials. We have hardcoded few user credentials. I am going to test the user authentication with those credentials using Postman tool.
Username: chathuranga
Password: test123
Username: bob
Password: test123
Here is my Postman request.
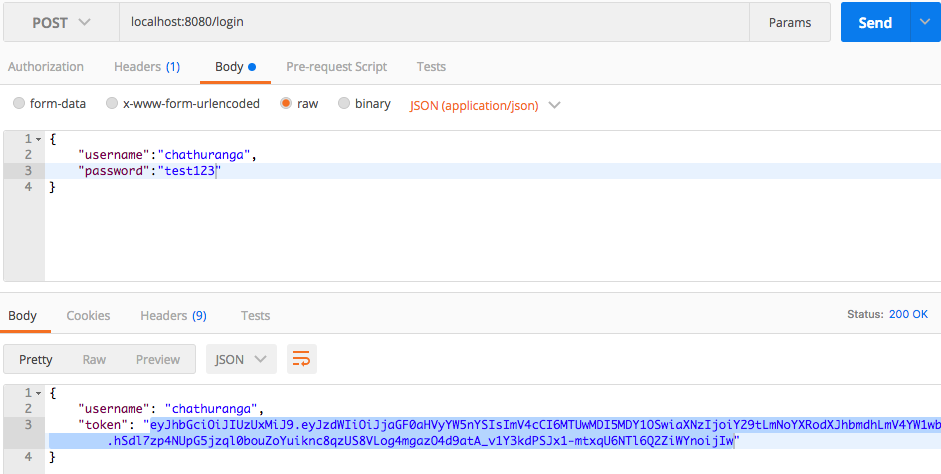
Here is the response retrieved. You can see that i am getting the username and JWT token as the response.
Now we have the JWT token. So we can use this token to show our authenticity.
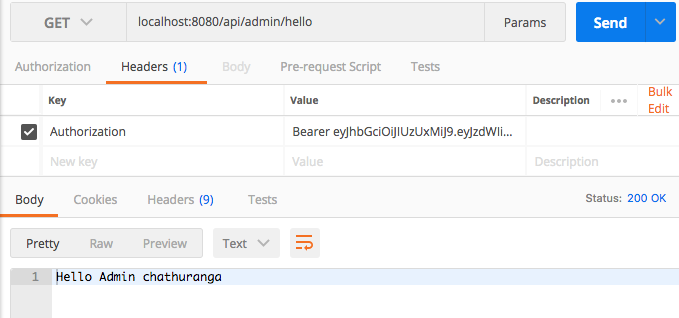
Accessing Secured Api
Please refer the below secured controller. It has two methods to support for two endpoint URLs.
1. /api/admin/hello – this can be accessed only by users with ROLE_ADMIN
2. /api/user/hello – this can be accessed only by users with ROLE_USER
package com.chathuranga.rest.jwt.controller;

import org.springframework.http.HttpMethod;
import org.springframework.security.access.annotation.Secured;
import org.springframework.security.core.context.SecurityContextHolder;
import org.springframework.web.bind.annotation.RequestMapping;
import org.springframework.web.bind.annotation.RequestMethod;
import org.springframework.web.bind.annotation.RestController;

@RestController
@RequestMapping(value = "/api")
public class WelcomeController {

    @Secured("ROLE_ADMIN")
    @RequestMapping(path = "/admin/hello", method = RequestMethod.GET)
    public String helloAdminController() {
        String loggedUserName = SecurityContextHolder.getContext().getAuthentication().getName();

        return "Hello Admin " + loggedUserName;
    }

    @Secured("ROLE_USER")
    @RequestMapping(path = "/user/hello", method = RequestMethod.GET)
    public String helloUserController() {

        String loggedUserName = SecurityContextHolder.getContext().getAuthentication().getName();

        return "Hello User " + loggedUserName;
    }
}
Please refer the following Postman screenshot.
Spring Security Related Configurations and Implementation Classes
SecurityConfig.java
import org.springframework.beans.factory.annotation.Autowired;
import org.springframework.security.config.annotation.authentication.builders.AuthenticationManagerBuilder;
import org.springframework.security.config.annotation.method.configuration.EnableGlobalMethodSecurity;
import org.springframework.security.config.annotation.web.builders.HttpSecurity;
import org.springframework.security.config.annotation.web.configuration.EnableWebSecurity;
import org.springframework.security.config.annotation.web.configuration.WebSecurityConfigurerAdapter;
import org.springframework.security.web.authentication.UsernamePasswordAuthenticationFilter;

@EnableWebSecurity
@EnableGlobalMethodSecurity(prePostEnabled = true, securedEnabled = true, jsr250Enabled = true)
public class SecurityConfig extends WebSecurityConfigurerAdapter {

    @Autowired
    private JwtAuthFilter authFilter;

    @Autowired
    private JwtAuthenticationProvider authenticationProvider;

    @Autowired
    private JwtAuthenticationEntryPoint authenticationEntryPoint;

    @Override
    protected void configure(AuthenticationManagerBuilder auth) throws Exception {
        auth.authenticationProvider(authenticationProvider);
    }

    @Override
    protected void configure(HttpSecurity http) throws Exception {
        http.csrf().ignoringAntMatchers("/login");

        http.authorizeRequests()
                .antMatchers("/login")
                .permitAll()
                .antMatchers("/api/**")
                .authenticated()
                .and()
                .addFilterBefore(authFilter, UsernamePasswordAuthenticationFilter.class)
                .exceptionHandling()
                .authenticationEntryPoint(authenticationEntryPoint);
    }
}
- Here we have used a custom authentication provider called JwtAuthenticationProvider. It will be used to authenticate users , based on JWT token.
- We have disabled the CSRF token validation for URL /login.
- Any request coming to /login will be permitted and any request coming to URL /api/** should be authenticated.
- We have created a custom Filter (JwtAuthFilter) and it will be applied before executing UsernamePasswordAuthenticationFilter
Any authentication related exception will be handled using the custom authentication entry point provided.(That is JwtAuthenticationEntryPoint)
JwtAuthFilter.java
This filter will be used to capture the JWT token sent by the users through Authorization header. This will find the JWT token in the request header and set it in the Authentication object before executing the UsernamePasswordAuthenticationFilter provided by the Spring security.
(The filter creates an instance of JwtAuthToken class with token retrieved and set it as the current Authentication object for the request)
import org.springframework.security.core.context.SecurityContextHolder;
import org.springframework.stereotype.Component;

import javax.servlet.*;
import javax.servlet.http.HttpServletRequest;
import java.io.IOException;

@Component
public class JwtAuthFilter implements Filter
{

    @Override
    public void doFilter(ServletRequest request, ServletResponse servletResponse, FilterChain filterChain) throws IOException, ServletException
    {
        HttpServletRequest servletRequest = (HttpServletRequest) request;
        String authorization = servletRequest.getHeader("Authorization");

        if (authorization != null)
        {
            JwtAuthToken token = new JwtAuthToken(authorization.replaceAll("Bearer ", ""));
            SecurityContextHolder.getContext().setAuthentication(token);
        }
        filterChain.doFilter(servletRequest, servletResponse);
    }

    @Override
    public void destroy()
    {

    }

    @Override
    public void init(FilterConfig filterConfig) throws ServletException
    {

    }
}
JwtAuthenticationProvider.java
import com.chathuranga.rest.jwt.auth.model.User;
import com.chathuranga.rest.jwt.auth.service.UserAuthenticationService;
import org.springframework.beans.factory.annotation.Autowired;
import org.springframework.security.authentication.AuthenticationProvider;
import org.springframework.security.core.Authentication;
import org.springframework.security.core.AuthenticationException;
import org.springframework.stereotype.Component;

@Component
public class JwtAuthenticationProvider implements AuthenticationProvider
{

    @Autowired
    private UserAuthenticationService authenticationService;

    @Override
    public Authentication authenticate(Authentication authentication) throws AuthenticationException
    {
      User user =  authenticationService.authenticateToken((String) authentication.getCredentials());
      return new JwtAuthenticatedUserToken(user.getUsername(),user.getUserRoles());
    }

    /*
     Returns true if this AuthenticationProvider supports the indicated Authentication object.
     */
    @Override
    public boolean supports(Class<?> aClass)
    {
        return JwtAuthToken.class.equals(aClass);
    }
}
The JwtAuthenticationProvider receives the Authentication instance set on the SecurityContext, which in our case is the JwtAuthToken we set using the JwtAuthFilter. This token is then verified using the JwtService. If the token is valid, we return a JwtAuthenticatedUserToken (username and ACL – Access Control List) or throw an AuthenticationException if it is invalid. Any authentication related exception (an instance of AuthenticationException) will be handled by JwtAuthenticationEntrypoint.
JwtAuthenticationEntryPoint.java
import com.fasterxml.jackson.databind.ObjectMapper;
import org.springframework.http.MediaType;
import org.springframework.security.core.AuthenticationException;
import org.springframework.security.web.AuthenticationEntryPoint;
import org.springframework.stereotype.Component;

import javax.servlet.ServletException;
import javax.servlet.http.HttpServletRequest;
import javax.servlet.http.HttpServletResponse;
import java.io.IOException;
import java.util.Collections;

import static javax.servlet.http.HttpServletResponse.SC_FORBIDDEN;

@Component
public class JwtAuthenticationEntryPoint implements AuthenticationEntryPoint
{
    @Override
    public void commence(HttpServletRequest httpServletRequest, HttpServletResponse httpServletResponse, AuthenticationException e)
            throws IOException, ServletException {
        httpServletResponse.setStatus(SC_FORBIDDEN);
        httpServletResponse.setContentType(MediaType.APPLICATION_JSON_VALUE);

        String message;
        if(e.getCause() != null) {
            message = e.getCause().getMessage();
        } else {
            message = e.getMessage();
        }
        byte[] body = new ObjectMapper()
                .writeValueAsBytes(Collections.singletonMap("error", message));
        httpServletResponse.getOutputStream().write(body);
    }
}
