This is the Part 2 of the series of articles written to share my experience on securing REST Api(s) with Spring Security OAuth2. The other pars of this article series have been listed below.
Part 1 : Basics of OAuth2, Roles, Grant types and Microservices security.
Part 2 : Setting up Authorization server with Spring Security OAuth2 using In-memory token store and client details
Part 3 : Setting up Resource Server with Spring Security OAuth2.
Part 4 : Enhancing Authorization server to store client app details and tokens in the database (JDBC client and token store)
Part 5 : Secure REST Api with Spring Security OAuth2 using JWT token
Part 6 : Token Revoke and Invalidating
Here we will be focusing on how to implement Authorization server to handle client registration and token issuing using in-memory mechanism.
Setting up Authorization server
You can create a spring boot based project for Authorization server is as follows. Make sure that you have added the Web, OAuth2-Cloud and Spring Security dependencies correctly.
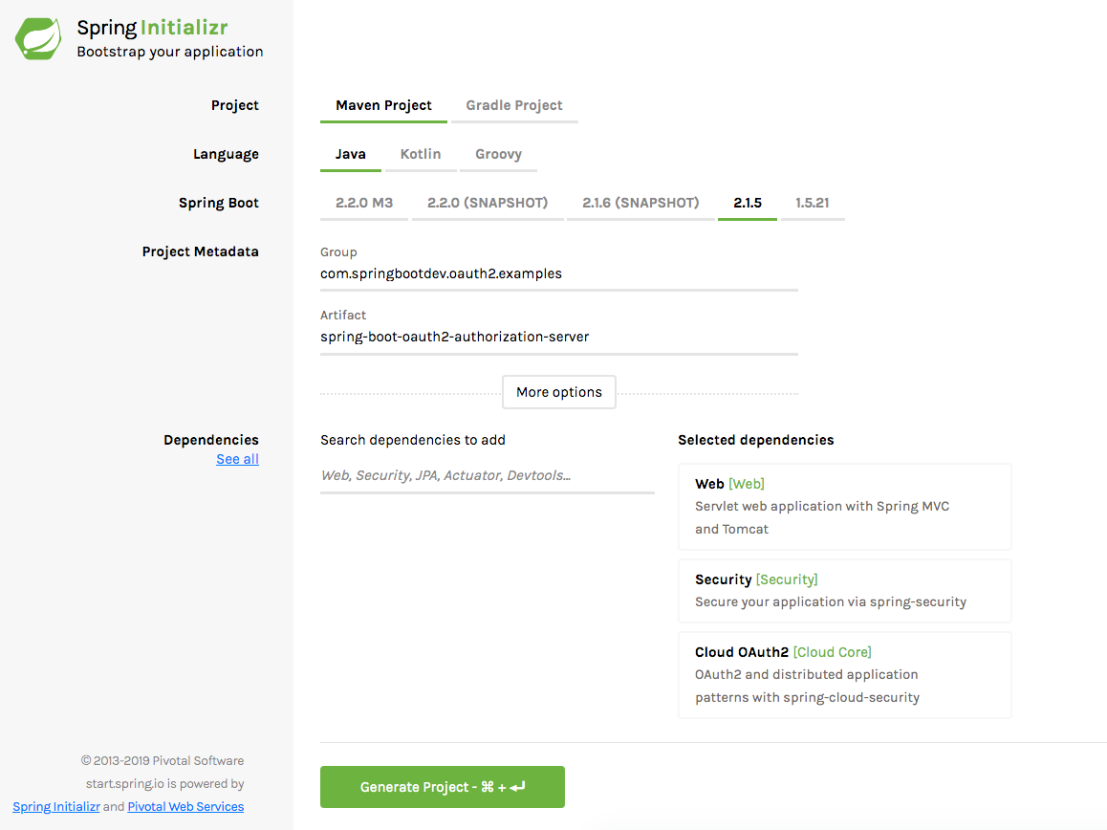
once the project is generated, make sure that the following dependencies exist in the pom.xml.
<dependency>
   <groupId>org.springframework.boot</groupId>
   <artifactId>spring-boot-starter-security</artifactId>
</dependency>
<dependency>
   <groupId>org.springframework.boot</groupId>
   <artifactId>spring-boot-starter-web</artifactId>
</dependency>
<dependency>
   <groupId>org.springframework.cloud</groupId>
   <artifactId>spring-cloud-starter-oauth2</artifactId>
</dependency>
Once the project is generated, we can add the WebSecurity Configuration as follows.
This file contains bidirectional Unicode text that may be interpreted or compiled differently than what appears below. To review, open the file in an editor that reveals hidden Unicode characters.
Learn more about bidirectional Unicode characters
| import org.springframework.beans.factory.annotation.Autowired; | |
| import org.springframework.context.annotation.Bean; | |
| import org.springframework.security.authentication.AuthenticationManager; | |
| import org.springframework.security.config.annotation.authentication.builders.AuthenticationManagerBuilder; | |
| import org.springframework.security.config.annotation.web.configuration.EnableWebSecurity; | |
| import org.springframework.security.config.annotation.web.configuration.WebSecurityConfigurerAdapter; | |
| import org.springframework.security.crypto.password.PasswordEncoder; | |
| @EnableWebSecurity | |
| public class WebSecurityConfiguration extends WebSecurityConfigurerAdapter { | |
| @Autowired | |
| private PasswordEncoder passwordEncoder; | |
| @Bean(name = "authenticationManager") | |
| @Override | |
| public AuthenticationManager authenticationManagerBean() throws Exception { | |
| return super.authenticationManagerBean(); | |
| } | |
| @Override | |
| protected void configure(AuthenticationManagerBuilder auth) throws Exception { | |
| auth.inMemoryAuthentication().withUser("user").password(passwordEncoder.encode("secret")).roles("USER"); | |
| auth.inMemoryAuthentication().withUser("admin").password(passwordEncoder.encode("secret")).roles("ADMIN"); | |
| } | |
| } |
The Authorization server will authenticate users and issue tokens to access the protected resources. Since the authorization server does not maintain/expose any resources, we have nothing to secure here. Therefore we haven’t declared the HTTP or Web Security configurations here. we have created only the authentication-manager. The users will be authenticated against the in-memory user details store implemented.
Adding Authorization Server Configuration
We have added the Authorization server configuration as follows.
clients.inMemory() specifies that we are going to store the services in memory. In a ‘real’ application, we would save it in a database, an LDAP server.As you can see that we have registered one client application in memory.
authorizedGrantTypes – This specifies what are the possible authorization grant types supported by the client application being registered. For this article, we will be using only the password grant type.
Spring Security OAuth exposes two endpoints for checking tokens (/oauth/check_token and /oauth/token_key). Those endpoints are not exposed by default (have access “denyAll()”). You can enable those endpoints for authenticated client applications as follows.
oauthServer.checkTokenAccess("isAuthenticated()");
You may add “permitAll()” instead of “isAuthenticated()”
Running the Authorization Sever
Now we have done the required configuration for the OAuth2 Authorization server. lets run it and check whether it is working.
mvn spring-boot:run
The server will be up and running on port 9090.
Generating Access Token and Refresh Token
The following endpoint can be used to generate the access token and refresh token.
POST /oauth/token
First we need to use the client application credentials to authenticate with Authorization server. Then we can use the user credentials to generate an access token and refresh token for accessing the protected resource. Please refer the below screenshots.
- Authenticate using client app credentials
username : client
password : password

- Generate access token for the user credentials.
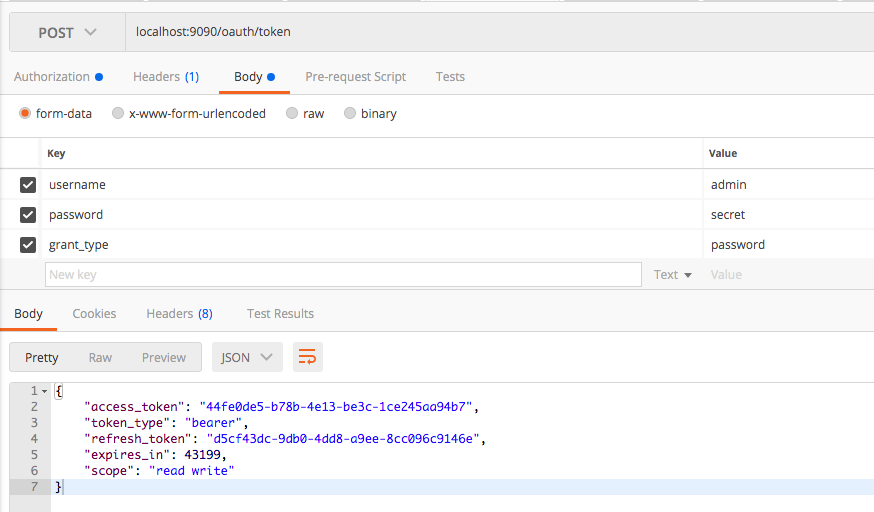
You can see that access token and refresh token are generated correctly.
Checking and Verifying the Generated Token
You can use the following endpoint to check and verify the generated token.
POST /oauth/check_token
This can be done as follows.
- Authenticate with client app credentials
username : client
password : password

- Sending the generated token for retrieving the details.
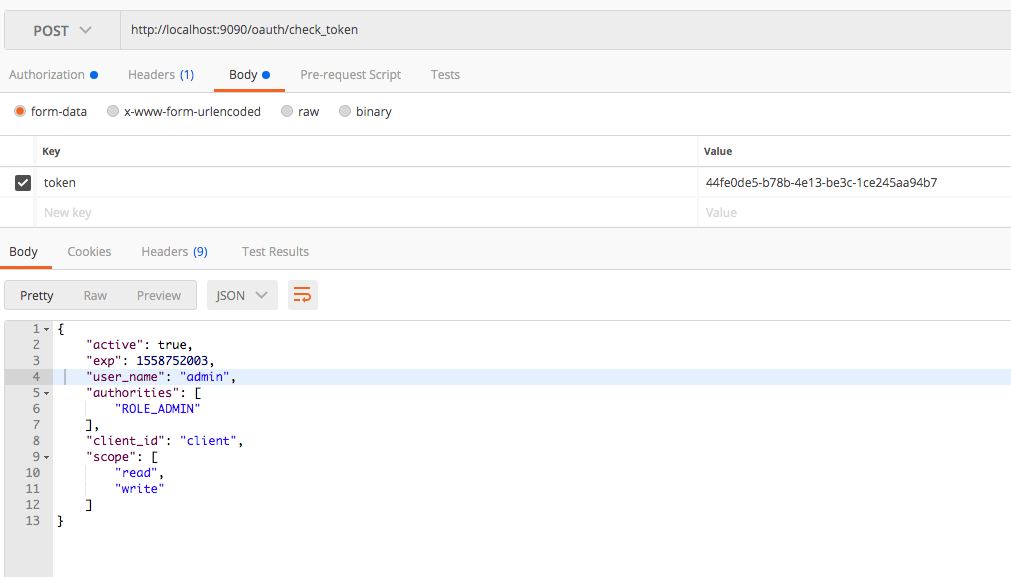
You can see that the response contains client app id, scopes, user and authorities/roles.
In the next part, we will look at how to set up resource server to keep protected resources and authorize the access to the protected resources only for the valid/authorized tokens.
Source Code
The completed source code of this article can be found at GitHub. Click here to download it.
