You can refer the part 1 of this article as follows.
The Problem
The previous article (click here to visit it) has described how to use Spring Cloud Config Server as a centralized location for keeping the configuration properties related to the application services (microservices). The application services will act as Config Clients who will communicate with Config Server to retrieve the properties related to them.
If any property is changed, the related service need to be notified by triggering a refresh event with Spring Boot Actuator (/actuator/refresh). The user will have to manually trigger this refresh event. Once the event is triggered, all the beans annotated with @RefreshScope will be reloaded (the configurations will be re-fetched) from the Config Server.
In a real microservice environment, there will be a large number of independent application services. Therefore is it not practical for the user to manually trigger the refresh event for all the related services whenever a property is changed.
The Solution
Since it is impractical to manually trigger the event for all services, what would be the better solution?
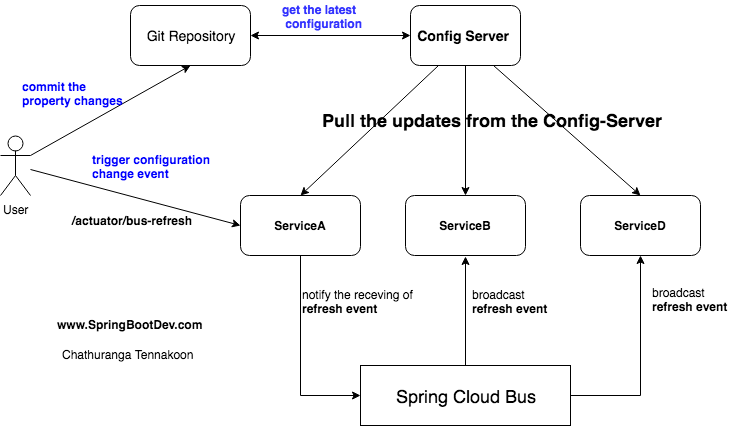
The better approach is to trigger the refresh event for one service and broadcast the event through all other available services. This sounds good ! In this article, we are going to explore a way to trigger the refresh event for only one service and that event is automatically propagated (broadcasted) through all the other services. This can be achieved with Spring Cloud Bus.
What is Spring Cloud Bus ?
Spring Cloud Bus links the independent services in the microservices environment through a light weight message broker (e.g:- RabbitMQ or Kafka). This message broker can be used to broadcast the configuration changes and events. In addition, it can be used as a communication channel among independent services.
A key idea is that the Bus is like a distributed Actuator for a Spring Boot application that is scaled out, but it can also be used as a communication channel between applications.
Spring Cloud Bus and Spring Cloud Stream
Spring Cloud Bus is built on Spring Cloud Stream. Therefore Spring Cloud Bus can be identified as the application use of Spring Cloud Stream.
The Architecture
Here it shows how the Spring Cloud Bus fits into the micro services architecture with Spring Cloud Config Server and Config Clients.
Spring Cloud Bus and Message Broker
As we have already discussed, Spring Cloud Bus links the independent application services (distributed nodes) through lightweight message broker. The message broker can be implemented with either RabbitMQ or Kafka. Here we are going to use the RabbitMQ as the message broker.
Installing RabbitMQ with Docker
Let’s start with RabbitMQ, which we recommend running as RabbitMQ as a docker image. First we need to install Docker and run following commands once Docker is installed successfully:
docker pull rabbitmq:3-management
This command pulls RabbitMQ docker image together with management plugin installed and enabled by default.
Next, we can run RabbitMQ:
docker run -d --hostname my-rabbit --name some-rabbit -p 15672:15672 -p 5672:5672 rabbitmq:3-management
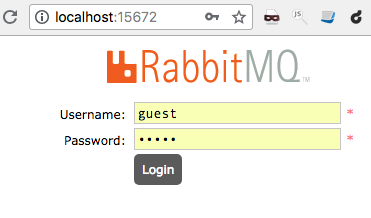
Once we executed the above command, we can go to the web browser and open http://localhost:15672, which will show the management console login form.
The default username is: ‘guest’; password: ‘guest’.
RabbitMQ will also listen on port 5672. (but the web port is 15672)
What we are going to build in this article!
Here is the overview of what we are going to build in this article.
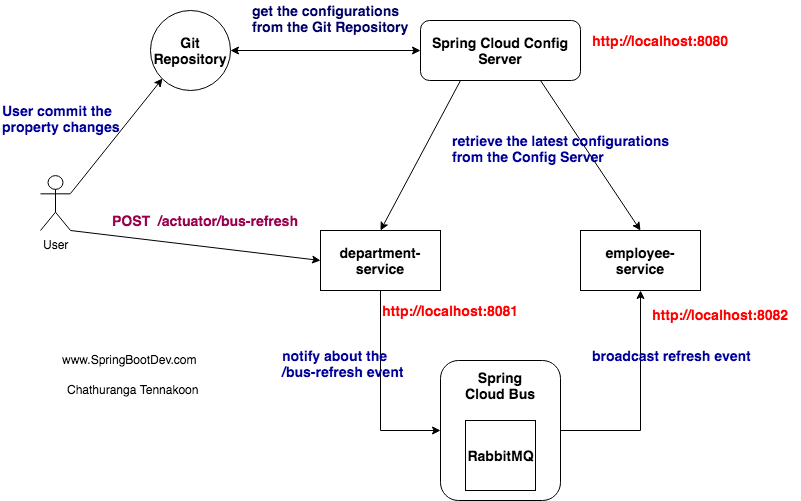
Git repository will contains the configuration property files ( properties and yml files) related to the application services that have been deployed.
Spring Cloud Config Server is responsible for retrieving the latest configurations from configured property source (here it is Git repository) and maintaining them as a centralized service for client applications (distributed independent services).
The client applications (Config Clients) will retrieve the configurations from the Config Server when they start up. Here the department-service and employment-service will retrieve the related configurations from the Config Server.
Config Clients (rather Application Services) are connected to each other through a Spring Cloud Bus. Spring Cloud uses a lightweight message broker (such as RabbitMQ or Kafka) to broadcast events across all connected clients.
The user can change the properties and push the change to the Git repository. But the Config Clients does not aware about the property changes. Therefore they do not try to refresh (re-fetch) their configurations with Spring Cloud Config Server.
Once the user triggers the refresh event for any service (here it is department-service), the Spring Cloud Bus will receive the refresh event. Then it will broadcast the refresh event across all the connected clients through the underlying message broker (e.g:- RabbitMQ).
The refresh event is triggered by invoking the endpoint /actuator/bus-refresh of the department-service.
Every Config Client (application service) has the Spring Boot Actuator in its classpath. Therefore the refresh event will be handled property and all the beans annotated with @RefreshScope will be refreshed. That means the Config Client will communicate with Config Server to retrieve the latest configuration properties for the related beans.
Then the Config Server pulls the latest configurations from the Git repository (property source) and updates the Config Sever itself. After the Config Client requests for getting the properties will be served with latest updated properties.
Finally the Config Client will receive the latest and updated properties through the Config Server.
Now lets implement the above architecture as follows.
Adding the properties files to the Git repository
Here we will add all the property files for the Git repository and set up the property source for the Spring Cloud Config Server. All the application related property files should be stored here.
The property files for all services related to this example can be found at GitHub. Click here to visit
Creating the Spring Cloud Config Server.
This is almost similar to the steps you followed in the previous article (click here to visit it). I will summarize the points here.
- Create a Spring Boot project with spring-cloud-config-sever dependency. (please refer the below screenshot)
- Add the @EnableConfigServer annotation to the main Spring Boot Configuration class.
- Add the Git repository related configurations to the application.properties.
e.g:-
spring.cloud.config.server.git.uri = https://github.com/chathurangat/spring-cloud-config-bus-refresh-example.git
spring.cloud.config.server.git.searchPaths = configuration-properties
spring.cloud.config.server.git.uri :- This specifies the Git repository location where the property files are stored.
spring.cloud.config.server.git.searchPaths :- If the property files are stored under the sub directory of the repository, the directory name should be specified here. if there are multiple sub directories, those can be declared with spaces. If the property files are stored in the root of the repository, then you can neglect this configuration. In this example, i have stored the property files under the “configuration-properties” directory of the repository. Therefore i have used the “searchPaths” configuration here.
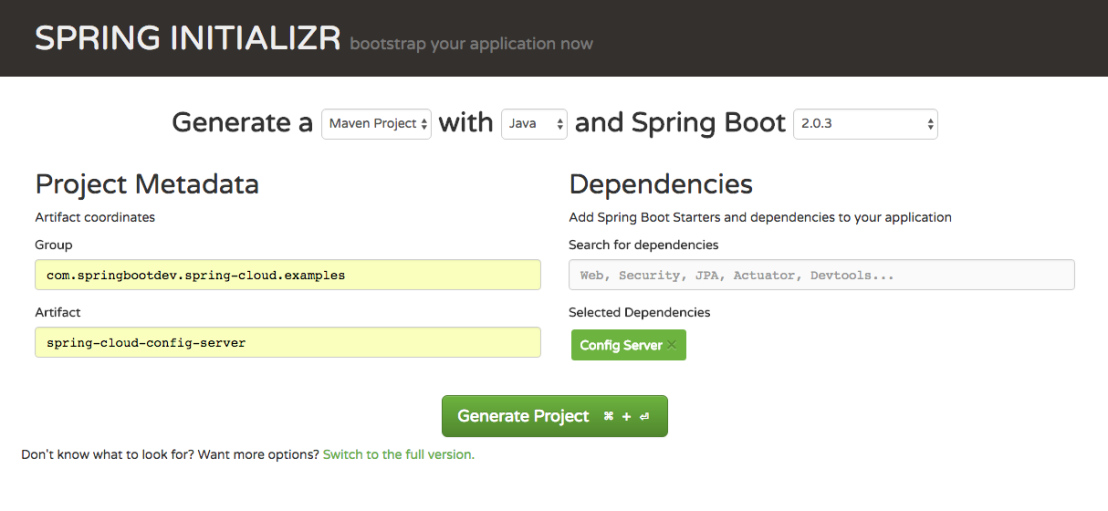
Once the project is created, make sure that Spring Cloud Config Server dependency is available in the classpath.
 <dependency>
    <groupId>org.springframework.cloud</groupId>
    <artifactId>spring-cloud-config-server</artifactId>
</dependency>
Lets run the Config Server with following command. it will run on port 8080.
mvn spring-boot:run
Creating the department service
The following dependencies should be added when creating the department service.
<dependency>
  <groupId>org.springframework.cloud</groupId>
  <artifactId>spring-cloud-starter-config</artifactId>
</dependency>

<dependency>
   <groupId>org.springframework.cloud</groupId>
   <artifactId>spring-cloud-starter-bus-amqp</artifactId>
</dependency>

<dependency>
  <groupId>org.springframework.boot</groupId>
  <artifactId>spring-boot-starter-actuator</artifactId>
</dependency>
Lets look at each dependency in detailed.
spring-cloud-starter-config :-
Spring Cloud Config has the Client and Server communication architecture. Therefore if any application that needs to communicate with Config Server should have the Config Client. This dependency will make the application as the Config Client.
spring-cloud-starter-bus-amqp :-
If you look at above diagram, you will notice that every distributed service is linked/connected through Spring Cloud Bus. This is the dependency for Spring Cloud Bus.
spring-boot-starter-actuator :-
Once the property is changed (Git Repository), the user a should trigger the refresh event for any service through the /actuator/bus-refresh endpoint. Then Spring Cloud Bus will broadcast the refresh event across all connected services. The other services should have the spring-boot-actuator on the class-path and @RefereshScope annotation on the relevant beans to be reloaded.
Create a bootstrap.properties file and add the following configurations
spring.application.name = department-service
spring.cloud.config.uri = http://localhost:8080
The value of spring.application.name property (department-service) will be used to identify the property files related to this service.
The application.properties should have the following configurations.
server.port=8081
management.security.enabled=false
management.endpoints.web.exposure.include=*

#RabbitMQ connection details
spring.rabbitmq.host=localhost
spring.rabbitmq.port=5672
spring.rabbitmq.username=guest
spring.rabbitmq.password=guest
Spring Cloud Bus will internally connect to a lightweight message broker (in our case RabbitMQ) and those details have been provided as above.
Add the following controller to the project. (WelcomeController.java)
This file contains bidirectional Unicode text that may be interpreted or compiled differently than what appears below. To review, open the file in an editor that reveals hidden Unicode characters.
Learn more about bidirectional Unicode characters
| import org.springframework.beans.factory.annotation.Value; | |
| import org.springframework.cloud.context.config.annotation.RefreshScope; | |
| import org.springframework.web.bind.annotation.GetMapping; | |
| import org.springframework.web.bind.annotation.RestController; | |
| @RefreshScope | |
| @RestController | |
| public class WelcomeController | |
| { | |
| @Value("${app.service-name}") | |
| private String serviceName; | |
| @GetMapping("/service") | |
| public String getServiceName() { | |
| return "service name [" + this.serviceName + "]"; | |
| } | |
| } |
@RefreshScope will refresh and reload the bean on “refresh event“. By default, the configuration values are read on the client’s startup, and not again. You can force a bean to refresh its configuration – to pull updated values from the Config Server – by annotating the WelcomeController with the Spring Cloud Config @RefreshScope and then by triggering a refresh event.
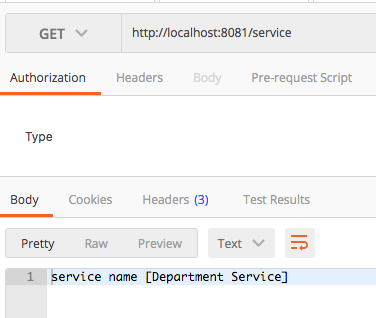
Lets deploy the department-service and call the /service endpoint as follows. It should return the value of the app.service-name property related to the department-service.properties
Creating the employee-service
Create another Spring Boot application for the employee-service. The employee-service should have the same dependencies as the department-service.
The configurations and project structure is also same as the department-service except following few configurations.
server.port = 8082  # change in application.properties
spring.application.name = employee-service  # change in bootstrap.properties
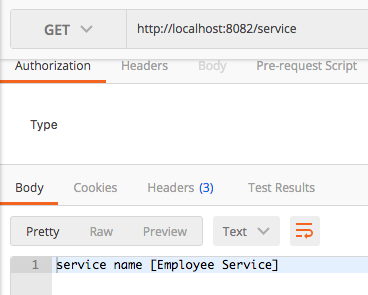
Lets deploy the employee-service and call the /service endpoint as follows. It should return the value of the app.service-name property related to the employee-service.properties
Testing the hard work!
Now we have three different applications running on three different ports. One application is Config Server and Other two are Config Clients.
In the previous article, we have to manually trigger the /actuator/refresh event for all Config Clients (application services) whenever a property is changed. Otherwise the change will not get reflected in all services. We found that it is not practical and easy approach.
Here we are going to use the Spring Cloud Bus to broadcast the refresh event across all services. Therefore whenever the property is changed, we need to trigger the refresh event for the Spring Cloud Bus. This can be done with invoking /actuator/bus-refresh endpoint through any of the connected services (any service that is connected to the Spring Cloud Bus). Then the Spring Cloud Bus will broadcast the refresh event across all the connected services.
In this way, it is possible to trigger the refresh event in one service and get it reflected in all other connected services.
Lets try it with our developed applications. make sure that all of them are up and running.
Make the changes to the property files
Lets change the value of the app.service-name property in the department-service.properties to “Department Service – Updated for Spring Cloud Bus Testing“.
In the same way, change the value of the app.service-name property in the employee-service.properties to “Employee Service – Updated for Spring Cloud Bus Testing” .
Now commit and push the changes to the Git repository.
Lets check the service endpoints
We will hit the /service endpoints of both department-service and employee-service and check whether the changes are reflected. You can see that the changes are not reflected yet.


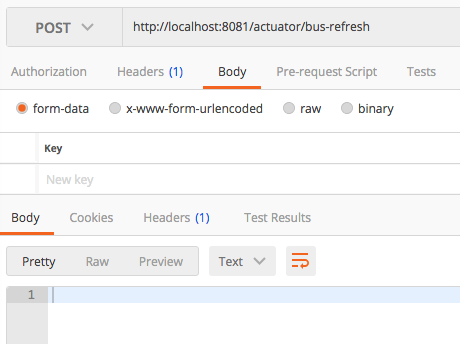
Lets broadcast the /actuator/bus-refresh event for just one service.
Here i have decided to invoke the /actuator/bus-refresh for department-service. It is completely fine if you decide to invoke it for employee-service. But make sure that you are going to invoke it for just one service and NOT for both.
Now according to the theories, the Spring Cloud Bus will get the refresh event it will broadcast it across all the connected services. In connected services, all the beans annotated with @RefreshScope will be refreshed on the refresh event.
Lets re-check the /service endpoints of both services.
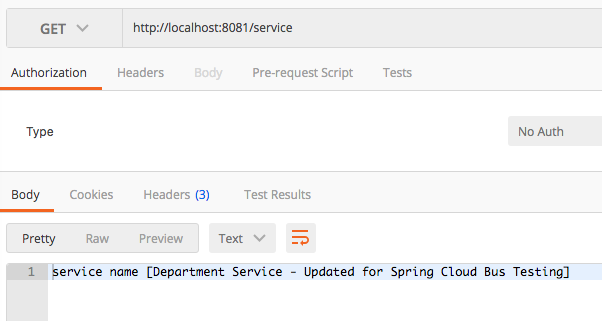
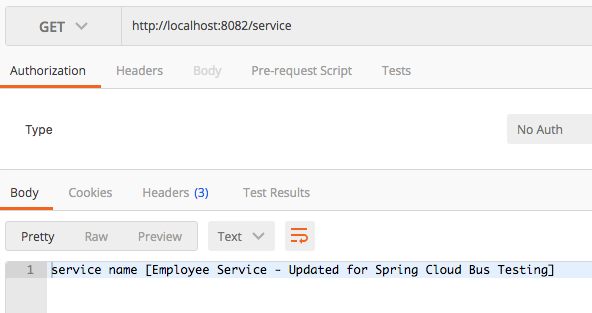
You can see that we didn’t hit any endpoint in the employee-service and it is also get updated. It is the power of Spring Cloud Bus. Assume that there are thousands of services are connected to this Bus. It is guaranteed that all those services will get the broadcast event and the property change will get reflected.
The Source Code
The complete source code relate to this article can be found at GitHub. Click here to download it.
Didn’t you find something that we can further improve?
If you observe carefully, you can see that Spring Cloud Bus requires each distributed services (Config Client) to connect with message broker such as RabbitMQ. As you can see that, those connection details are declared and maintained in the each application service (in each distributed node).
I am just questioning myself about that whether we can move the RabbitMQ connection details to the Spring Cloud Config Server as the shared properties. Lets talk about it in a separate article. Click here to visit that article.
What should be next?
Wouldn’t be nicer if all the refresh event is automatically published whenever the property source (Git repository) is changed. If that is possible, then it will not be required to trigger it manually for any service as we are currently doing. This can be achieved by listening to the webhook event of the GitHub or Bitbucket and broadcasting the refresh event for the all connected services through Spring Cloud Bus.

3 thoughts on “Spring Cloud Config : Refreshing the config changes with Spring Cloud Bus (Part 2)”