In this article, i am not going to explain the basics of Spring Cloud Stream OR the process of creating publishers and subscribers. Those have been clearly described in the Part 1 and Part 2of this article series.
It is possible to send messages with headers. In the receiving end (consumer application), there can be multiple message handlers (@StreamListener annotated methods) those accepts messages based on the headers of the message.
A copy of the message will be sent to every handler method and they will accept the message if it matches the given condition . The condition is a SpEL expression (Spring Expression Language) that performs checks on header values. The sample condition is given as follows.
In that way, you can use the headers to route messages (message routing) among multiple message handlers. Here we will look at, how to deliver the messages to the correct recipient based on the header.
In the previous part, we have tried Spring Cloud Stream pre-built component such as Sink, Source and Processor for building message driven microservices.
In this part, we will look at how to create custom binding classes with custom channels for publishing and retrieving messages with RabbitMQ.
Setting up the publisher application
The publisher application is almost similar as the previous article except the bindings and related configurations.
The previous article uses Source class (Spring Cloud Stream built-in component) for configuring the outputmessage channel (@Output) for publishing messages. Here we are not going to use the built-in component and we will be developing a custom output binding class to build and configure the output message channel.
This file contains bidirectional Unicode text that may be interpreted or compiled differently than what appears below. To review, open the file in an editor that reveals hidden Unicode characters. Learn more about bidirectional Unicode characters
we have declared a custom Source class with “orderPublishChannel” as the output message channel.
Now we need to bind this OrderSource class in the OrderController.
This file contains bidirectional Unicode text that may be interpreted or compiled differently than what appears below. To review, open the file in an editor that reveals hidden Unicode characters. Learn more about bidirectional Unicode characters
source.create() will configure the output message channel whose name is “orderPublishChannel“. The published messages will be delegated to the RabbitMQ exchange through the “orderPublishChannel“.
We need to change the application.properties based on the channel name as follows.
Now we have completed the development of the publisher application with custom source bindings for publishing messages. Lets move forward with developing the consumer application.
Setting up the consumer application.
The consumer application is almost similar as the previous article except the bindings and related configurations.
The previous article uses Sink class (Spring Cloud Stream built-in component) for configuring the inputmessage channel (@Input) for retrieving messages. Here we are not going to use the built-in component and we will be developing a custom input binding class to build and configure the input message channel.
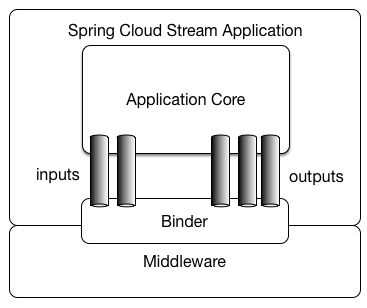
Spring Cloud Stream is a framework that helps in developing message driven or event driven microservices. Spring Cloud Stream uses an underlying message broker (such as RabbitMQ or Kafka) that is used to send and receive messages between services.
When i am writing this article, there are two implementations of the Spring Cloud Stream.
Spring Cloud Stream implementation that uses RabbitMQ as the underlying message broker.
Spring Cloud Stream implementation that uses Apache Kafka as the underlying message broker.
An application defines Input and Output channels which are injected by Spring Cloud Stream at runtime. Through the use of so-called Binder implementations, the system connects these channels to external brokers.
The difficult parts are abstracted away by Spring, leaving it up to the developer to simply define the inputs and outputs of the application. How messages are being transformed, directed, transported, received and ingested are all up to the binder implementations. (e.g:- RabbitMQ or Kafka)
In the previous article (Part 2 of this series), we have discussed how to use Spring Cloud Bus to broadcast the refresh event ( /actuator/bus-refresh) across all the connected services. In here the refresh event should be manually triggered on any service that is connected to the Spring Cloud Bus. (You can select any service as you wish. The only requirement is that it should connect to the Spring Cloud Bus).
The main problem here is that whenever the properties are changed, the refresh event should be manually triggered. Even if it is for just one service, it is still a manual process. What will happen if the developer forgets to manually trigger the refresh event after updating the properties in the remote repository?
Wouldn’t be nicer if there is any way to automate this refresh event triggering whenever the remote repository is changed. In order to achieve this, the config server may need to listen for the events of the remote repository. This can be done with webhook event feature provided by the remote repository providers.
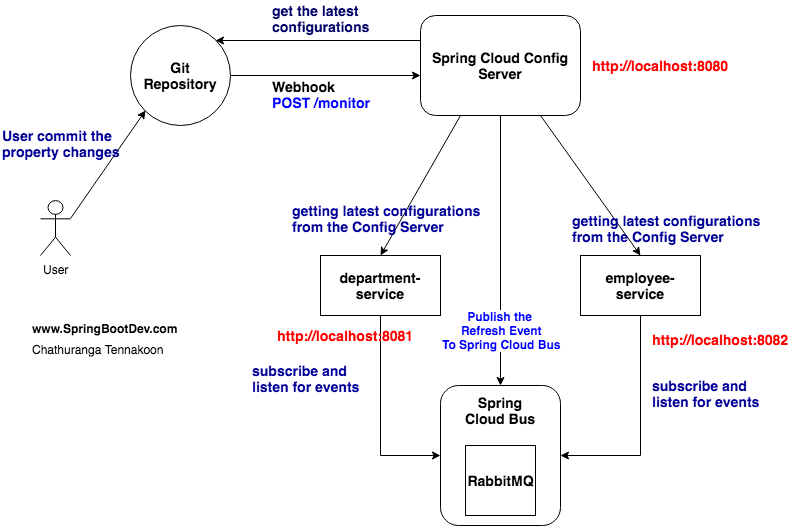
The Solution
Here is the architecture of the proposed solution.
The previous article (click here to visit it) has described how to use Spring Cloud Config Server as a centralized location for keeping the configuration properties related to the application services (microservices). The application services will act as Config Clients who will communicate with Config Server to retrieve the properties related to them.
If any property is changed, the related service need to be notified by triggering a refresh event with Spring Boot Actuator (/actuator/refresh). The user will have to manually trigger this refresh event. Once the event is triggered, all the beans annotated with @RefreshScope will be reloaded (the configurations will be re-fetched) from the Config Server.
In a real microservice environment, there will be a large number of independent application services. Therefore is it not practical for the user to manually trigger the refresh event for all the related services whenever a property is changed.
In previous article, we have discussed how to use Spring Cloud Bus to broadcast the configuration property changes (occurred in the Spring Cloud Config Server) across distributed services.
Spring Cloud Bus links or connects the distributed services through a lightweight message broker such as Kafka or RabbitMQ. whenever the refresh event is triggered in one service, Spring Cloud Bus will broadcast the refresh event across multiple services (known as Config Clients).
Therefore every Config Client should connect to the underlying message broker (that can be either RabbitMQ or Kafka) of the Spring Cloud Bus to listen for the refresh events published/broadcasted. This will lead every Config Client to keep a connection with message broker implemented in the Spring Cloud Bus.
We have already developed a consumer application to consume the messages published by the above consumer application. In that consumer application we have focused on retrieving the publish messages manually. In other words, pulling the messages from the RabbitMQ queue whenever the client application needs them. If you need to look at that article, please click here.
In this article, we will be focusing on receiving the messages from queues with a listener. The consumer application will be listening for one or more queues for the incoming messages. whenever an incoming message is delivered to one of those queues, that message will be delivered to the consumer application through the listener (available in the consumer application).
This application is very much similar to the Consumer application we have developed or part 2 of this article series. Therefore all the configuration related classes will be same and i am not going to repeatedly explain them here. If you want know the further details, please refer the explanations in those articles.
The full source code of this application can be found at GitHub.
Open the source code directory called consumer-listener. In there you can see the source codes related to this article.
I will explain the most critical component here. That is the ConsumerService.
This file contains bidirectional Unicode text that may be interpreted or compiled differently than what appears below. To review, open the file in an editor that reveals hidden Unicode characters. Learn more about bidirectional Unicode characters
ConsumerService will be listening to two queues known as “all_cars_queue” and “nissan_cars_queue“. whenever a message is delivered to any of those queues, that message will be delivered to this consumer service class.
This is the second part of the article that is focused on retrieving the RabbitMQ messages manually (Simply pulling the messages from queues whenever the client application needs them).
As you can see, in the first part, we have developed a Producer application. In this part, we will be developing a Consumer application to retrieve messages from the queue manually (whenever we need them)
The full source code of this article series can be found at GitHub.
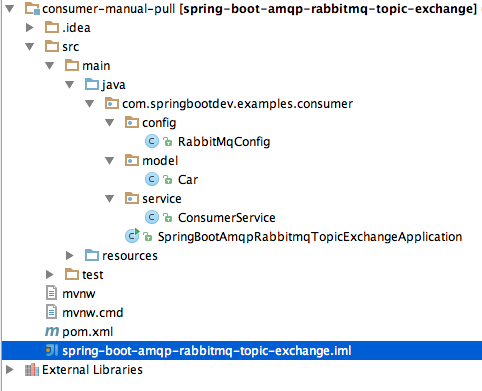
Open the source code directory called consumer-manual-pull. In there you can see the source codes related to this article.
Consumer Application
Here is the project structure.
first make sure that you have defined the valid RabbitMQ server details in the application.properties file. These information will be used by the ConnectionFactory class to make a connection with RabbitMQ server when the RabbitTemplate is used.
This file contains bidirectional Unicode text that may be interpreted or compiled differently than what appears below. To review, open the file in an editor that reveals hidden Unicode characters. Learn more about bidirectional Unicode characters
This is the RabbitMQ configuration class and we have configured the RabbitTemplate here.
This file contains bidirectional Unicode text that may be interpreted or compiled differently than what appears below. To review, open the file in an editor that reveals hidden Unicode characters. Learn more about bidirectional Unicode characters
As you are already familiar, we have done set of configurations for RabbitTemplate including the message converters. The only strange code here is the DefaultClassMapper bean. In order to understand the reason behind this bean, please refer the message segement.
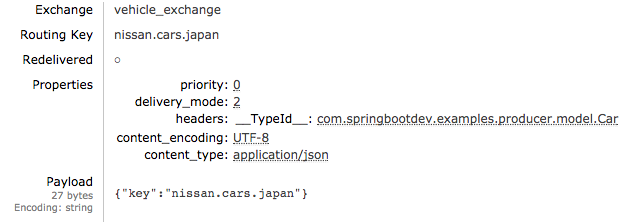
In the MessageProperties, you can see that the __TypeId__ is set to following class declaration. This __TypeId__ information is added by the message converter defined in the Producer application when the POJO is transformed to the JSON format.
com.springbootdev.examples.producer.model.Car
When the producer convert the POJO message to the JSON, the type information is added as a header information of the Message Properties. When the consumer receive the message, the message converter tries to convert the JSON message into the given type in the header. You can see that the Consumer application has a POJO class called Car. But it is in a different package. (Not in the same package as the header information declared) So we need to do the class mapping to inform message converter that where the relevant POJO for the message type is located.
Then the message converter can convert the incoming message to the relevant POJO format.
Now lets look at our consumer service used for receiving messages.
This file contains bidirectional Unicode text that may be interpreted or compiled differently than what appears below. To review, open the file in an editor that reveals hidden Unicode characters. Learn more about bidirectional Unicode characters
for the demonstration purpose, we will be receiving messages from “all_cars_queue“. we are using spring scheduled method to retrieve the message from the queue for every 5 seconds.
receiveAndConvert method of the RabbitTemplate will be used to pull/retrieve messages from queue. based on the FIFO principal, we will get the messages from the queue.
You can run and see the output with following command. This application is developed to be run as a command line application.
mvn spring-boot:run
When you run the application You will see the following output in the terminal.
No we have developed the Consumer application that is used to retrieve/pull messages manually.
If you are looking for a way to listen to the queue and retrieve messages automatically ( whenever the queue get a message), please refer the part 3 of this article series.
As we are already aware, there are four types of RabbitMQ message exchanges are available. They can be listed as follows.
Direct Exachange
Topic Exchange
Fanout Exchange
Header Exchange
In this Article, we are going to look at Topic exchange.
What is Topic Exchange?
Same as Direct, but wildcards are allowed in the binding key. ‘#‘ matches zero or more dot-delimited words and ‘*‘ matches exactly one such word.
* (star) can substitute for exactly one word.
# (hash) can substitute for zero or more words.
Topic exchanges route messages to one or many queues based on matching between a message routing key and the pattern that was used to bind a queue to an exchange. The topic exchange type is often used to implement various publish/subscribe pattern variations. Topic exchanges are commonly used for the multicast routing of messages.
Here is what we are going to do
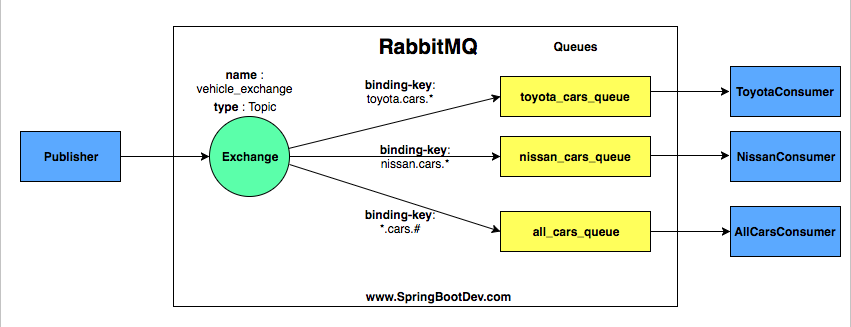
In this example we are trying to sort the messages and direct into the right queue based on the manufacturer of the car. we will be getting a huge amount of messages about registered cars in the city. The routing key pattern of every message is as follows.
manufacturer_name.car.type
As you can see, we have created a Topic exchange called vehicle_exchange. In addition, we have created three queues and bound them to the Topic exchange (vehicle_exchange) with following binding keys.
toyota_cars_queue ( binding key – toyota.cars.* )
toyota_cars_queue is bound to the exchange with wildcard biding key toyota.cars.* This means that the any message starting with routing key toyota.cars and ending with exactly any text should be directed to this queue (toyota_cars_queue).
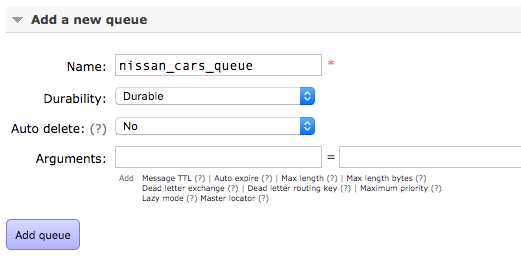
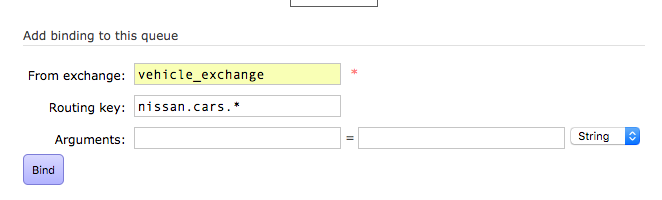
nissan_cars_queue ( binding key – nissan.cars.* )
In the same way, any message starting with routing key nissan.cars and ending with exactly any text should be directed to the nissan_cars_queue.
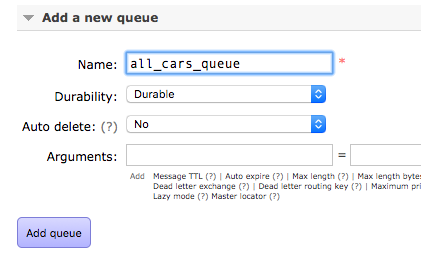
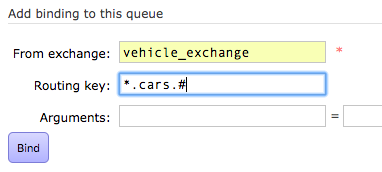
all_cars_queue ( binding key – *.cars.#)
According to the binding key, the routing key should start with any text (exactly one) and followed by cars keyword. it can be ended with zero or more texts.
e.g:- The following set of routing keys can be identified as valid routing key for this binding pattern.
The following table will show you a list of routing keys and their destination queue(s)
routing key
delivered to queue(s)
nissan.cars.japan
nissan_cars_queue and all_cars_queue
nissan.cars
all_cars_queue
toyota.cars.japan.manufactured
all_cars_queue
japan.toyota.cars
No matching queue. message will be discard
import.nissan.cars.from.japan
No matching queue. message will be discard
toyota.cars.manufatured
toyota_cars_queue and all_cars_queue
no.latest.cars.toyota
No matching queue. message will be discard
Now i believe that you have a clear understanding of how these wildcard binding keys are working with topic exchange.
Topic exchange : More to consider
Topic exchange is powerful and can behave like other exchanges.
When a queue is bound with “#” (hash) binding key – it will receive all the messages, regardless of the routing key – like in fanout exchange.
When special characters “*” (star) and “#” (hash) aren’t used in bindings, the topic exchange will behave just like a direct one.
Setting UP RabbitMQ Server
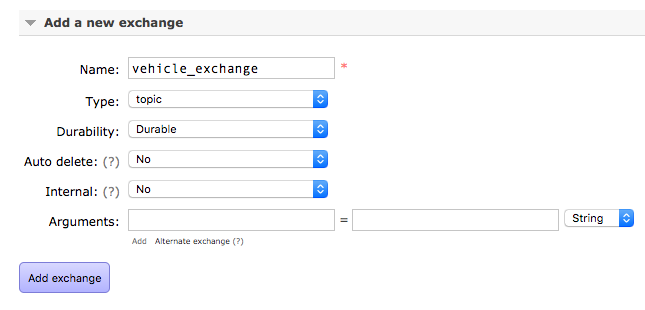
Creating the exchange
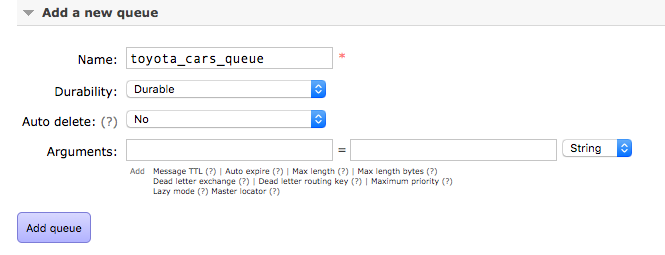
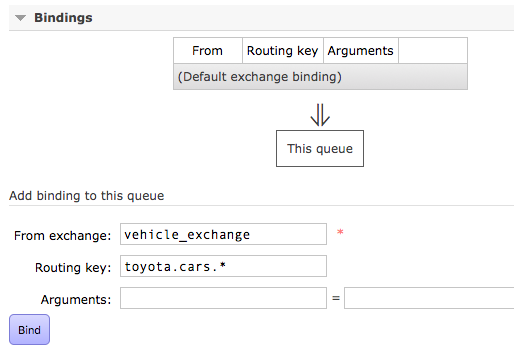
Creating the toyota_cars_queue and bind it to the vehicle_exchange.
Creating the nissan_cars_queue and bind it to the vehicle_exchange.
Creating the all_cars_queue and binding it to the vehicle_exchange
Now we have created all three queues and bound them to the Topic exchange that we have created. Now it is the time to develop a publisher and subscriber application for publish and receive messages from this RabbitMQ server set up.
Producer and Consumer Application
Before moving forward, i need to inform you that the fully source code for the Producer and Consumer application can be found at GitHub. You may clone the source code and continue with the article.
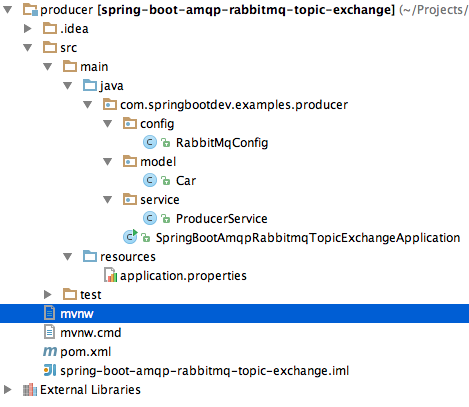
Here is the project structure of the Producer Application.
first make sure that you have defined the valid RabbitMQ server details in the application.properties file. These information will be used by the ConnectionFactory class to make a connection with RabbitMQ server when the RabbitTemplate is used.
This file contains bidirectional Unicode text that may be interpreted or compiled differently than what appears below. To review, open the file in an editor that reveals hidden Unicode characters. Learn more about bidirectional Unicode characters
Now check whether you have declared/configured the required beans to use Spring AMQP feature with RabbitMQ.
This file contains bidirectional Unicode text that may be interpreted or compiled differently than what appears below. To review, open the file in an editor that reveals hidden Unicode characters. Learn more about bidirectional Unicode characters
As i have mentioned earlier, ConnectionFactory will use the RabbitMQ server details declared in the application.properties to make a connection with RabbitMQ server when the RabbitTemplate is used.
We will be trying to send the POJO instance ( Car object) as the message body. we cannot send it as a java object and we need to convert it into some other common exchange format. We have chosen the JSON as the common exchange format and RabbitTemplate will use the Jackson2JsonMessageConverter as a the message converter for converting the POJO into the JSON format.
Now we will look at the ProducerService
This file contains bidirectional Unicode text that may be interpreted or compiled differently than what appears below. To review, open the file in an editor that reveals hidden Unicode characters. Learn more about bidirectional Unicode characters
As per the above table. we are having seven routing keys and we are going to publish messages with those routing keys to the exchange called “vehicle_exchange“. When you run the Producer application, the output will be something like below.
mvn spring-boot:run
Now all the messages are published to the RabbitMQ server. So we can check whether the messages are delivered to the relevant queues.
In the previous article (click here to view the article), consumer application listen to the queue using a listener. Therefore whenever the queue receive a message, the listener who is listening to the queue will get notified. So that the Consumer application will automatically get the message with the help of the listener.
In this article, the Consumer application will be developed in a way to pull the messages from the queue manually. that means the message(s) will be manually pulled whenever the client application needs them. (I am emphasizing it again that we are not going to use any queue Listener here)
The source code of the Producer application of the previous article (click here to go to the previous article) can be used as it is. But there will be a minor modification for the Consumer application. The Consumer.java class should be changed as follows to manually retrieve/pull the messages from the defined queue.
This file contains bidirectional Unicode text that may be interpreted or compiled differently than what appears below. To review, open the file in an editor that reveals hidden Unicode characters. Learn more about bidirectional Unicode characters
You can see that the Consumer does not listen to the queue and receive messages automatically. It will use the receiveAndConvert() method of the RabbitTemplate to receive messages from the queue. We can set the queue name and messages will be pulled from that queue . The receiveAndConvert() will use the message converter set in the RabbitTemplate to convert the received message into the desired POJO (Java Object) format. It will be retrieving the messages from the Order Queue based on FIFO principle.
The complete source code of this article can be found at GitHub.
You can download the source and just build and run the application.


